3.1 Installing OPENMARU Cloud APM System Agent
Download System Agent
Log in to the console of the OPENMARU APM server and download the file for installation.
When you select Agent Installation Guide > SYS AGENT, the page where you can click Download SYS Agent is displayed as shown below.

Download the file to install the system agent.
If you are using a Linux operating system, you can download it directly using the wget command as shown below.
-
Download the system agent.
$ wget https://cloud.openmaru.io/api/v1/projects/[Project-ID]/download/sys-agent.zip
Install the system agent
-
extract the file.
$ unzip sys-agent.zip
-
change agent settings.
$ cd khan-sys-agent
$ vi conf/khan-sys-agent.conf
-
khan-sys-agent.conf
khan.host=cDIwMjEwODAwMDYuYXBtLmEtYXBuZTIub3Blbm1hcnUuaW8=

khan.port=443

# specify this machine's ip address, only valid ip address of this machine can be used.
#khan.agent.ip=192.168.10.11

# agent's compression algorithm : snappy(default), lzw
#agent.compress.type=lzw

# Gathering netstat info : true(default)
#khan.netstat=false

# include network interface
# configuration sample for openshift
#khan.network.interfaces=eth0,eth1,ens192,lo,tun0,vxlan_sys_4789
# configuration sample for kubernetes
#khan.network.interfaces=eth0,eth1,ens192,lo,tun0,kube-ipvs0,vxlan.calico,nodelocaldns

# include disk mount
# configuration sample for openshift
#khan.disk.mounts=/,/home,/data,/var/lib/docker/containers,C,D

# Allow command list
#khan.allow.commands=service,systemctl

# Memory sigar supported OS vendor version : Enterprise Linux 5,5,Enterprise Linux 6,6(default) startsWith
#khan.memory.sigar.supported.os.vendor.versions=Enterprise Linux 5,5,Enterprise Linux 6,6
Settings in the khan-sys-agent.conf file
The settings in the khan-sys-agent.conf file are as follows.
| Settings (environment variables) | Description | Default |
|---|---|---|
khan.host |
Enter the IP of the OPENMARU APM server. |
khan.port |
khan.port |
Enter the port number of the OPENMARU APM server. |
|
khan.tls |
TLS enabled or not |
false |
agent.compress.type |
Encryption algorithm |
snappy |
khan.netstat |
Whether to monitor network (netstat) |
true |
khan.network.interfaces |
Monitor only set network interfaces + (OMAPM_NETWORK_INTERFACES) ex) eth0,eth1,ens192,lo,tun0,vxlan_sys_4789 |
All interfaces |
khan.disk.mounts |
Monitor only set mount disks + (OMAPM_DISK_MOUNTS) ex) /,/home,/data,/var/lib/docker/containers,C,D |
|
khan.allow.commands |
Restrict execution nouns in the agent + (OMAPM_ALLOW_COMMANDS) ex) service,systemctl |
|
OMAPM_NAME |
SYS agent name Separation when installing more than one agent on one machine (Openmaru SYS Container images only) |
Setting up plugins for the system agent
The System Agent can use plugins to extend its functionality.
Currently, APM provides the following plugins: Apache monitoring plugin, nginx monitoring plugin, cubrid monitoring plugin, Docker container monitoring plugin, and CRI-O container monitoring plugin.
Set disabled.txt in the plugins directory and start the system agent to run the plugin module.
Enable a plugin
To enable a plugin, you can set which plugins to use by setting the following in the plugins/disabled.txt file.
-
plugins/disabled.txt file.
#.
# name to disable plugin
# # name to disable plugin

khan-plugin-apache
khan-plugin-nginx
khan-plugin-docker
khan-plugin-crio
khan-plugin-containerd
khan-plugin-cubrid
khan-plugin-mysql
-
Enable the khan-plugin-apache and khan-plugin-docker plugins.
#.
# name to disable plugin
# # name to disable plugin

#khan-plugin-apache
khan-plugin-nginx
#khan-plugin-docker
khan-plugin-crio
khan-plugin-containerd
khan-plugin-cubrid
khan-plugin-mysql
Copy the plugin zip file to the plugins directory, and start the system agent to run the plugin module. At this time, the directory is created by unzipping the zip file.
Apache plugin settings
The Apache plugin is configured using the config.properties file under plugins/khan-plugin-apache-5.1.0/conf.
Since the configuration file can be changed by upgrading the plugin, you can separate the plugin file from the configuration file by setting it in the config.properties file in the plugins/khan-plugin-apache.conf directory.
-
*config.properties configuration file contents
instance=apache
host=localhost
port=80
username=
password=
infoUrlPath=/server-info?server
statusUrlPath=/status?auto
jkStatusUrlPath=/jkstatus
modClusterManagerUrlPath=/mod_cluster_manager

maxConnections=1
maxConnectionsPerHost=1
maxConnectionsPerRoute=1
waitIdleCheck=60000
waitIdleClose=120
requestTimeout=1000
sessionTimeout=1000

## "key":"log directory path":"http status code index" - split with whitespaces, ex) homepage:/data/logs/homepage:8
#http.status.code.log.dir=homepage:/data/logs/homepage:8,admin:/data/logs/admin:8
#http.status.code.log.exclude.url.patterns=\\*/,/status,/server-info,/jkstatus,/mod_cluster_manager
#http.status.code.log.exclude.file.patterns=^httpd.log$,.*mod_jk.*,.*modjk.*,.*error_log.*,.*modcluster.*
| Settings | Description | Defaults |
|---|---|---|
instance |
Apache instance name to be displayed in OPENMARU APM |
apache |
host |
Hostname of the Apache server to collect information from, preferably localhost |
localhost |
port |
Port number of the Apache server to collect information from |
80 |
username |
Not currently used |
|
password |
currently deprecated |
|
infoUrlPath |
URL where Apache’s mod_info is set. Make it accessible from localhost. |
|
statusUrlPath |
URL where Apache’s mod_status is set. Make it accessible from localhost. |
|
jkStatusUrlPath |
Apache jkstatus page URL. |
/jkstatus |
modClusterManagerUrlPath |
Enter the URL of the Apache mod cluster manager access page. |
/mod_cluster_manager |
maxConnections |
Maximum number of connections to collect Apache information, 1 is sufficient |
|
maxConnectionsPerHost |
The number of connections to collect Apache information. |
|
maxConnectionsPerRoute |
Number of connections to collect Apache information |
|
waitIdleCheck |
Idle check wait time |
|
waitIdleClose |
Idle Close wait time |
|
requestTimeout |
Timeout if no response to request |
|
sessionTimeout |
Session Timeout |
|
http.status.code.log.dir |
HTTP response code monitoring settings |
homepage:/data/logs/homepage:8 Service name to be displayed in the console: Web server log directory path: Response code location (space-based) |
http.status.code.log.exclude.url.patterns |
Specify URL patterns to exclude from response code monitoring |
|
http.status.code.log.exclude.file.patterns |
Specify log file patterns to exclude from response code monitoring |
How to set up Apache for APM monitoring
In the httpd.conf file, set the permissions to read /status, /server-info URLs from localhost as shown below. At this time, set ExtendedStatus to On to get more information from server-status.
#
# ExtendedStatus controls whether Apache will generate "full" status
# information (ExtendedStatus On) or just basic information (ExtendedStatus
# Off) when the "server-status" handler is called. The default is Off.
#
ExtendedStatus On

#
# Allow server status reports generated by mod_status,
# with the URL of http://servername/server-status
# Change the ".example.com" to match your domain to enable.
#
<Location /status>
  SetHandler server-status
  Order deny,allow
  Deny from all
  Allow from localhost
</Location>

#
# Allow remote server configuration reports, with the URL of
# http://servername/server-info (requires that mod_info.c be loaded).
# Change the ".example.com" to match your domain to enable.
#
<Location /server-info>
  SetHandler server-info
  Order deny,allow
  Deny from all
  Allow from localhost
</Location>
NGINX plugin settings
The nginx plugin configuration uses the config.properties file located under plugins/khan-plugin-nginx-5.1.0/conf. Since the configuration file can be changed by upgrading the plugin, you can separate the plugin file from the configuration file by setting it in the config.properties file in the plugins/khan-plugin-nginx.conf directory.
-
config.properties configuration file contents.
#.
# Nginx status monitoring
# # Nginx status monitoring

instance=nginx
host=localhost
port=80
username=
password=
statusUrlPath=/nginx_status

maxConnections=1
maxConnectionsPerHost=1
maxConnectionsPerRoute=1
waitIdleCheck=60000
waitIdleClose=120
requestTimeout=1000
sessionTimeout=1000
| Settings | Description | Default |
|---|---|---|
instance |
Nginx instance name to be displayed in OPENMARU APM |
nginx |
host |
Hostname of the nginx server to collect information from, preferably localhost |
localhost |
port |
Port number of the nginx server to collect information from |
80 |
username |
Not currently used |
|
password |
Deprecated |
|
statusUrlPath |
URL where nginx’s http_stub_status_module is set to Make it accessible from localhost. |
|
maxConnections |
Maximum number of connections to collect nginx information, 1 is sufficient |
1 |
maxConnectionsPerHost |
Number of connections to collect nginx information |
|
maxConnectionsPerRoute |
Number of connections to collect nginx information |
|
waitIdleCheck |
Idle check wait time |
|
waitIdleClose |
Idle Close wait time |
|
requestTimeout |
Timeout if there is no response to a request |
|
sessionTimeout |
Session Timeout |
How to set up nginx for APM monitoring
Since ngx_http_stub_status_module is not built by default, add the following to the nginx/conf.d/default.conf file.
    location /nginx_status {
    stub_status;
    allow 127.0.0.1;
    deny all;
}
Cubrid Plugin Settings
The configuration of the cubrid plugin uses the config.properties file under plugins/khan-plugin-cubrid-5.1.0/conf. Since the configuration file can be changed by upgrading the plugin, you can separate the plugin file from the configuration file by setting it in the config.properties file in the plugins/khan-plugin-cubrid.conf directory.
-
config.properties configuration file contents.
#.
# Cubrid status monitoring
# # Cubrid status monitoring

# cubrid server home directory
# if cubridHome is empty then check environment variable 'CUBRID'
cubridHome=

# comma separated broker names to exclude gather stats
excludedBrokers=query_editor
| Settings | Description | Default |
|---|---|---|
cubridHome |
Enter the path to the home directory of cubrid. |
|
excludeBrokers |
Enter the name of the broker to exclude from status collection. |
How to set up Cubrid for APM monitoring
In the cubrid home directory, modify conf/cm.conf support_mon_statistic to YES to enable resource monitoring of the database.
~
# support monitoring statistic (YES/NO), default NO
# If you want to use the advanced monitoring feature on CUBRID Manager,
# you should set this value to YES.

support_mon_statistic=YES
~
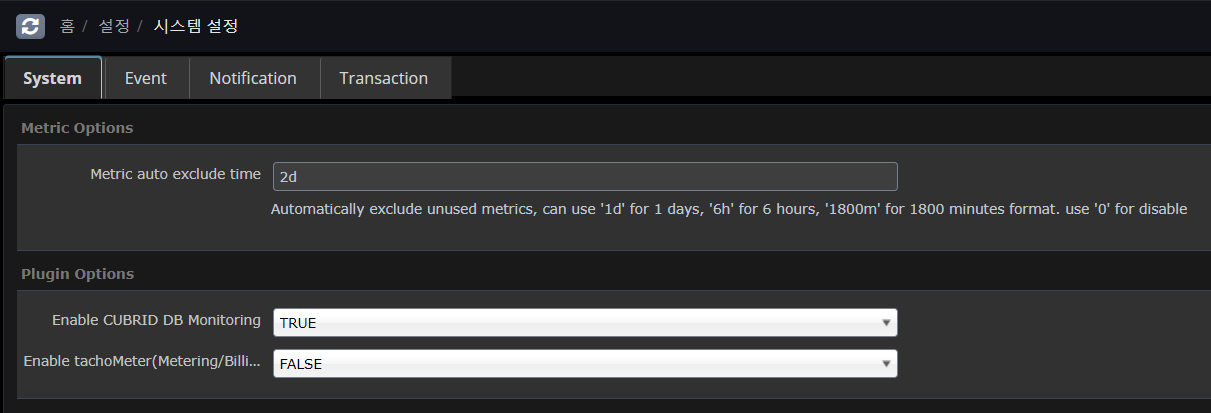
APM DASHBOARD settings
In APM dashborad Home Settings > System Settings > System In Plugin Options, set Enable CUBRID DB Monitoring to TRUE and save it.
Docker plugin settings
To configure the Docker plugin, use the config.properties file under plugins/khan-plugin-docker-5.1.0/conf.
Since the configuration file can be changed by upgrading the plugin, you can separate the plugin file from the configuration file by setting it in the config.properties file in the plugins/khan-plugin-docker.conf directory.
-
config.properties configuration file contents.
#
# Docker status monitoring
#

# Add docker remote api options in /etc/sysconfig/docker file.
# OPTIONS='...', -H tcp://0.0.0.0:4243 or -H tcp://127.0.0.1:4243
#docker.host=localhost
#docker.port=4243

# docker daemon connect type : sock or net
# Must use sock in Openshift
docker.connect.type=sock

docker.sock=/var/run/docker.sock

# docker's cgroup driver type : cgroup or systemd
# Openshift 3.6 use systemd type, below Openshift 3.5 use cgroup type
docker.cgroup.driver.type=systemd
#docker.cgroup.driver.type=cgroup


# connect timeout in millisecond
docker.connectTimeout=5000

# read timeout in millisecond
docker.readTimeout=2000
| Settings | Description | Default |
|---|---|---|
docker.host |
Enter the hostname or IP of the docker daemon. |
localhost |
docker.port |
Enter the port number of the docker daemon. |
4342 |
docker.connect.type |
Specify whether you want to use a socket file generated by Docker Engine or access Docker Engine using HTTP. You can use sock or net. On Openshift, you must use sock. |
sock |
docker.sock |
Specifies the socket file that Docker Engine creates. On Red Hat flavors of Linux, use the /var/run/docker.sock file. |
/var/run/docker.sock |
docker.cgroup.driver.type |
Specifies the cgroup driver type. Openshift 3.6 uses systemd and Openshift 3.5 uses cgroup. |
CRI-O plugin settings
The CRI-O plugin is configured using the config.properties file under plugins/khan-plugin-crio-5.1.0/conf.
Since the configuration file can be changed by upgrading the plugin, you can separate the plugin file from the configuration file by setting it in the config.properties file in the plugins/khan-plugin-crio.conf directory.
-
+] config.properties configuration file contents.
#
# CRI-O Container status monitoring
#

# crio sock file location
crio.sock=/var/run/crio/crio.sock

# connect timeout in millisecond
crio.connectTimeout=5000

# read timeout in millisecond
crio.readTimeout=2000
| Settings | Description | Defaults |
|---|---|---|
crio.sock |
Specifies the socket file that CRI-O creates. On Red Hat-like Linux, the file /var/run/crio.sock is used. |
/var/run/crio/crio.sock |
CONTAINERD plugin settings
The Containerd plugin is configured using the config.properties file under plugins/khan-plugin-containerd-5.1.0/conf.
Since the configuration file can be changed by upgrading the plugin, you can separate the plugin file from the configuration file by setting it in the config.properties file in the plugins/khan-plugin-crio.conf directory.
-
config.properties configuration file contents
#
# khan-plugin-containerd
#

# containerd sock file location
containerd.sock=/var/run/containerd/containerd.sock
# connect timeout in millisecond
containerd.connectTimeout=5000
# read timeout in millisecond
containerd.readTimeout=2000
| Settings | Description | Default |
|---|---|---|
containerd.sock |
Specifies the socket file that CONTAINERD creates. On Red Hat-like Linux, use the /var/run/containerd/containerd.sock file. |
/var/run/containerd/containerd.sock |
MySQL plugin settings
The configuration of the Containerd plugin uses the config.properties file under plugins/khan-plugin-mysql.conf.
Since the configuration file can be changed by upgrading the plugin, you can separate the plugin file from the configuration file by setting it in the config.properties file in the plugins/khan-plugin-mysql.conf directory.
The MySQL plugin supports Mysql, Mariadb, and Percona.
Before setting up, you need to create a MySQL account and assign permissions.
For MySQL 5.6 or MySQL 5.7, use the following command to create a user.
## Create an account
mysql> CREATE USER 'openmaru'@'localhost' IDENTIFIED BY '[PASSWORD]';
For MySQL 8.0 and later, create a user using the password encryption method.
mysql> CREATE USER 'openmaru'@'localhost' IDENTIFIED WITH mysql_native_password by '[PASSWORD]';Register the privileges.
## Get a list of running sessions
mysql> GRANT PROCESS,SELECT ON *.* TO 'openmaru'@'localhost';

## Force query termination on a running session
mysql> grant super on *.* to 'openmaru'@'localhost';
If performance_schema is not enabled
mysql> SHOW VARIABLES LIKE 'performance_schema';
+--------------------+-------+
| Variable_name | Value |
+--------------------+-------+
| performance_schema | ON |
+--------------------+-------+

mysql> GRANT SELECT ON performance_schema.* TO 'openmaru'@'localhost';-
Enable Slow Log monitoring
| Only available when log_output is TABLE |
mysql> show global variables where VARIABLE_NAME in ('slow_query_log', 'log_output');
+--------------------+-------+
| Variable_name | Value |
+--------------------+-------+
| slow_query_log | ON |
| log_output | TABLE |
+--------------------+-------+

my.conf
[mysqld]
general_log=on
log_output='TABLE'
-
*config.properties configuration file contents
#
# khan-plugin-mysql
#

# Enable remote monitoring (default: false)
#0.remote.enabled=false
0.cluster.name=
0.instance.id=om-mariadb
#  - ex) jdbc:mariadb://localhost:3306/mysql, jdbc:mysql://localhost:3306/mysql
0.jdbc.jdbcUrl=jdbc:mariadb://192.168.23.23:3306/mysql
#  - ex) org.mariadb.jdbc.Driver, com.mysql.jdbc.Driver, com.mysql.cj.jdbc.Driver
0.jdbc.driverClassName=org.mariadb.jdbc.Driver
0.jdbc.username=root
0.jdbc.password=opennaru
0.jdbc.maximumPoolSize=10
0.jdbc.minimumIdle=0
0.jdbc.validationTimeout=5000
0.jdbc.connectionTimeout=5000
0.path.my.cnf=/etc/my.cnf
-
The jdbc settings follow the HikariCP options.
-
For numeric prefixes, such as 0., utilize it when monitoring N MYSQLs (not only local but also remote MYSQLs can be monitored).
-
0.instance.id=db1
-
0….
-
1.instance.id=db2
-
1….
-
| Setting | Description | Default |
|---|---|---|
0.cluster.name |
If HA is configured, recognize as a group if the name is the same |
|
0.instance.id |
A distinguishable name for the collection server |
Required |
0.jdbc.jdbcUrl |
Connection JDBC URL |
Required |
0.jdbc.driverClassName |
Driver Class |
Required, org.mariadb.jdbc.Driver, com.mysql.cj.jdbc.Driver |
0.jdbc.username |
User Name |
Required |
0.jdbc.password |
Password |
Required |
0.jdbc.maximumPoolSize |
Pool maximum size |
10 |
0.jdbc.minimumIdle |
Pool minimum size |
0 |
0.jdbc.validationTimeout |
Validation check timeout |
5000 |
0.jdbc.connectionTimeout |
Time to wait before fetching the pool |
0.5 seconds |
0.path.my.cnf |
my.conf configuration file location + (if monitoring locally) (for local monitoring) |
/etc/my.cnf |
-
+] JDBC driver
Replace the driver files in the following directory if they are not compatible.
-
plugins/khan-plugin-mysql-5.1.0/lib/
-
mysql-connector-java-8.0.30.jar
-
mariadb-java-client-1.8.0.jar
-
Starting and ending the system agent
-
start the system agent.
$ cd khan-sys-agent/bin
$ ./start.sh
-
*shut down system agent
$ ./kill.sh
-
*Check system agent logs
$ ./tail.sh
2021-08-18 13:43:03 [INFO ] KhanAgentConfig.java::setPluginsStatus:371 - plugin khan-plugin-apache = status: enable
2021-08-18 13:43:03 [INFO ] KhanAgentConfig.java::setPluginsStatus:371 - plugin khan-plugin-docker = status: disable
2021-08-18 13:43:03 [INFO ] KhanAgentConfig.java::setPluginsStatus:371 - plugin khan-plugin-cubrid = status: enable
2021-08-18 13:43:03 [INFO ] KhanAgentConfig.java::setPluginsStatus:371 - plugin khan-plugin-service-checker = status: enable
2021-08-18 13:43:03 [INFO ] KhanAgentConfig.java::setPluginsStatus:371 - plugin khan-plugin-nginx = status: disable
2021-08-18 13:43:03 [INFO ] KhanAgentConfig.java::setPluginsStatus:371 - plugin khan-plugin-crio = status: disable
2021-08-18 13:43:03 [INFO ] ApacheStatusPlugin.java::start:64 - Starting Apache Plugin
2021-08-18 13:43:03 [INFO ] CubridStatusPlugin.java::start:37 - Starting Cubrid Plugin
2021-08-18 13:43:03 [INFO ] ServiceCheckerPlugin.java::start:44 - Starting Service Checker Plugin
2021-08-18 13:43:03 [INFO ] WebSocketService.java::startService:70 - Server URL : wss://p2021080005.apm.a-apne2.openmaru.io:443/monitoring/websocket
2021-08-18 13:43:03 [INFO ] WebSocketClient.java::createBootstrap:129 - Trying to connect : wss://p2021080005.apm.a-apne2.openmaru.io:443/monitoring/websocket
2021-08-18 13:43:04 [INFO ] WebSocketClient.java::operationComplete:140 - Connected.
2021-08-18 13:43:08 [INFO ] WebSocketClientHandler.java::channelRead0:115 - Successfully Connected.