Revision History
Revision History
Name |
Date |
Reason For Changes |
Version |
OPENMARU (support@opennaru.com) |
2016/06/23 |
Initial Version |
1.0 |
OPENMARU (support@opennaru.com) |
2019/10/07 |
Brand Update |
2.0 |
Copyright Notice
Copyright© 2016, Opennaru, Inc. All Rights Reserved.
906~907, 31, Ttukseom-ro 1-gil, Seongdong-gu, Seoul, South Korea
The contents of this software (OPENMARU APM, OPENMARU Installer) user manual and programs are protected by copyright laws, computer program protection laws, and international treaties. The contents of this manual and the programs described herein are available only under a license agreement with Opennaru, Inc. and may be used or reproduced only in compliance with the license agreement. No part of this User Guide may be transmitted, reproduced, distributed, or created in any form or by any means, electronic, mechanical, recording, or otherwise, in whole or in part, without the prior written consent of Opennaru, Inc.
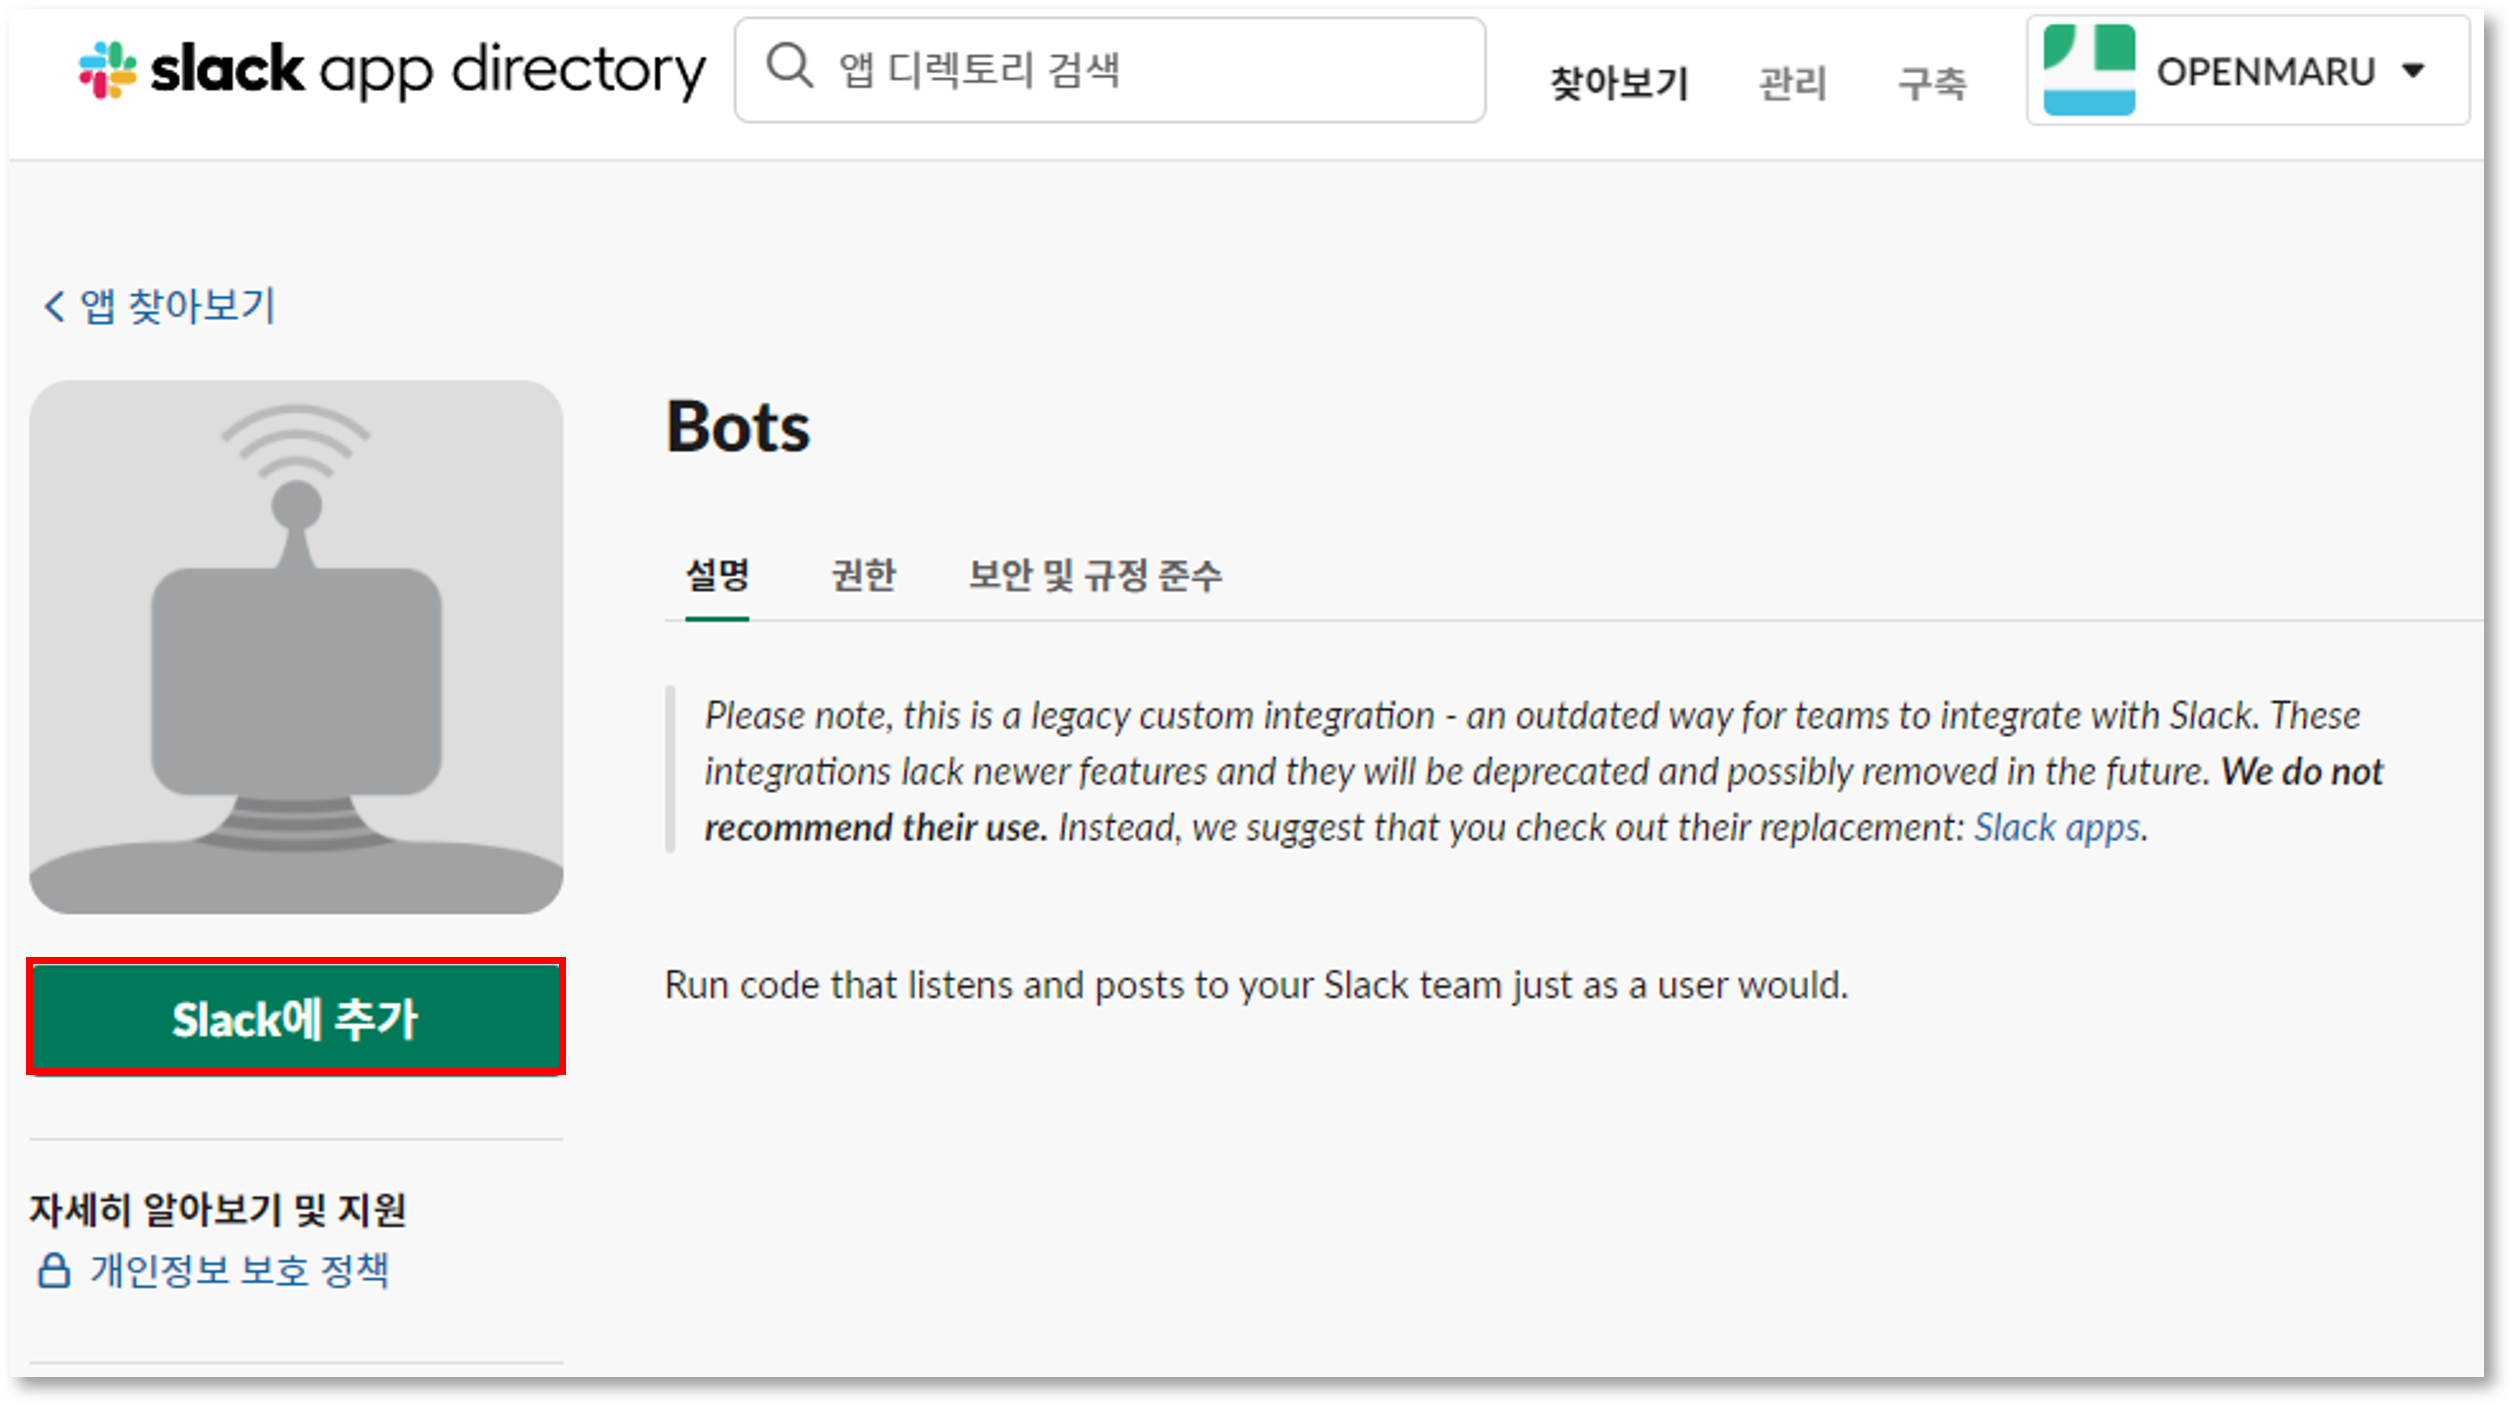
5.1 Get APM event alerts with Slack
What is Slack?

Slack works in a variety of web browsers and on iOS and Android platforms. The Slack app allows you to share messages between team members, much like a group chat in KakaoTalk, and all messages are stored on the server and can be retrieved at any time, just like email.
APM gives you the ability to add a bot to the slack that your team members use, which logs all the events that happen in APM in a specific message channel.
Users who subscribe to that channel can receive "alerts" on their mobile devices or web browsers about what’s happening in APM on their servers. It’s like an SMS or KakaoTalk messenger notification.
In the next chapter, we’ll show you how to create a team in Slack, add a bot, and integrate events from APM with Slack.

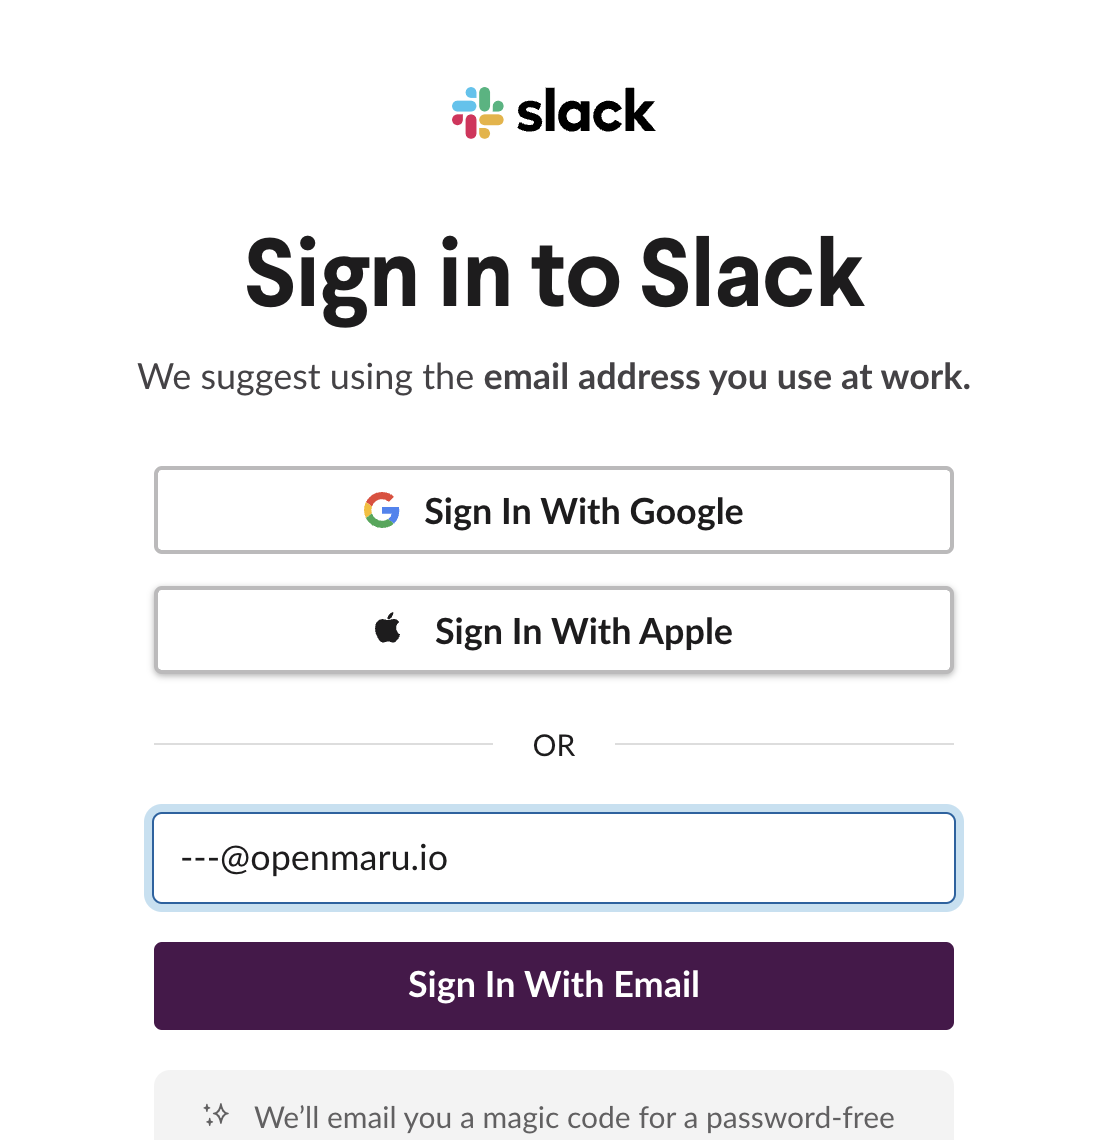
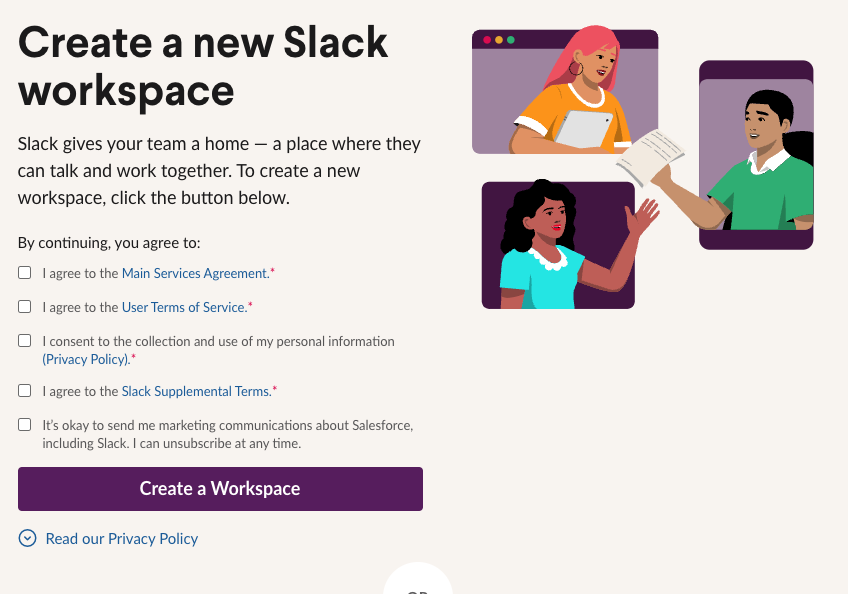
Create a Slack account
Click the "Create account" button and enter your email address.
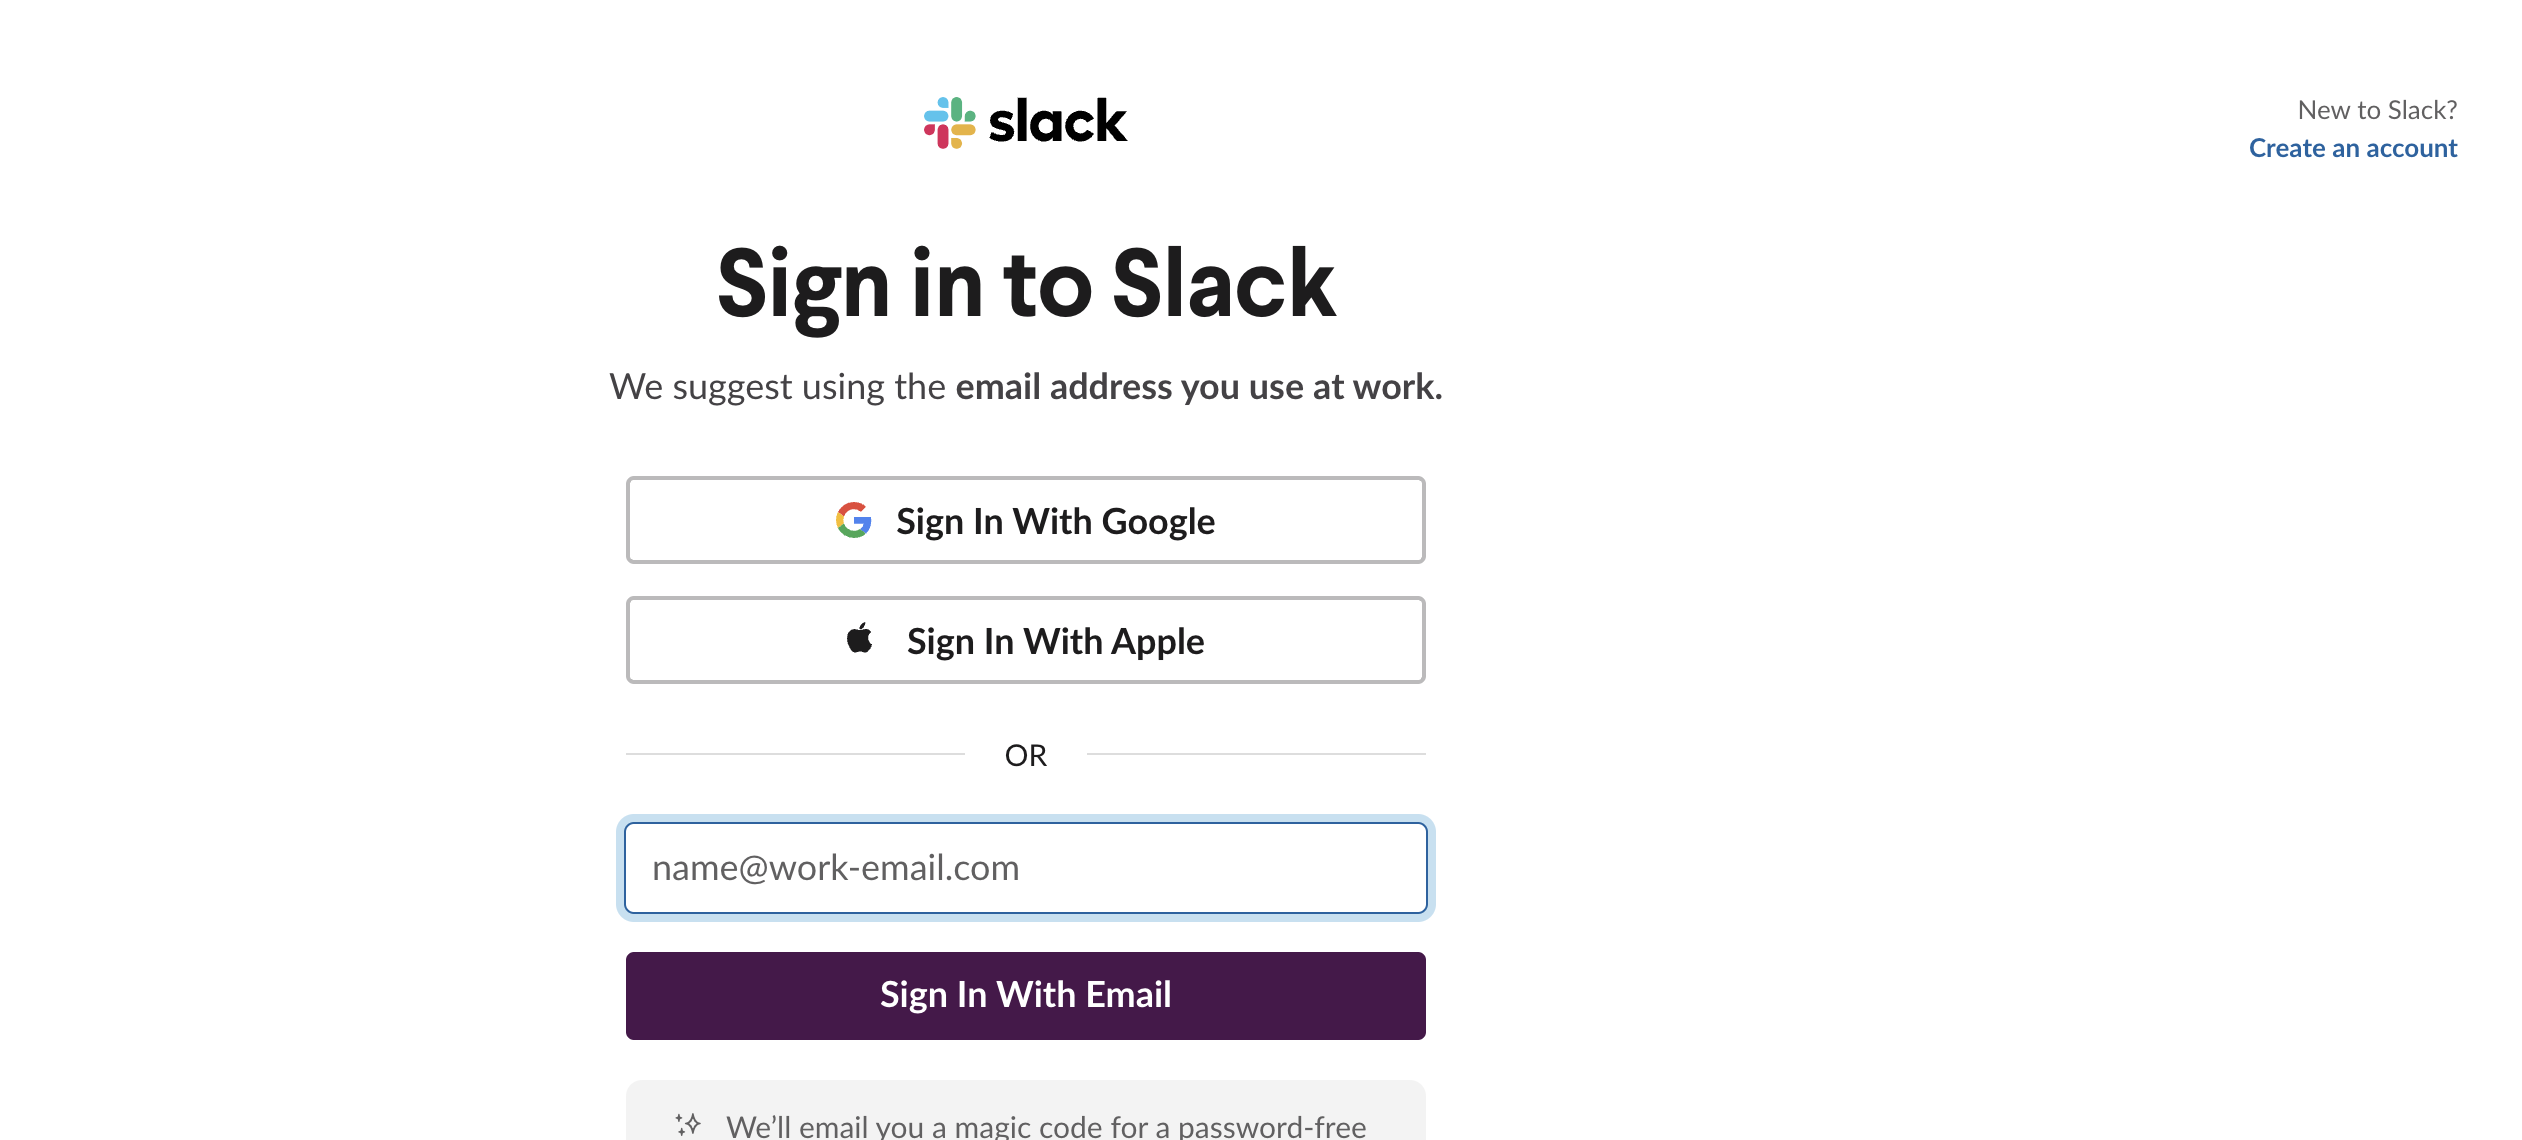
We recommend using the email address you use at work.
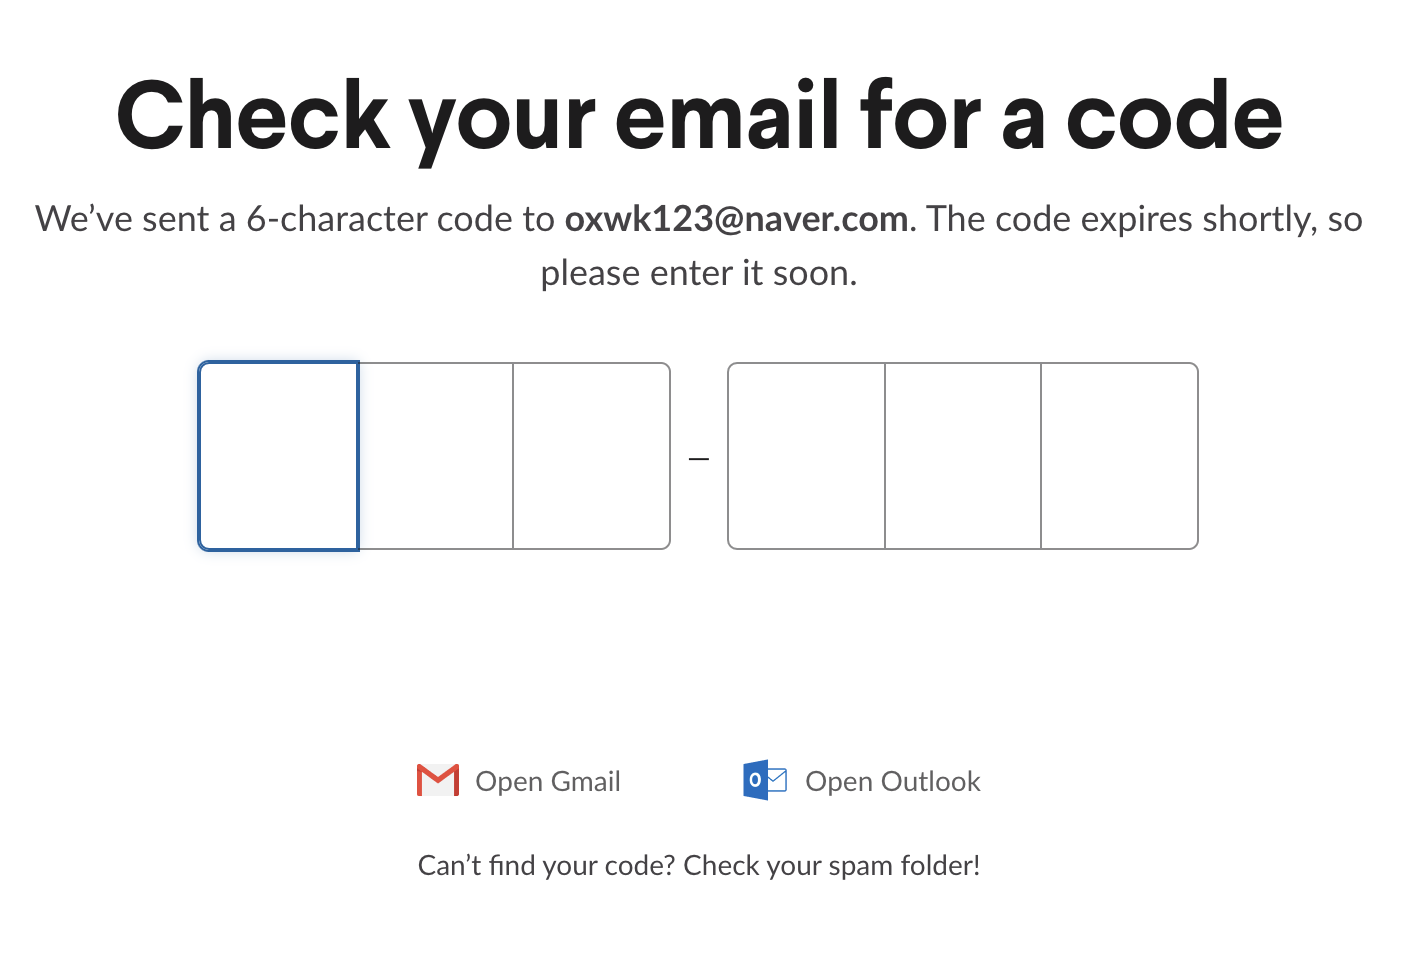
Enter your Slack confirmation code
Check the confirmation code sent to your email address.
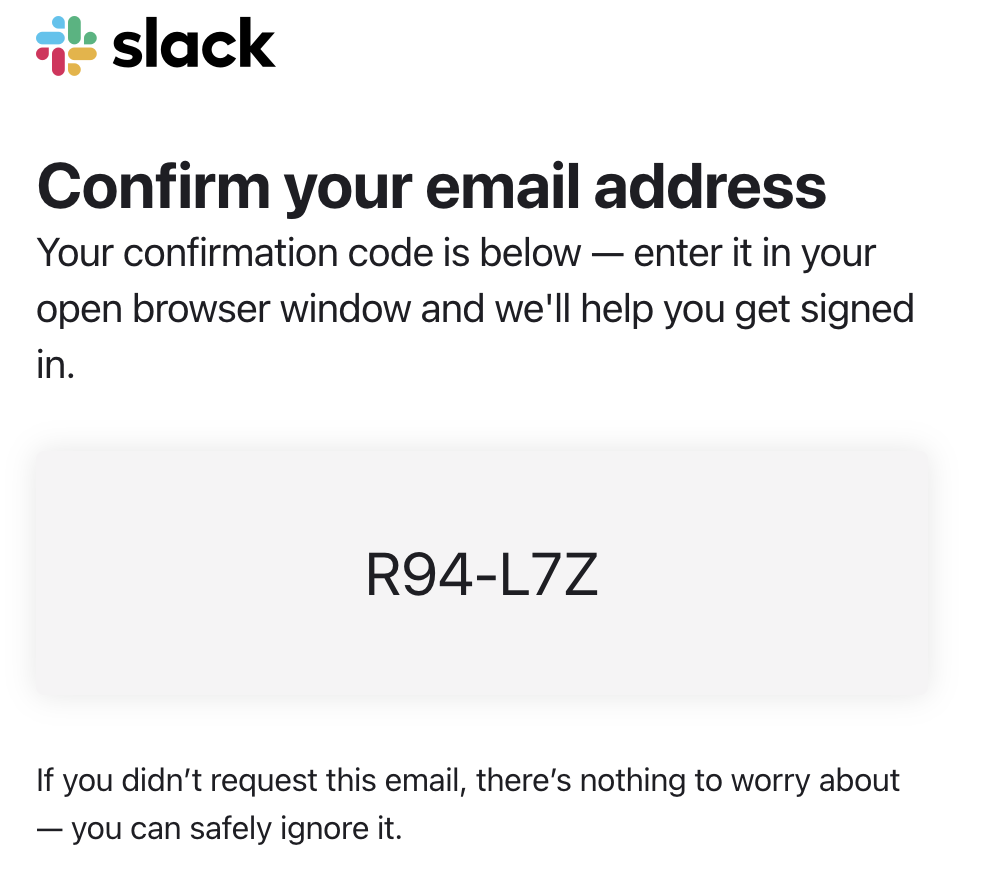
Enter the confirmation code into the appropriate window in Slack.
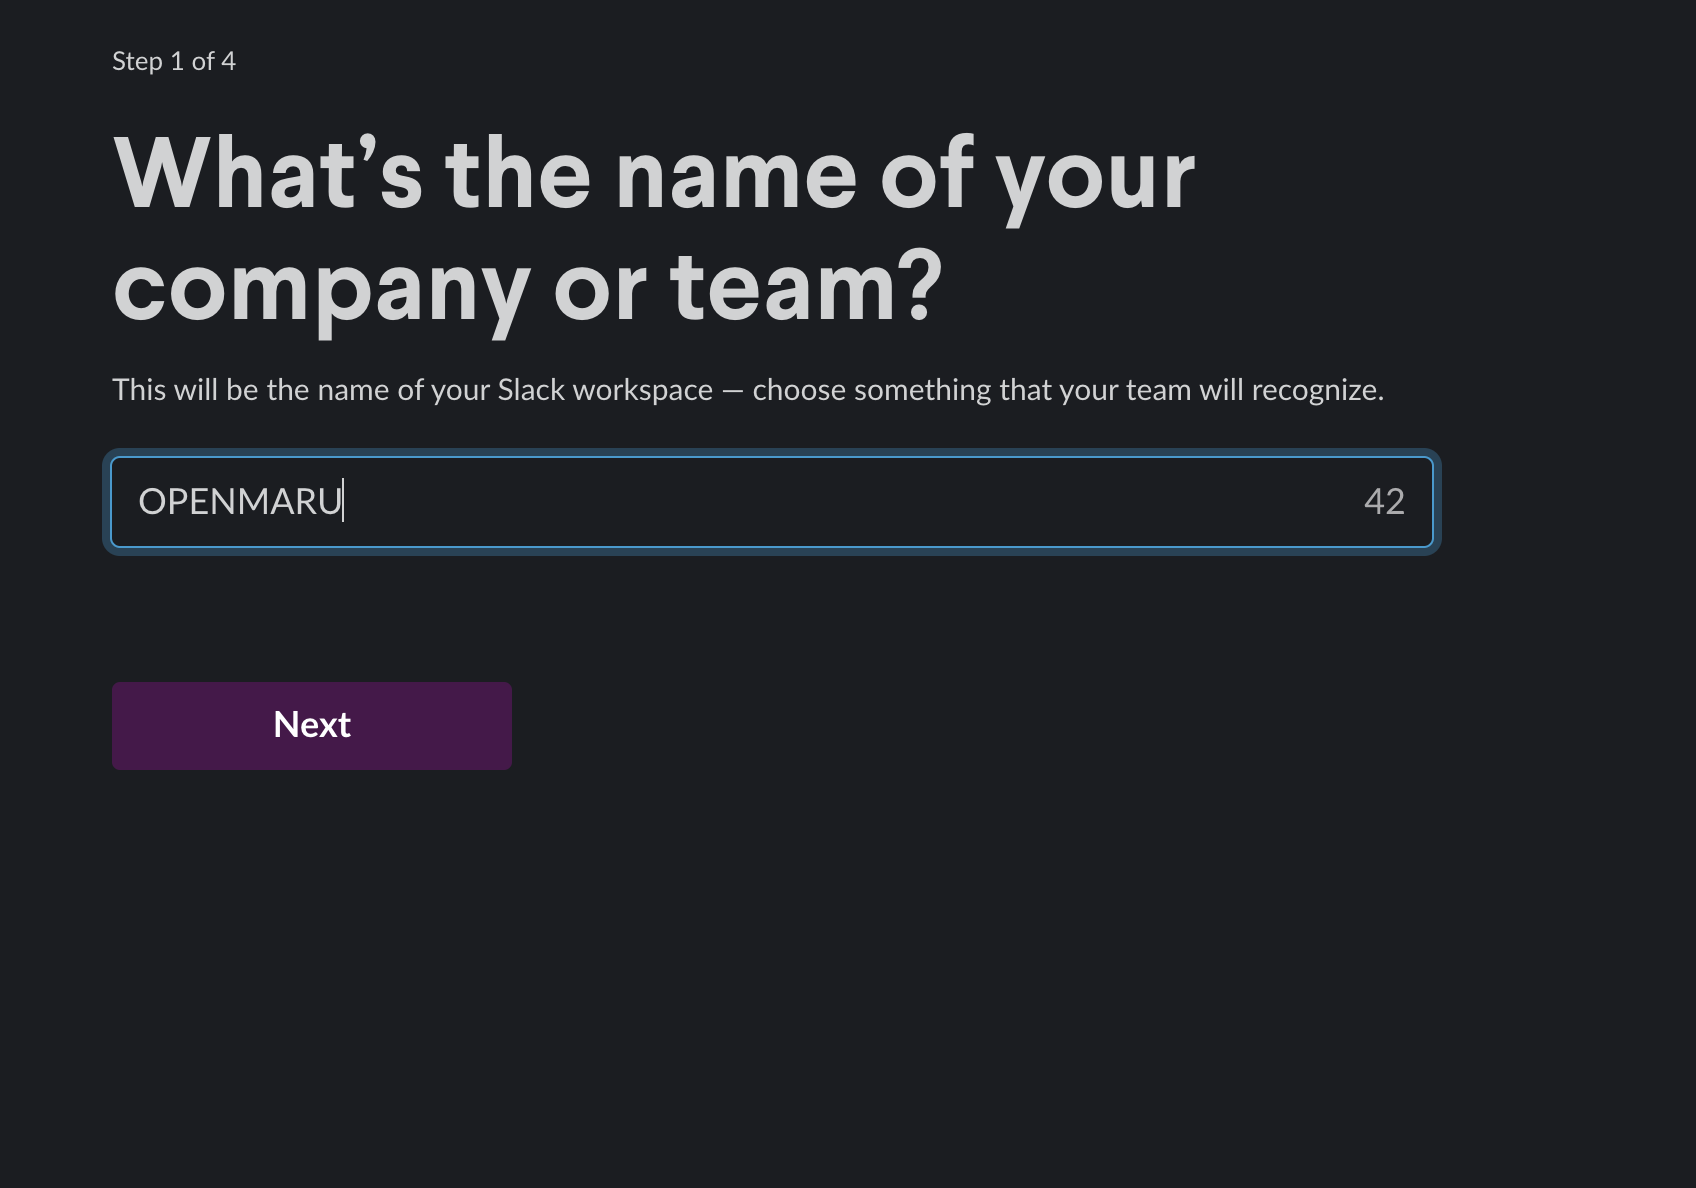
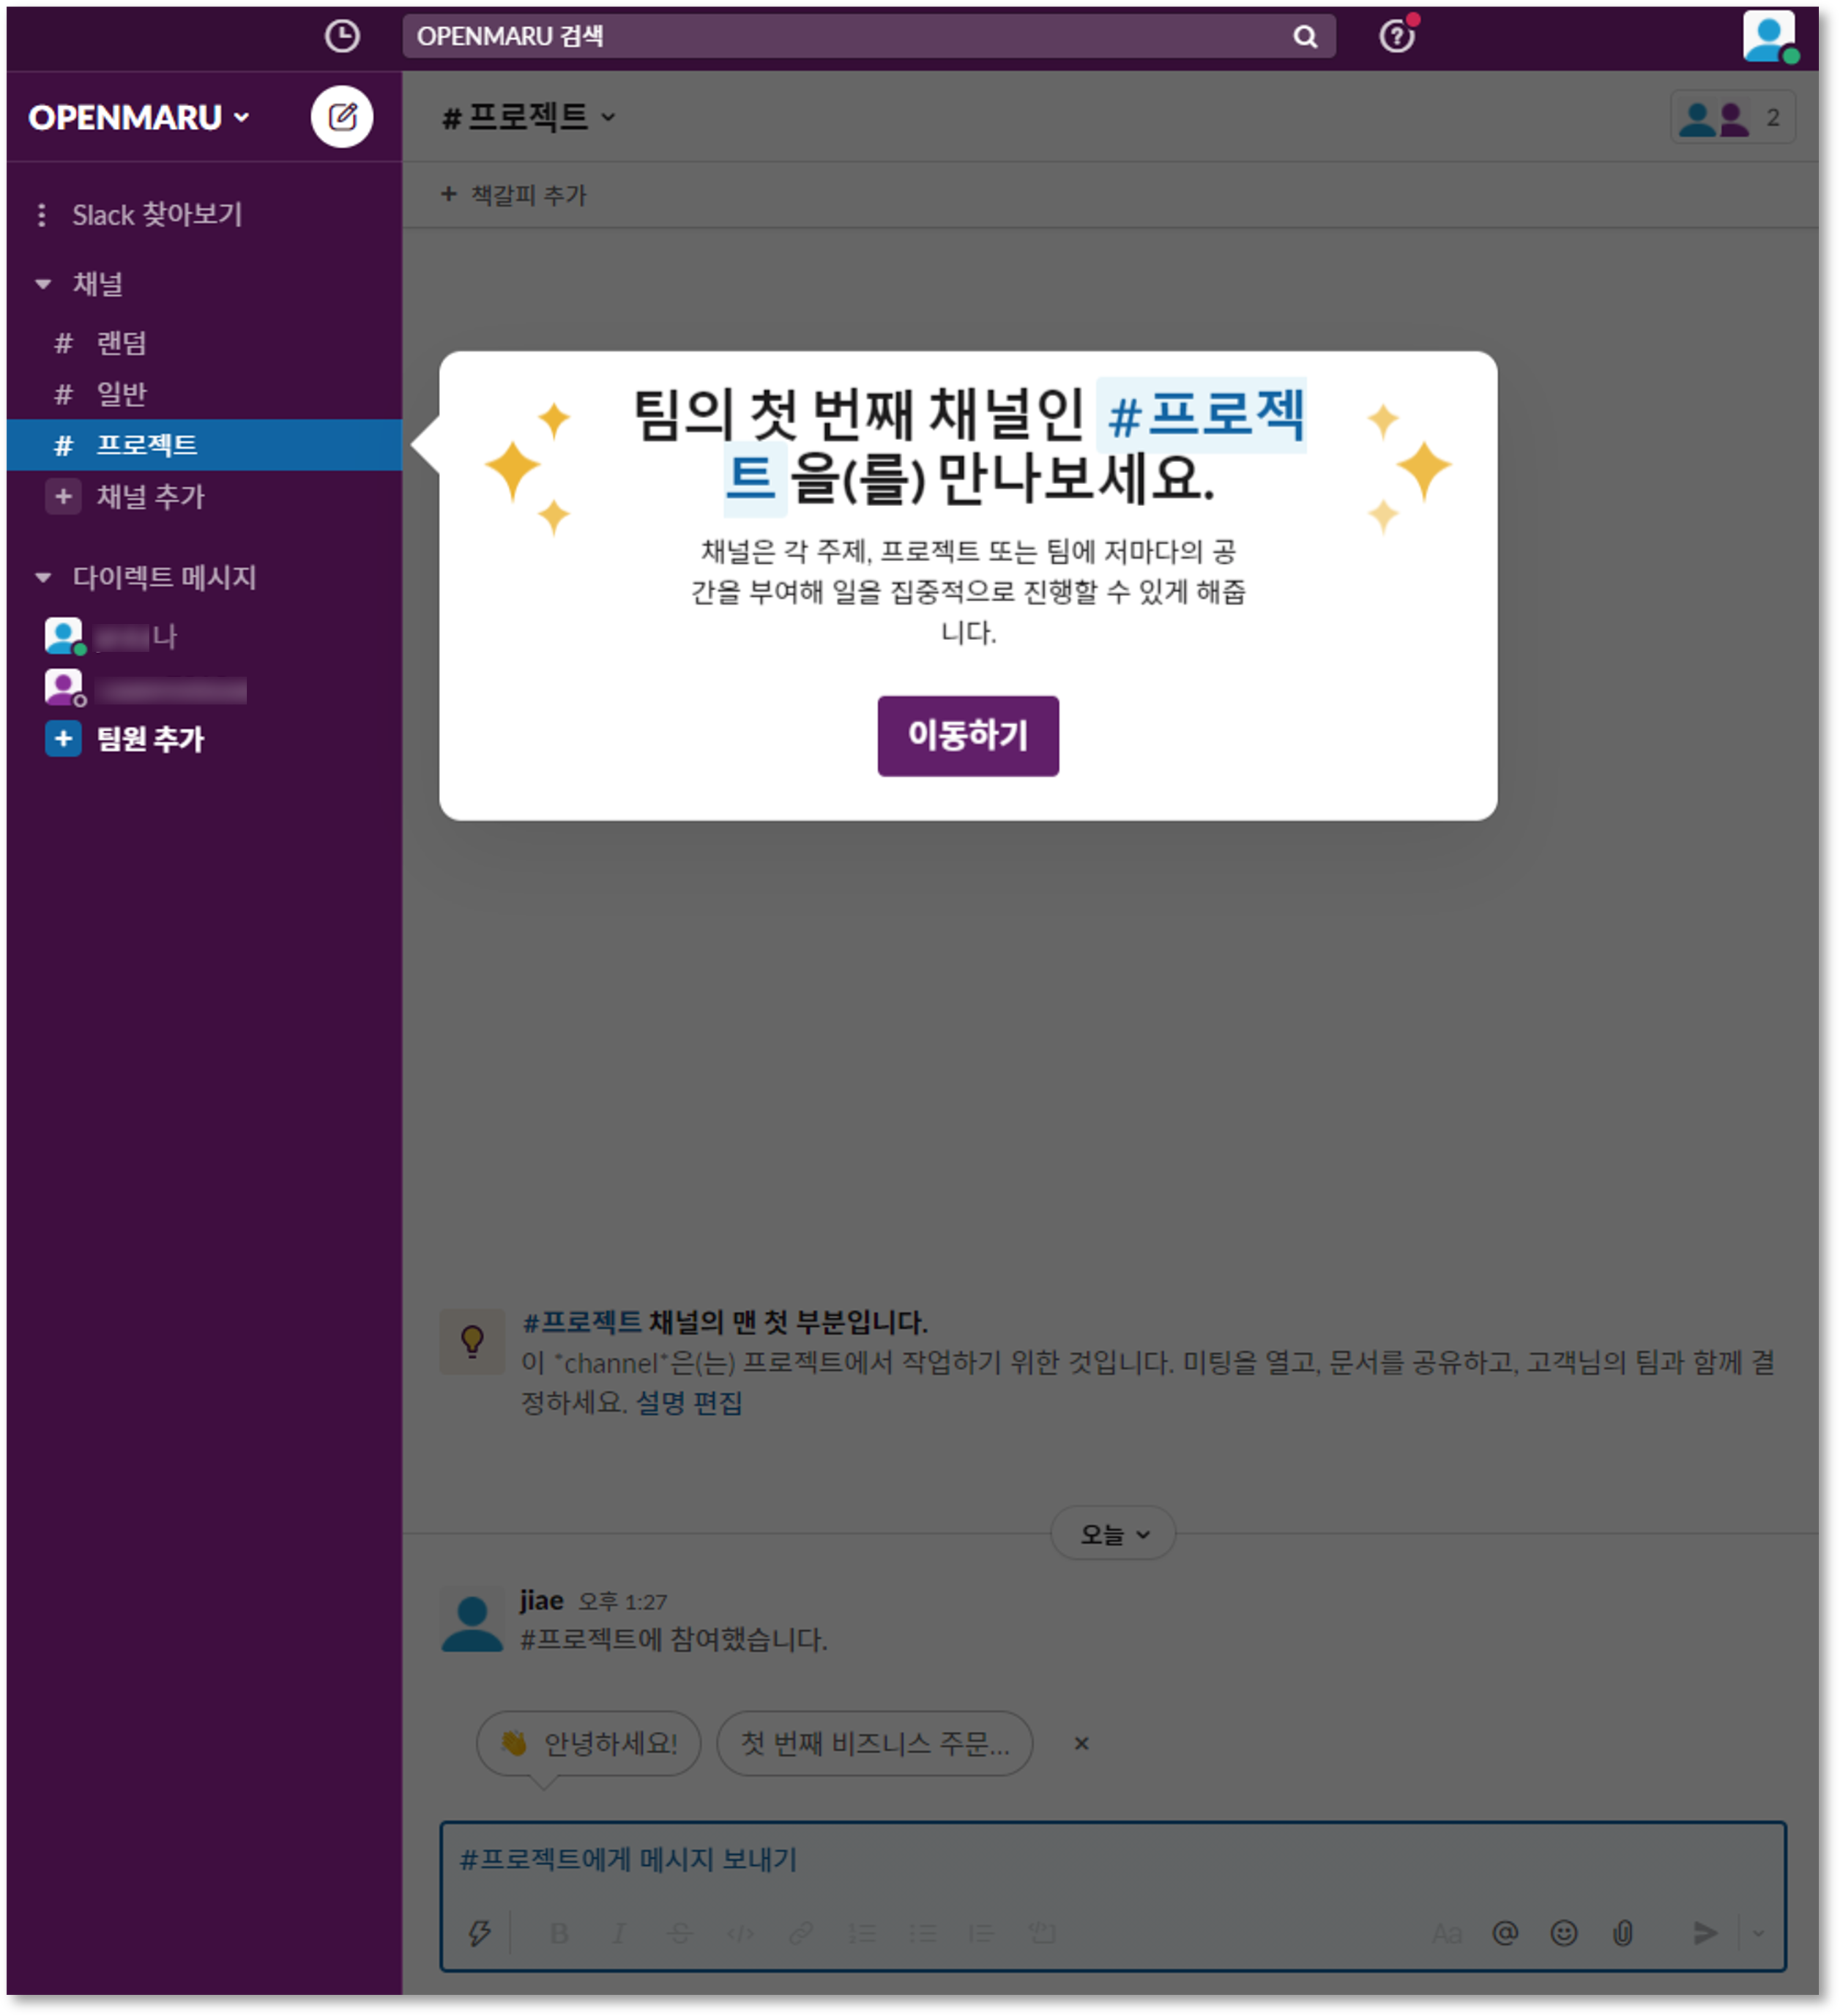
Create a Slack workspace
Click the "Create workspace" button to create a new workspace.
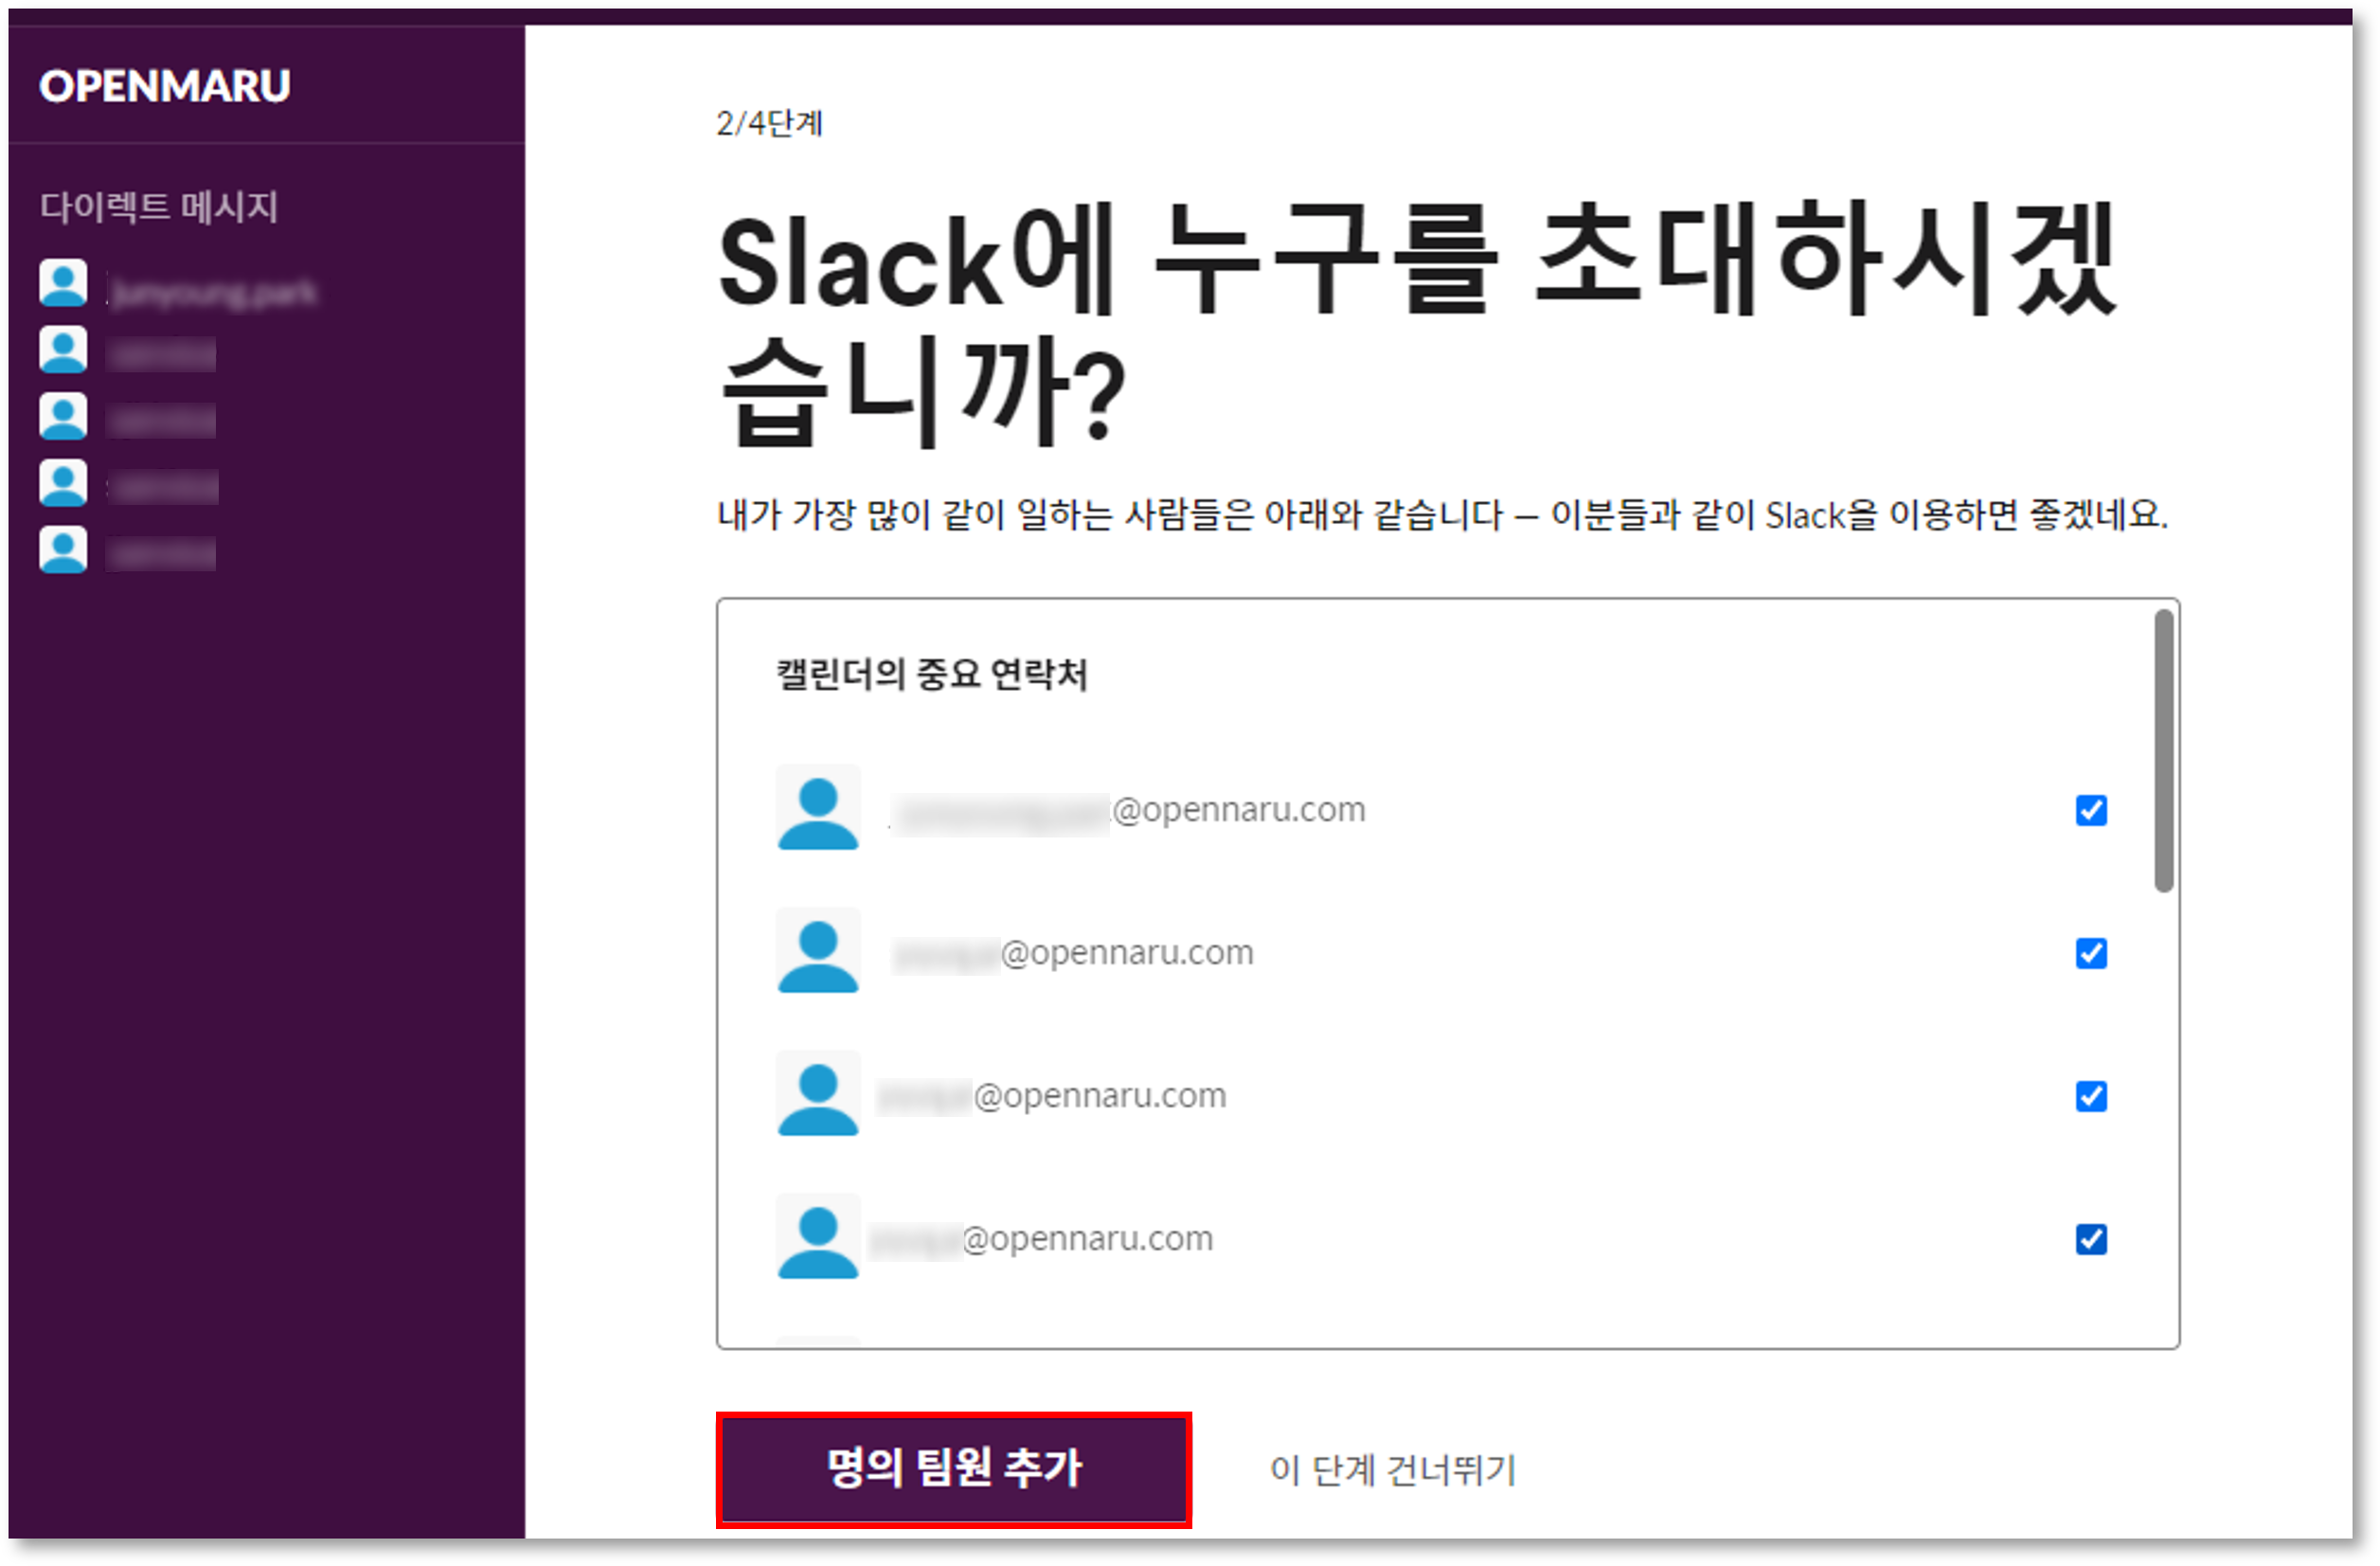
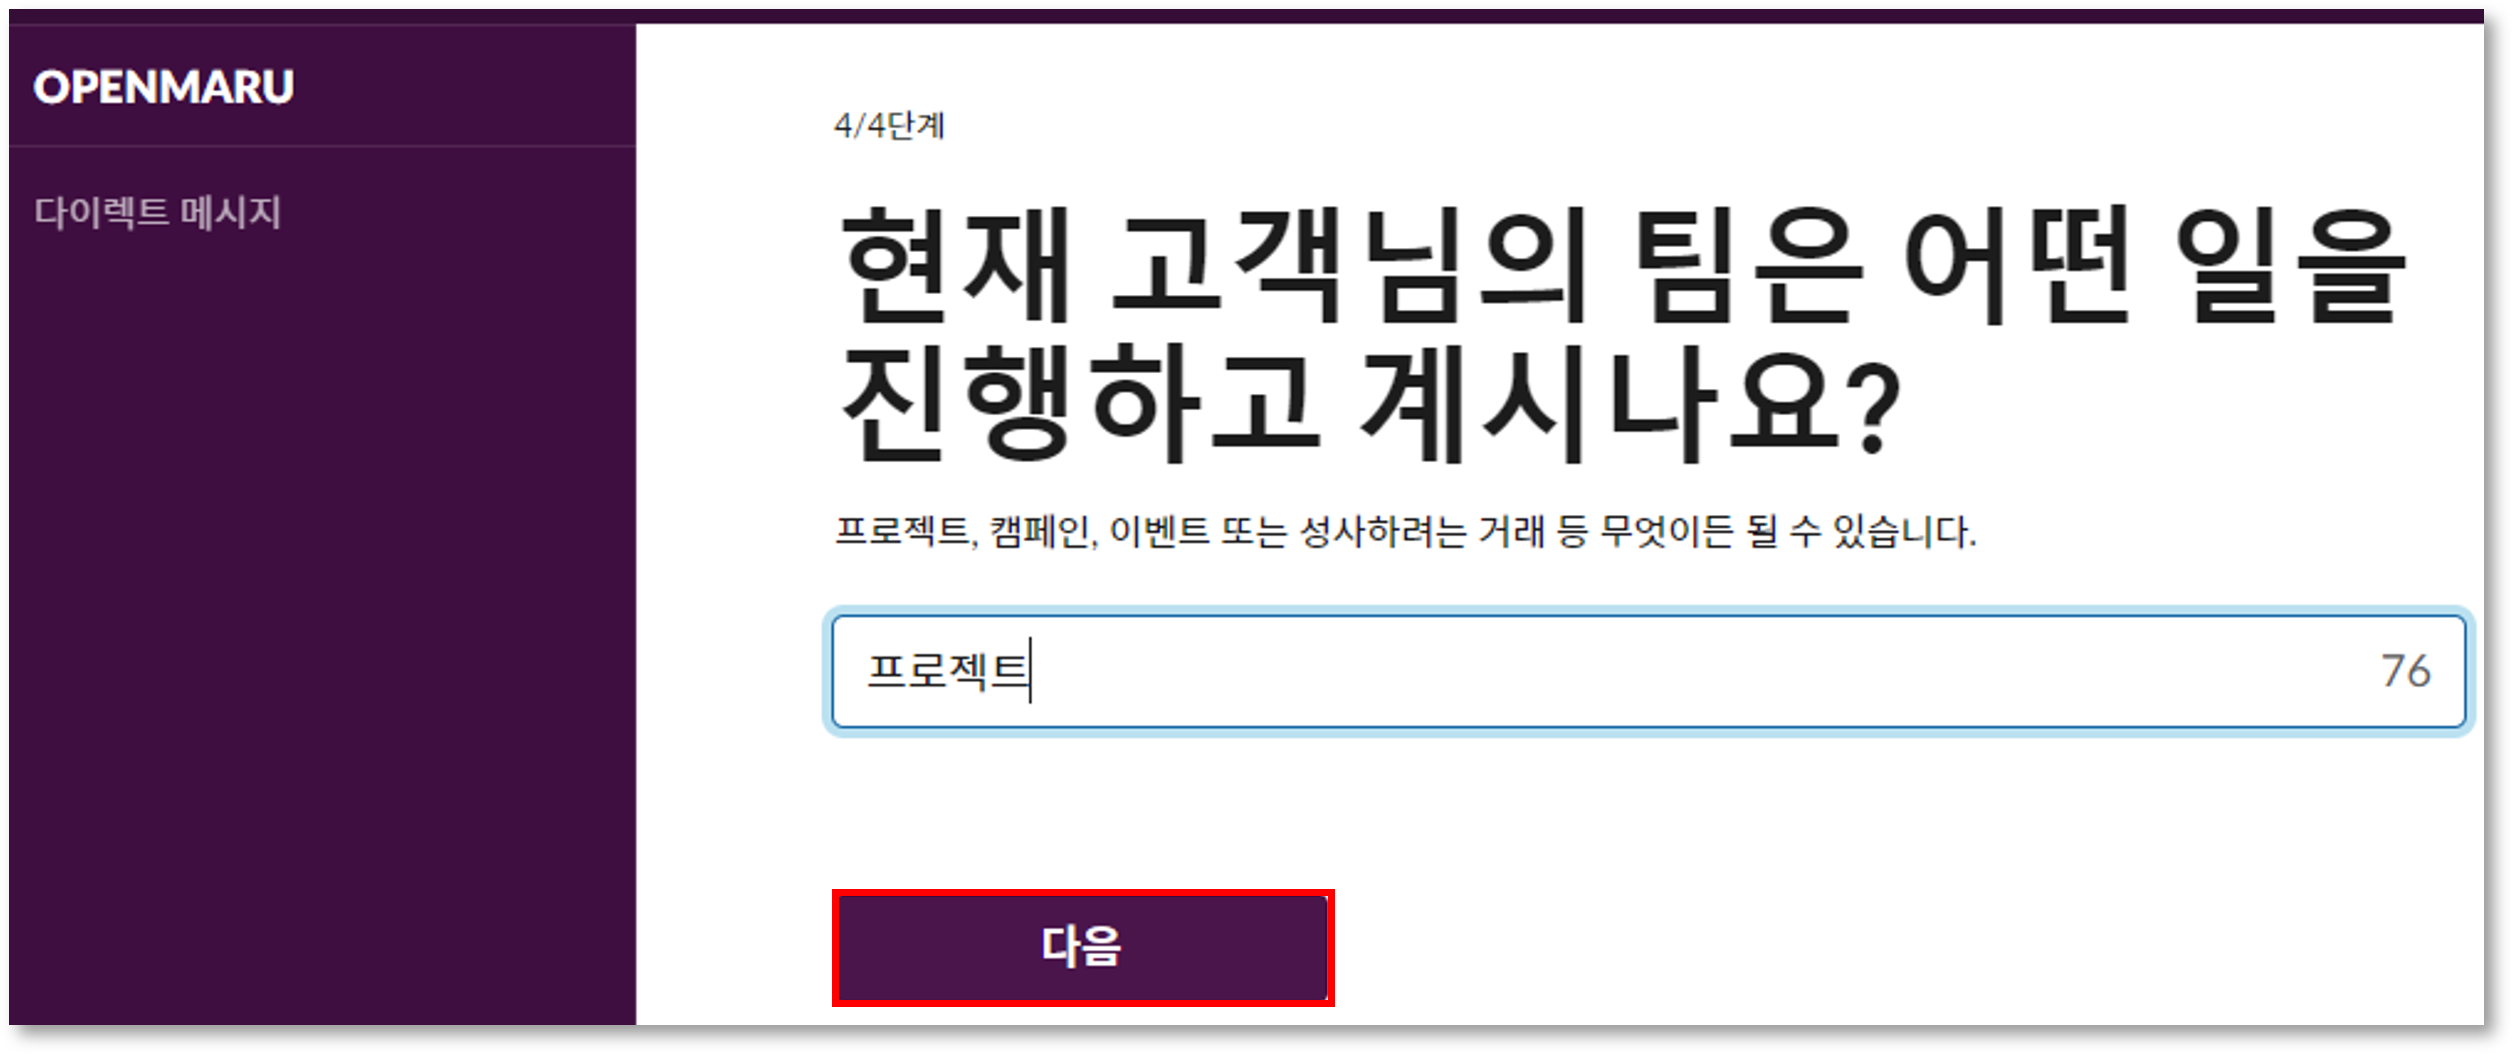
Fill in the information for the four questions.
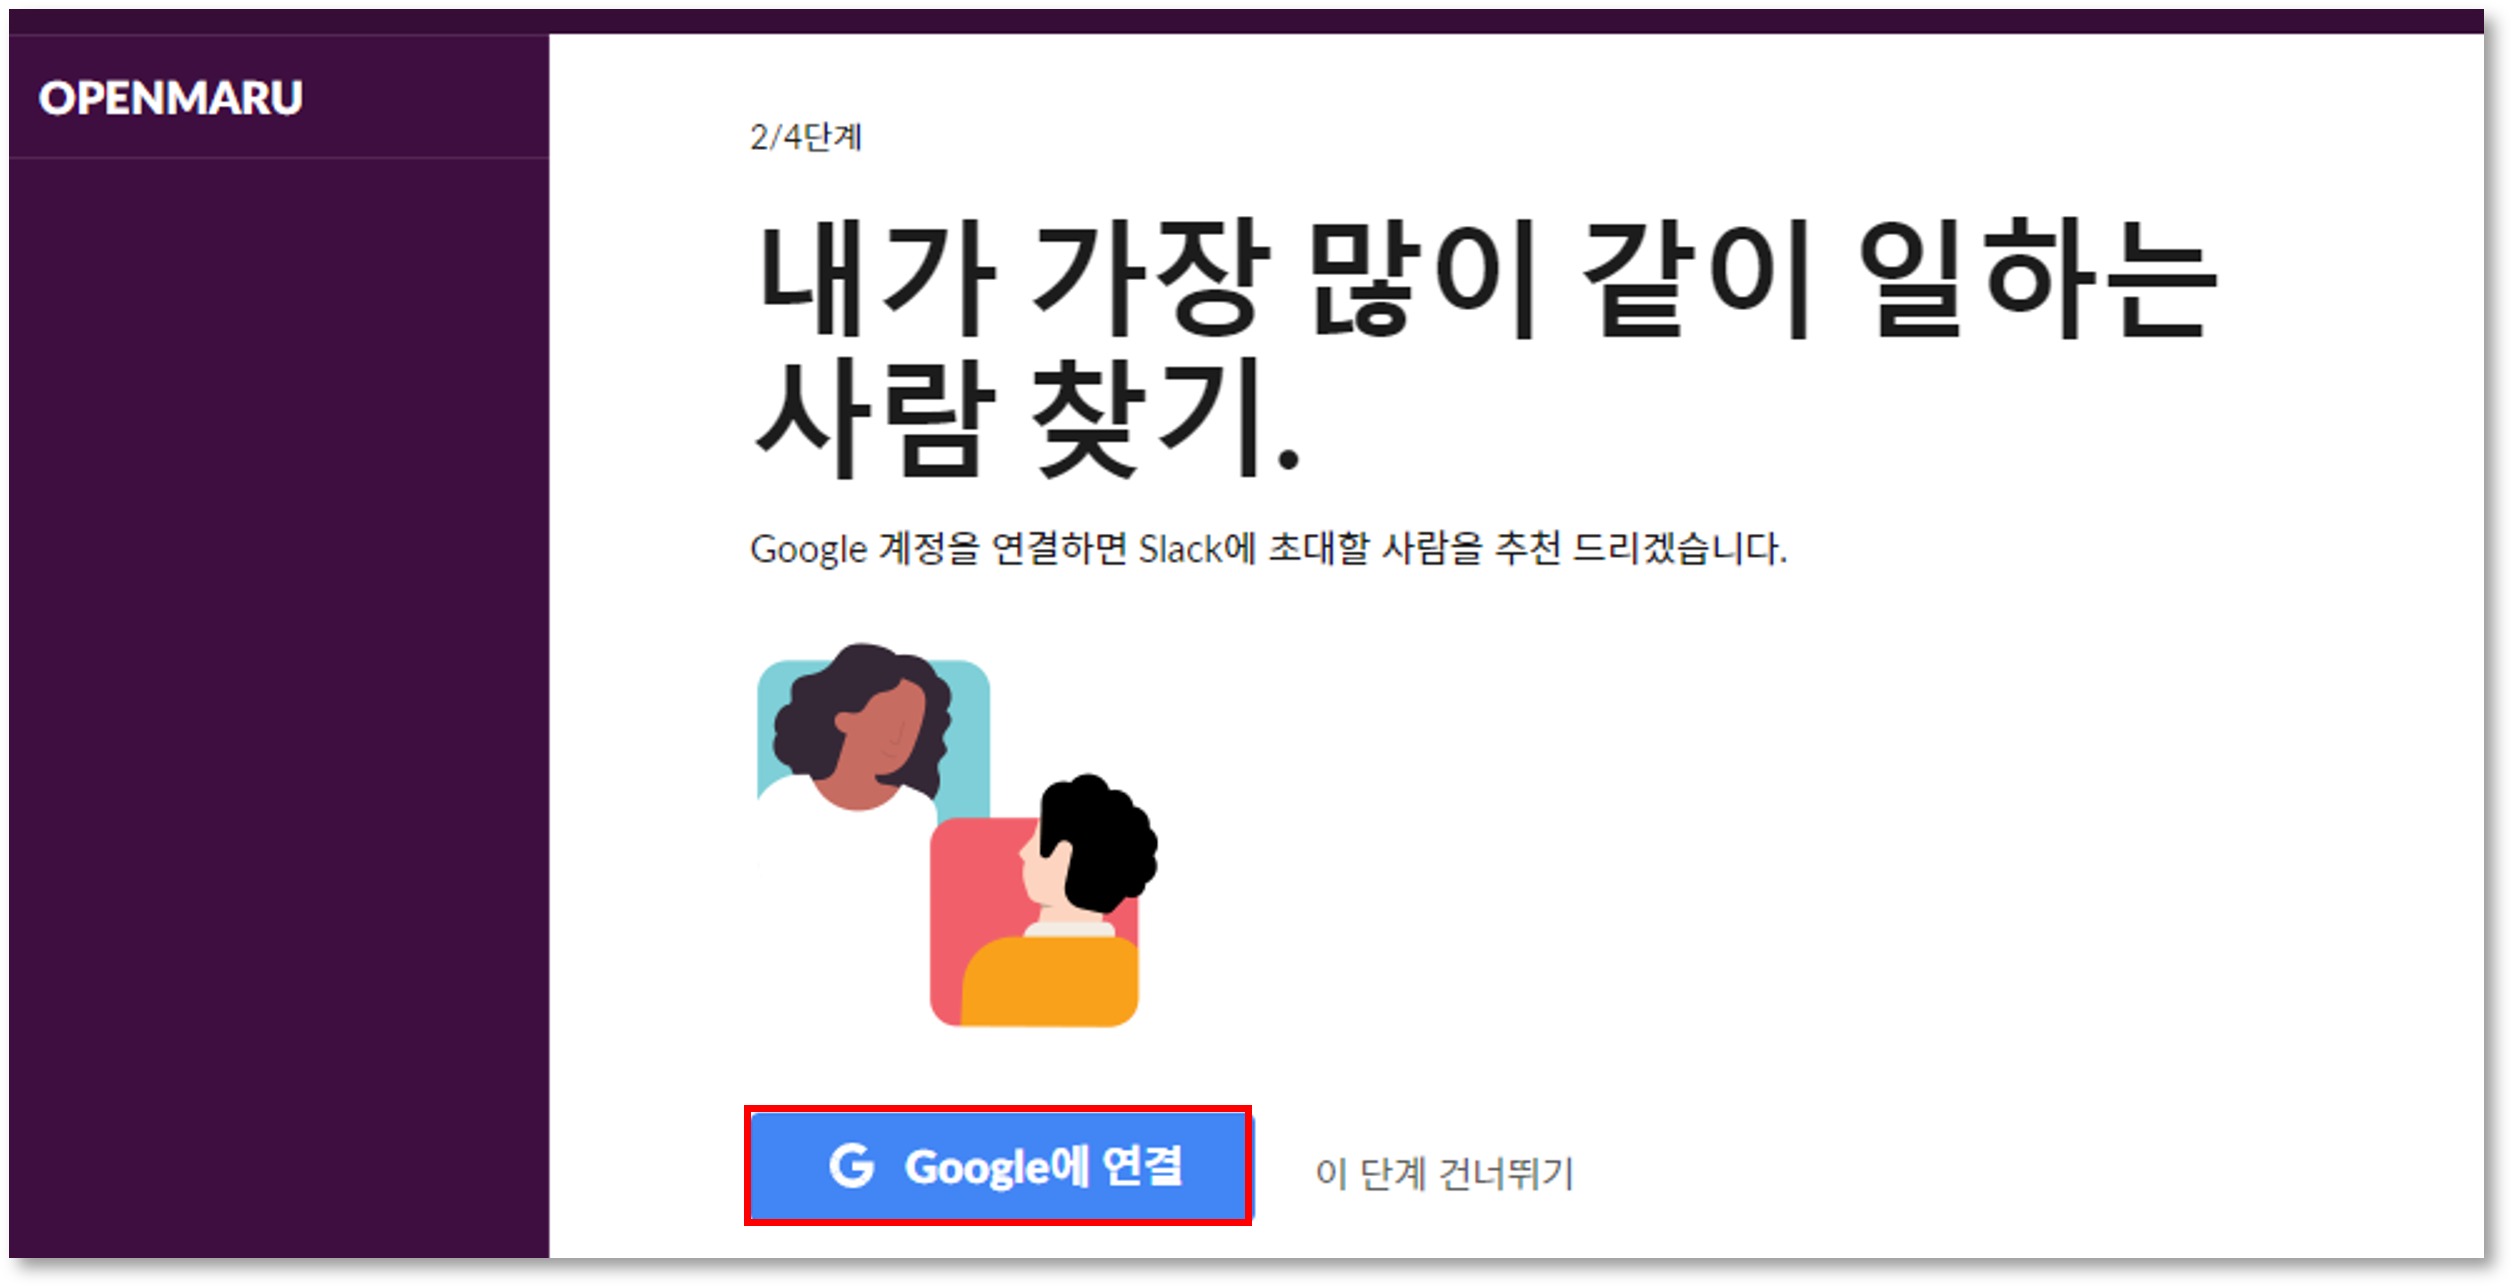
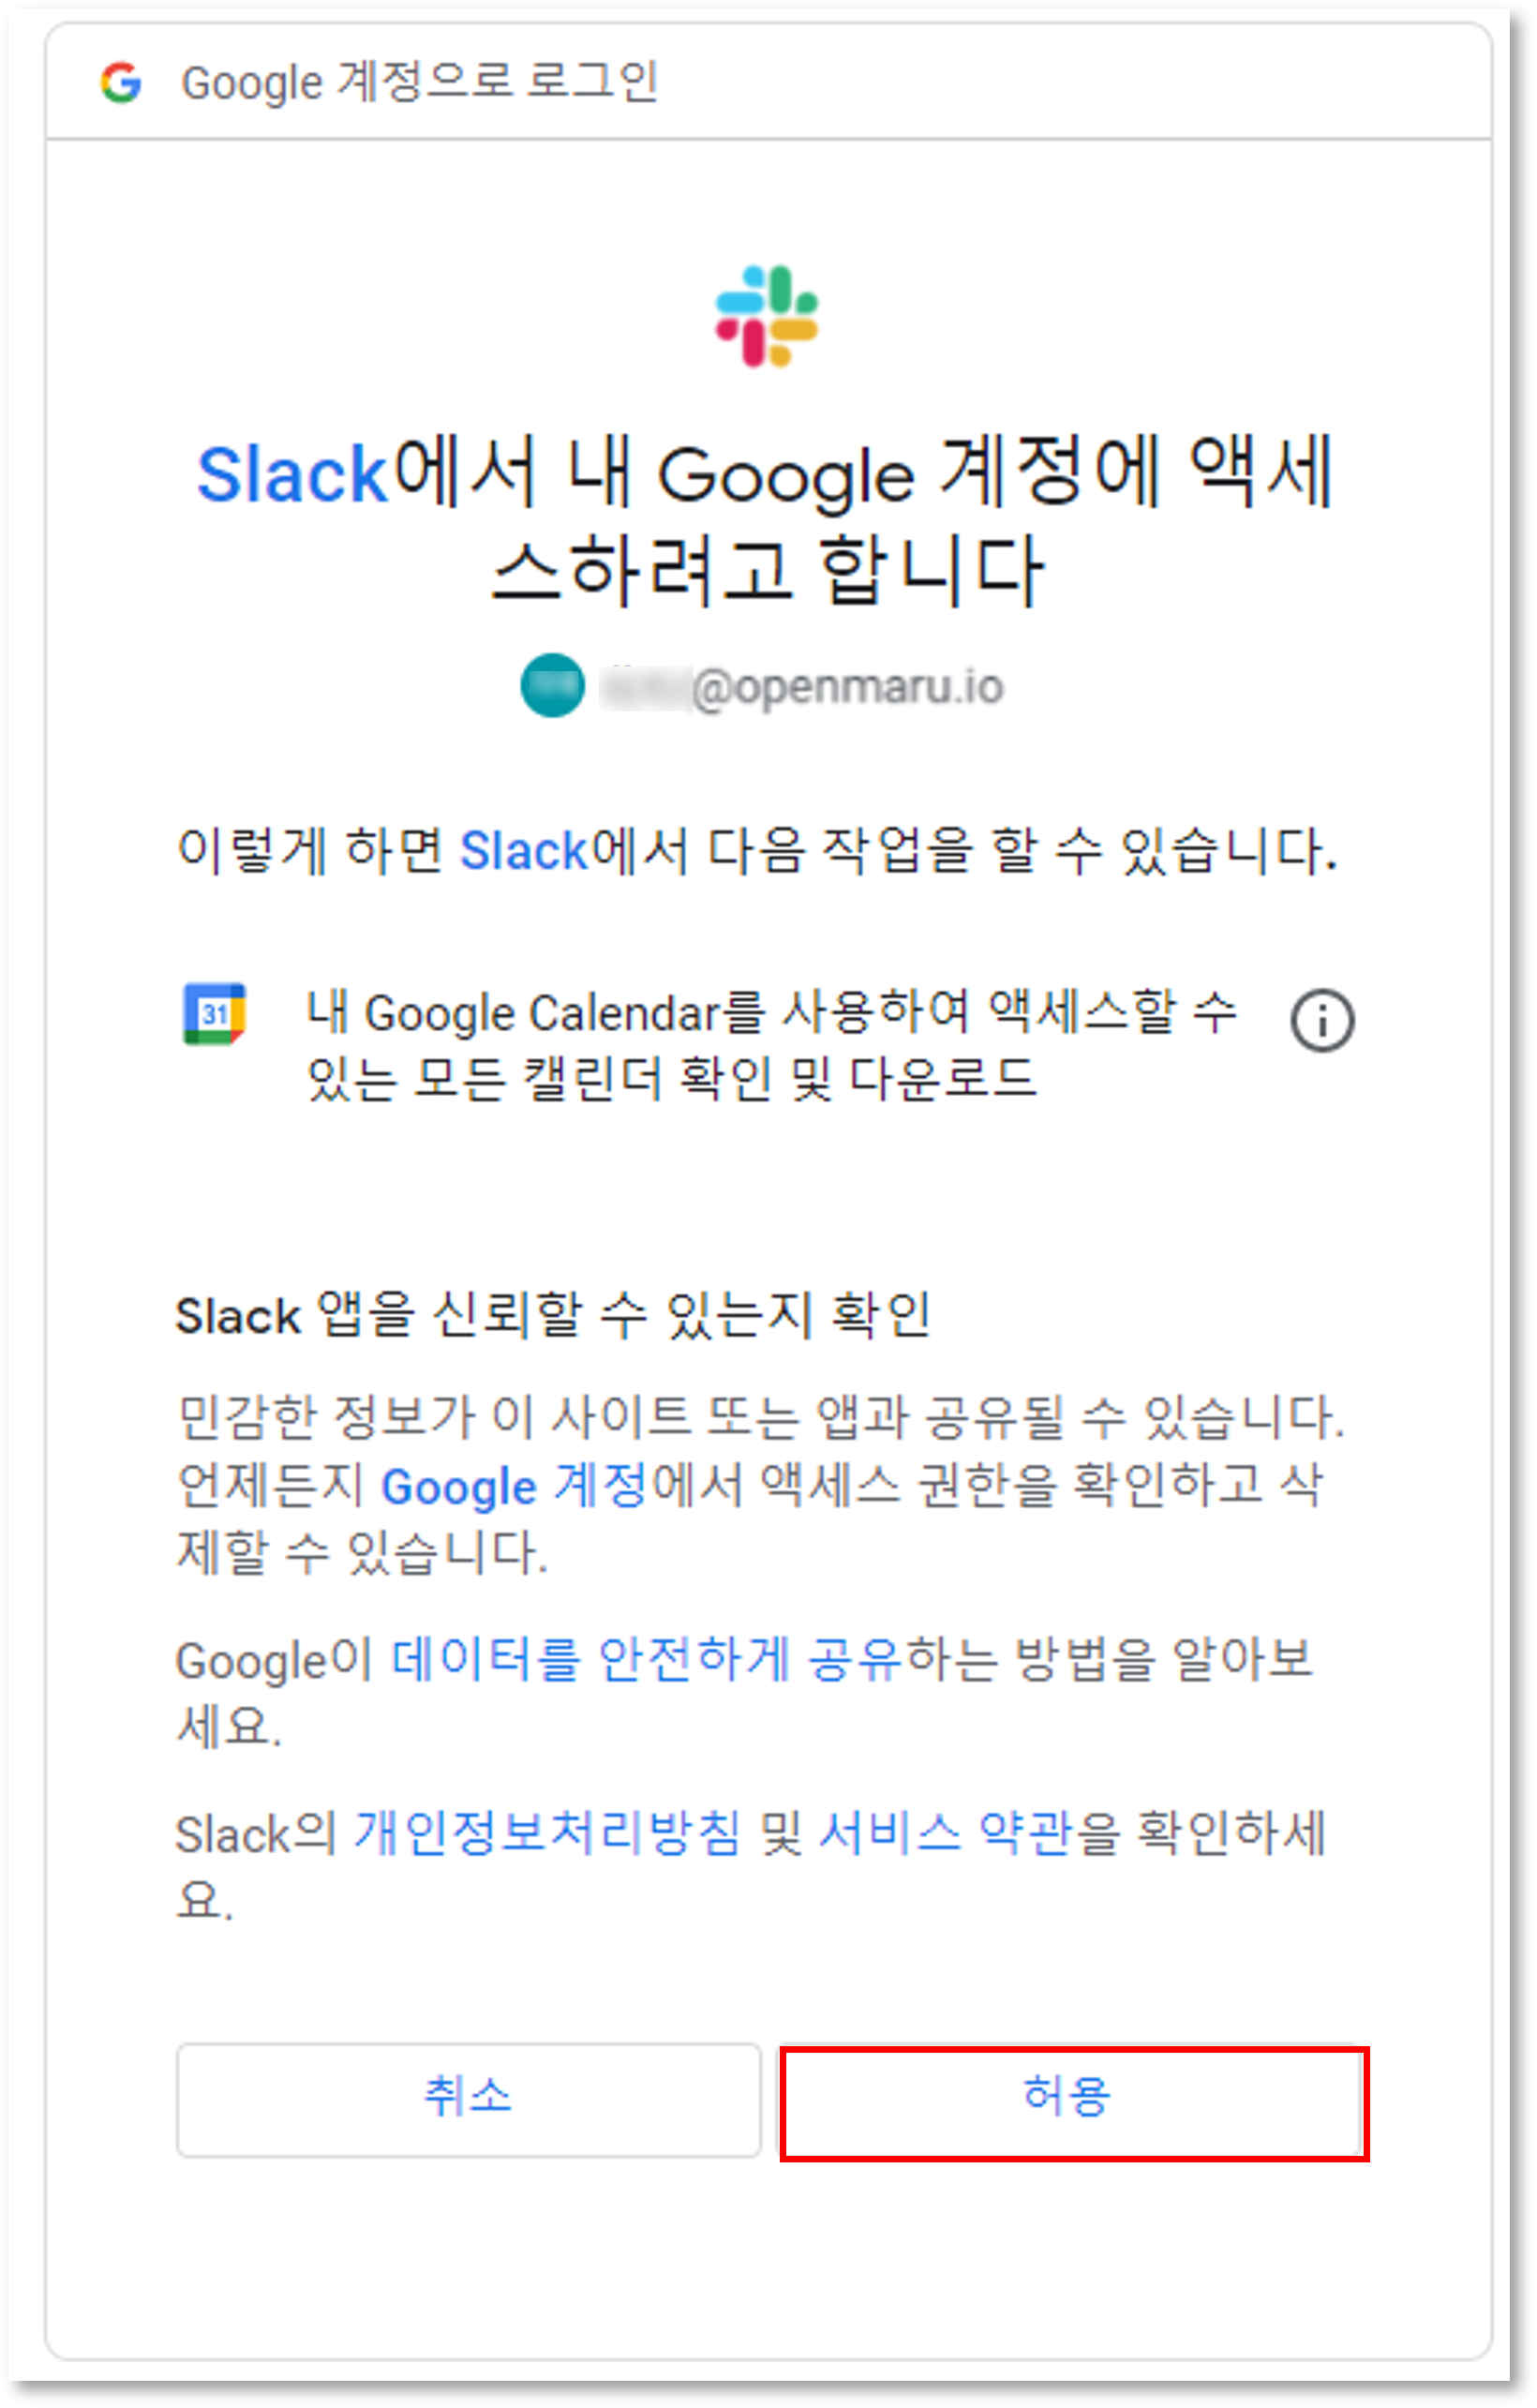
In step 2, you’ll be asked to "Connect with Google" to get suggestions for people to invite to Slack. to get suggestions for people to invite to Slack.
Select the Google account you want to connect and allow it.
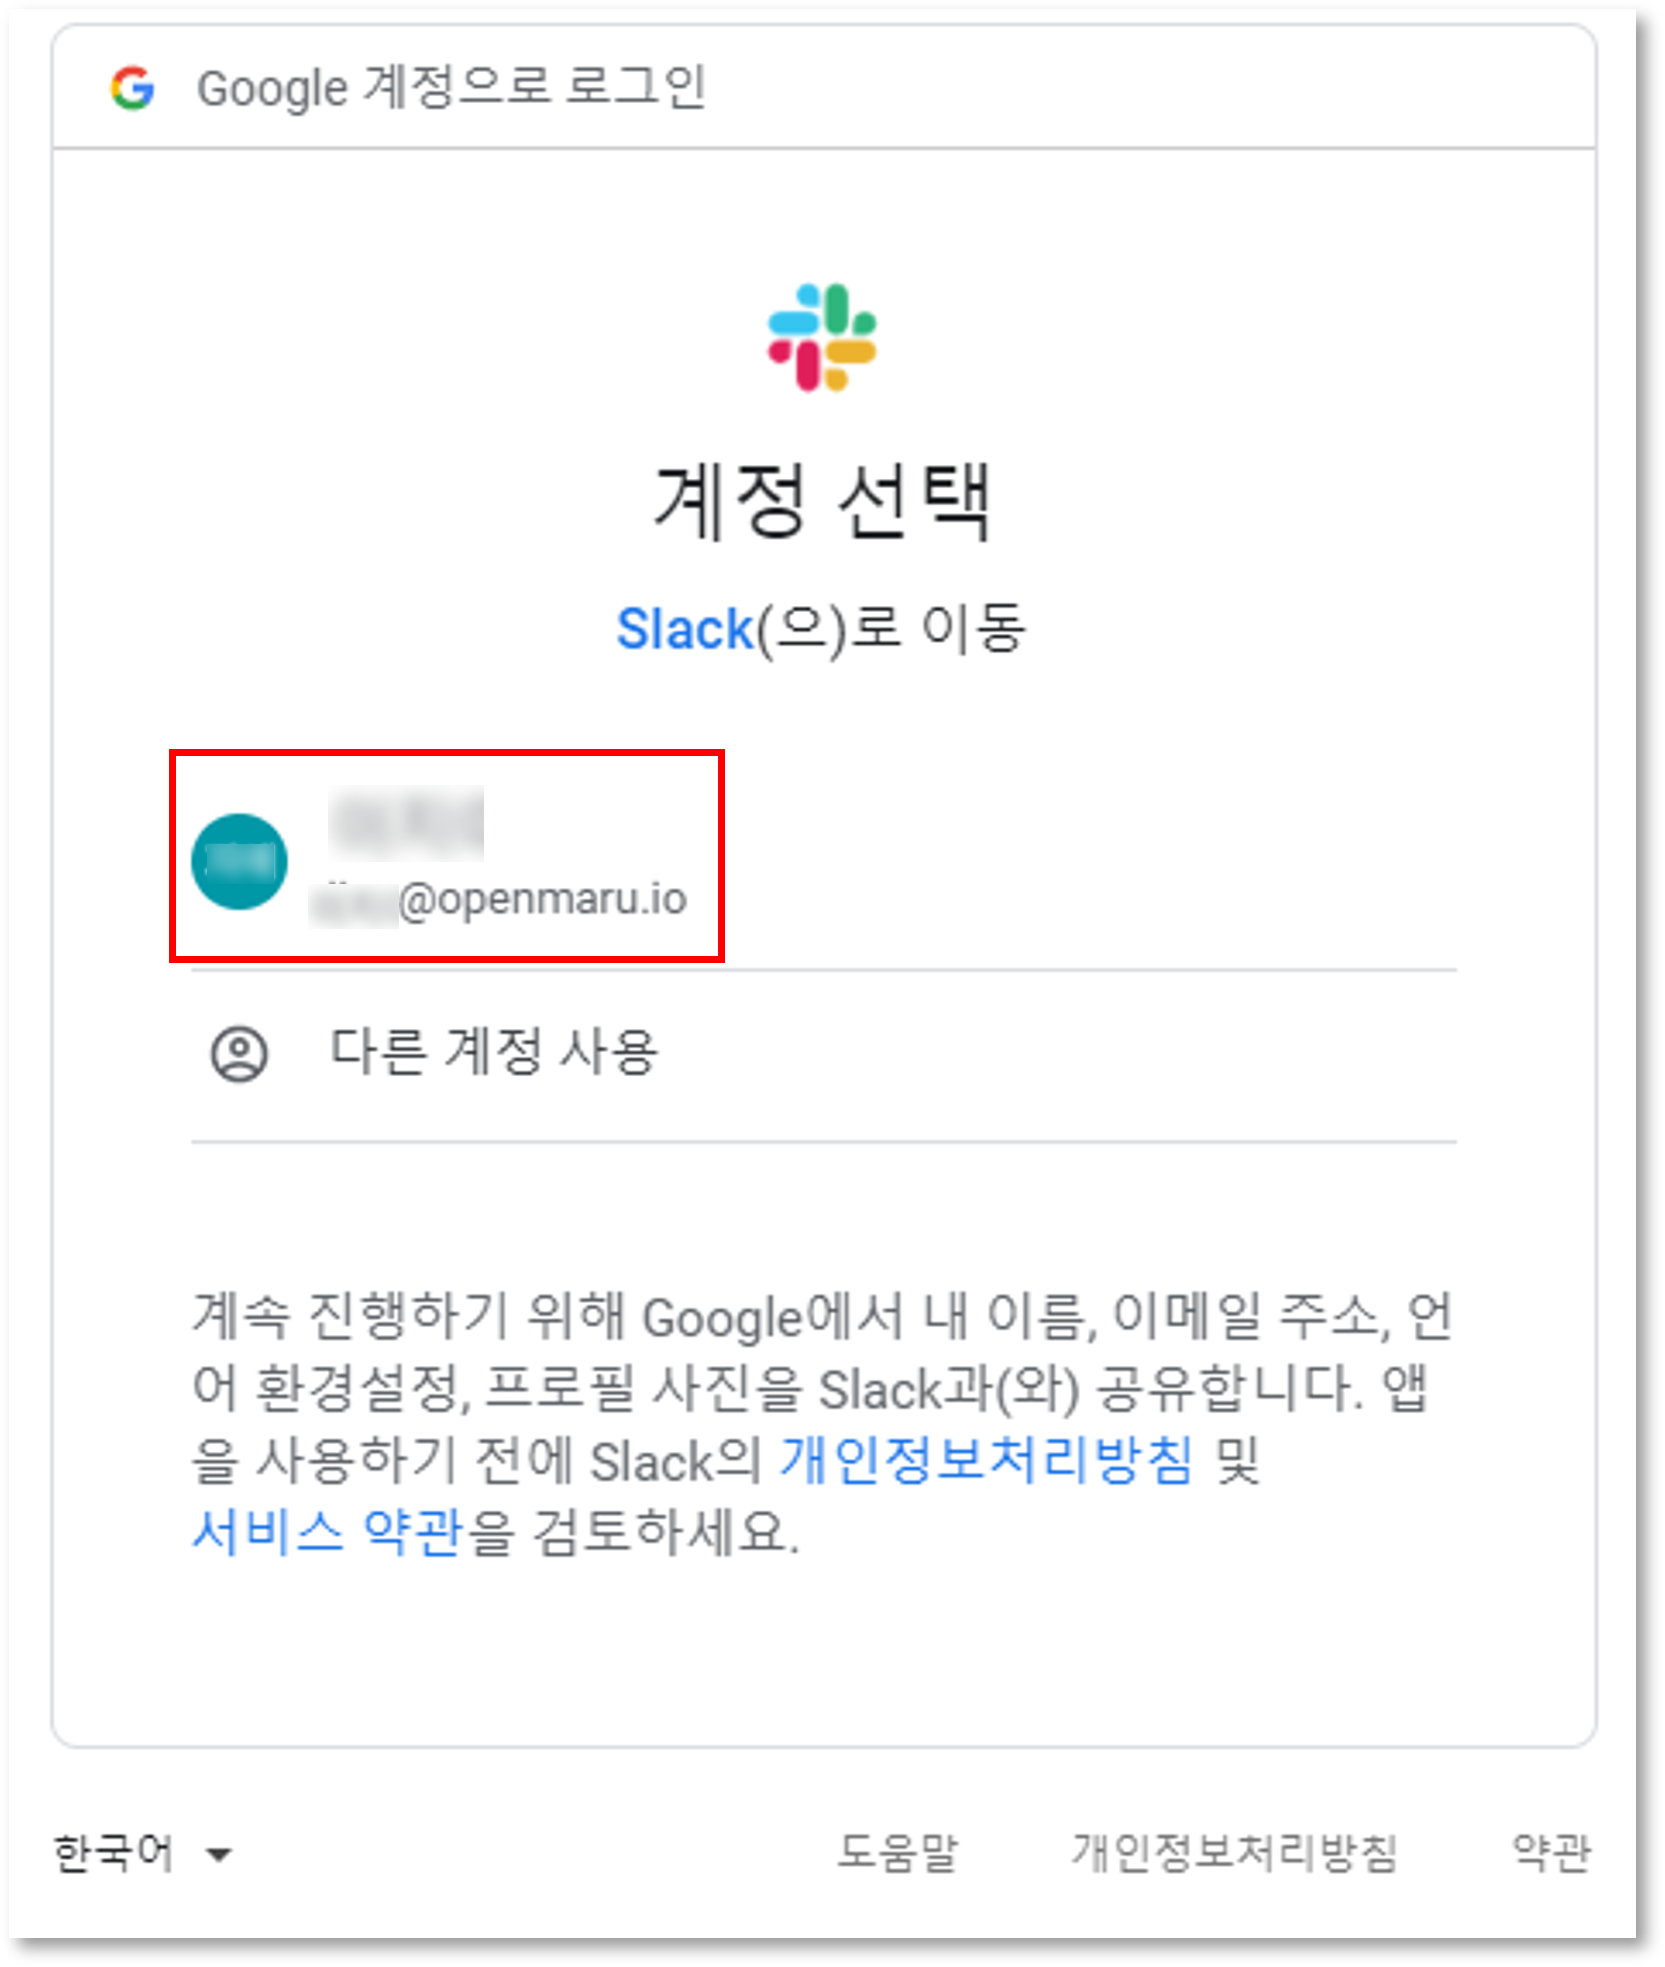
In addition to the suggested team members, you can select and remove other team members.
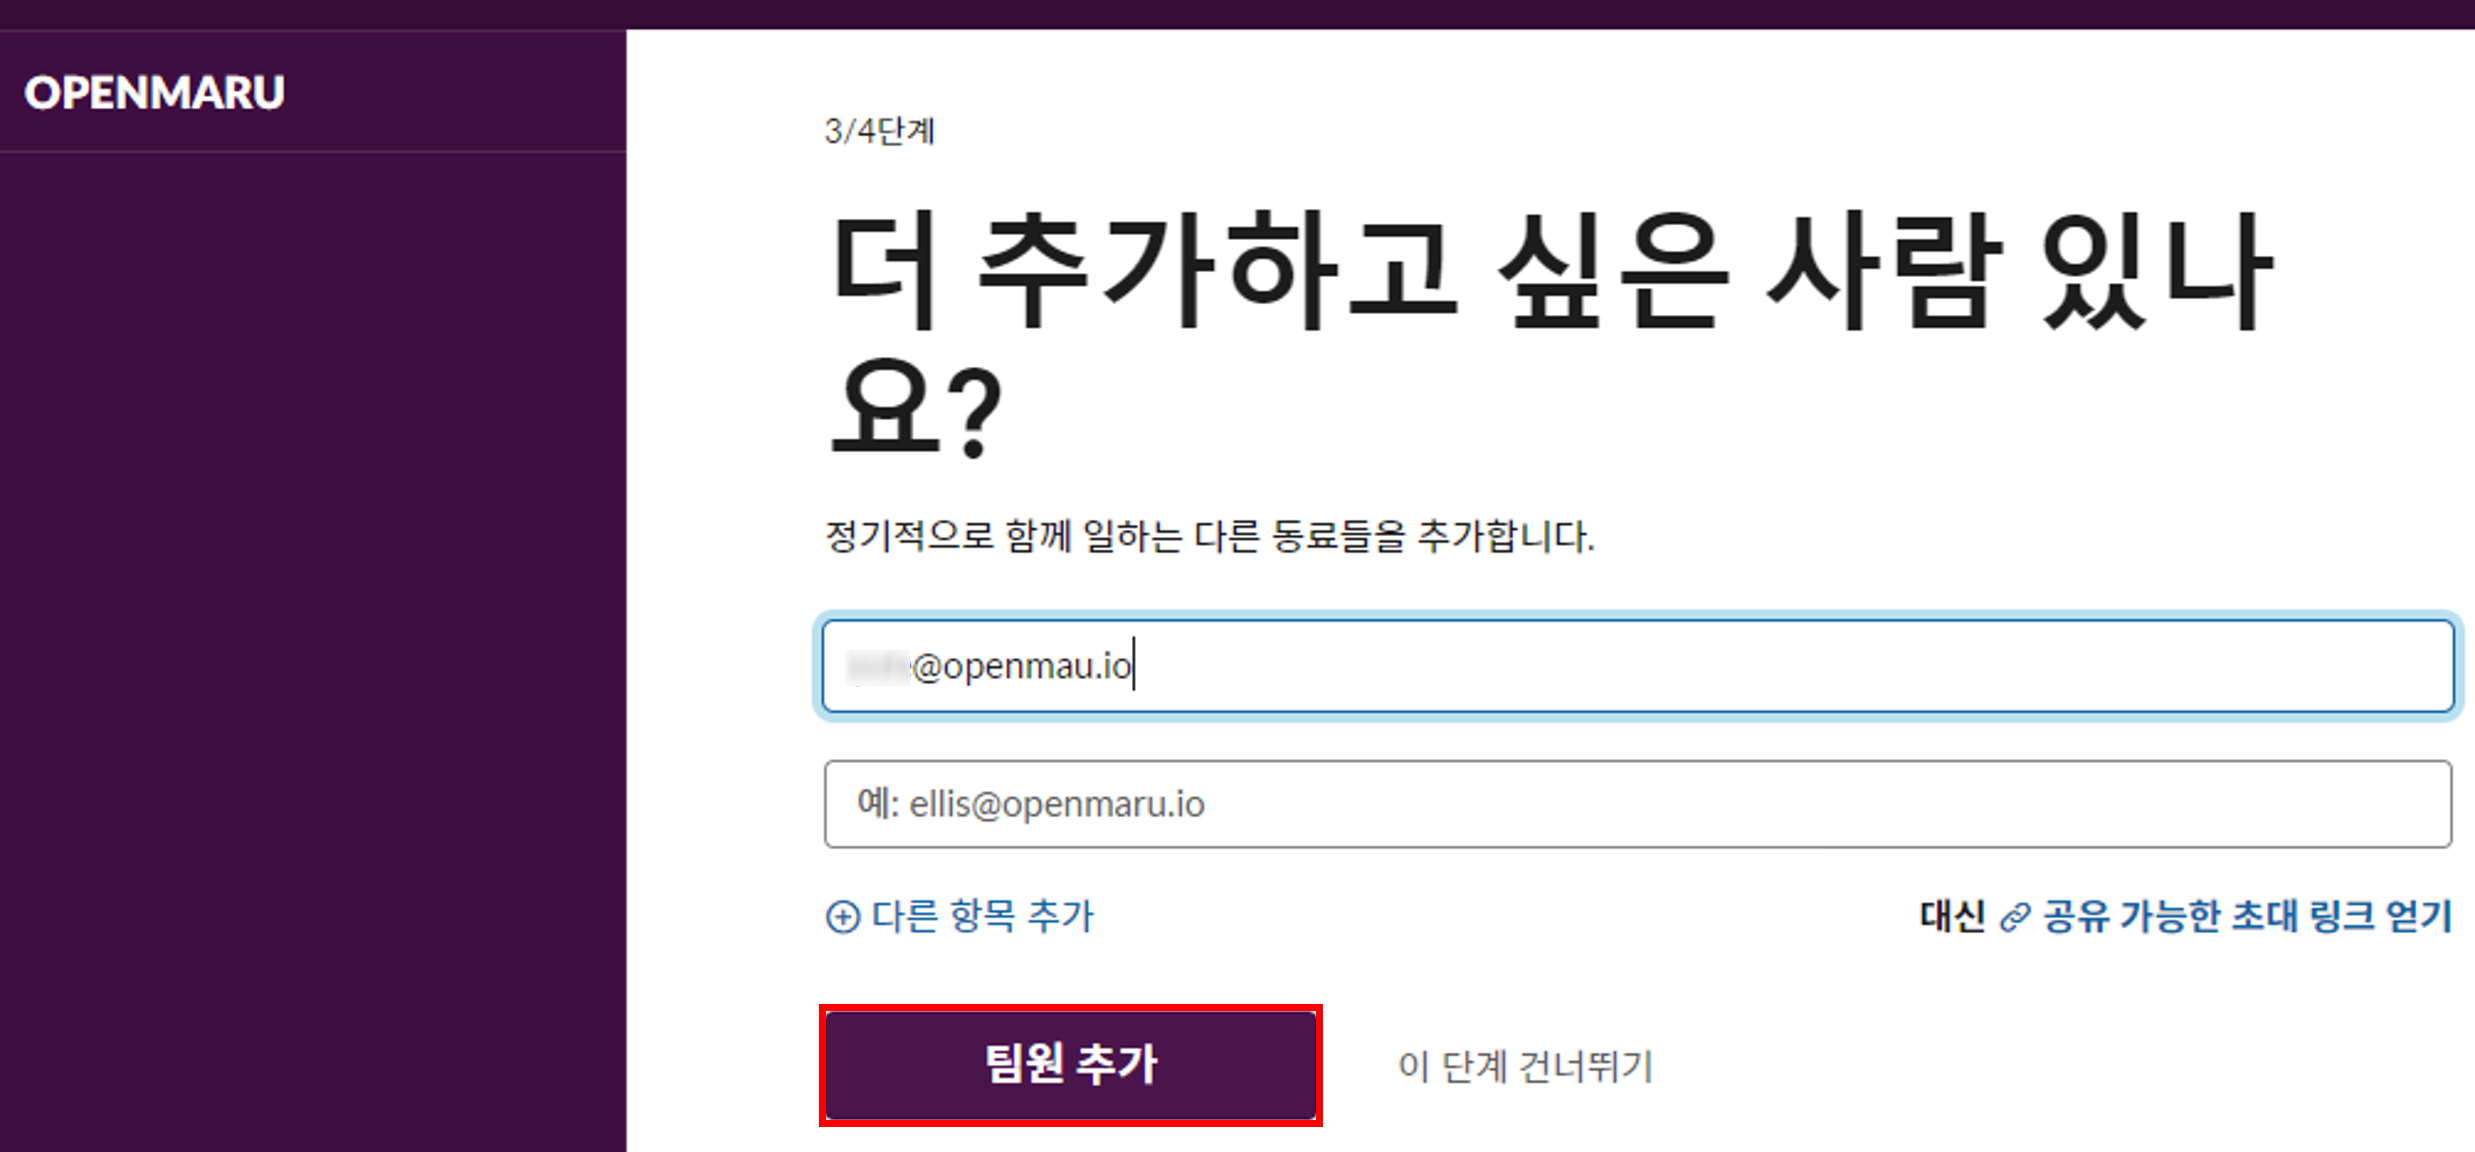
In step 3, you can enter the emails of the users you want to invite to the team. Fill in the information until step 4.
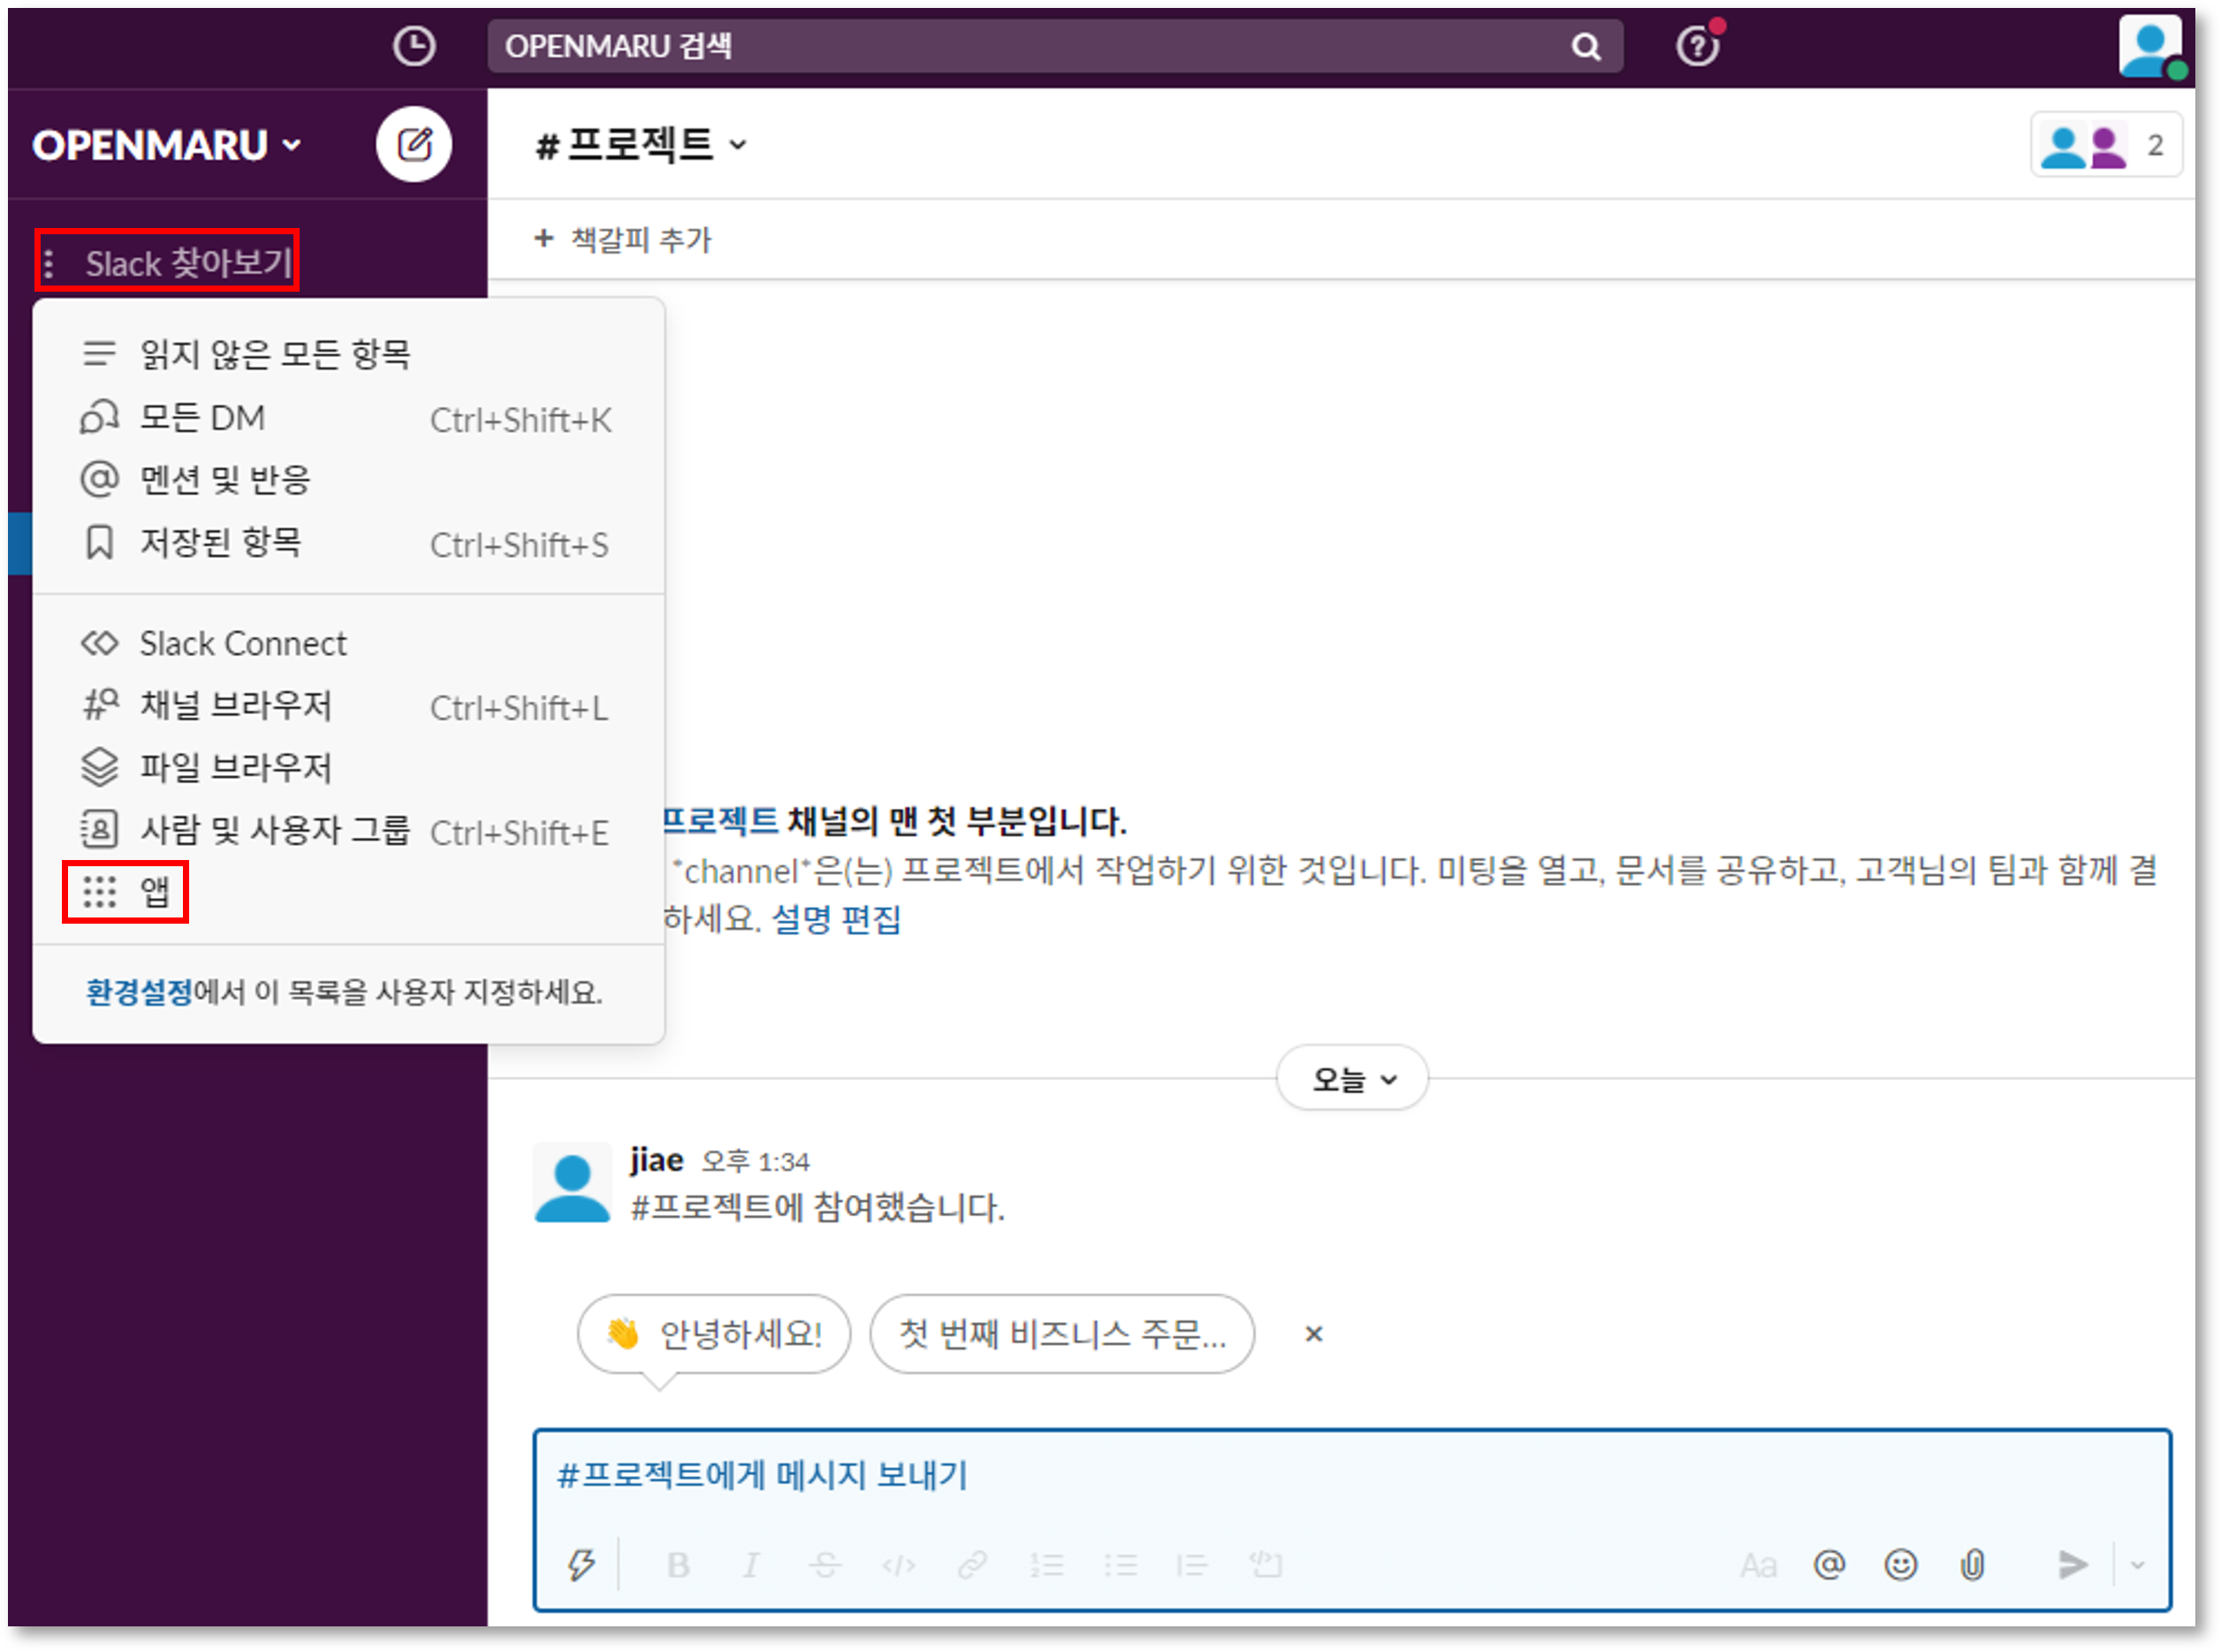
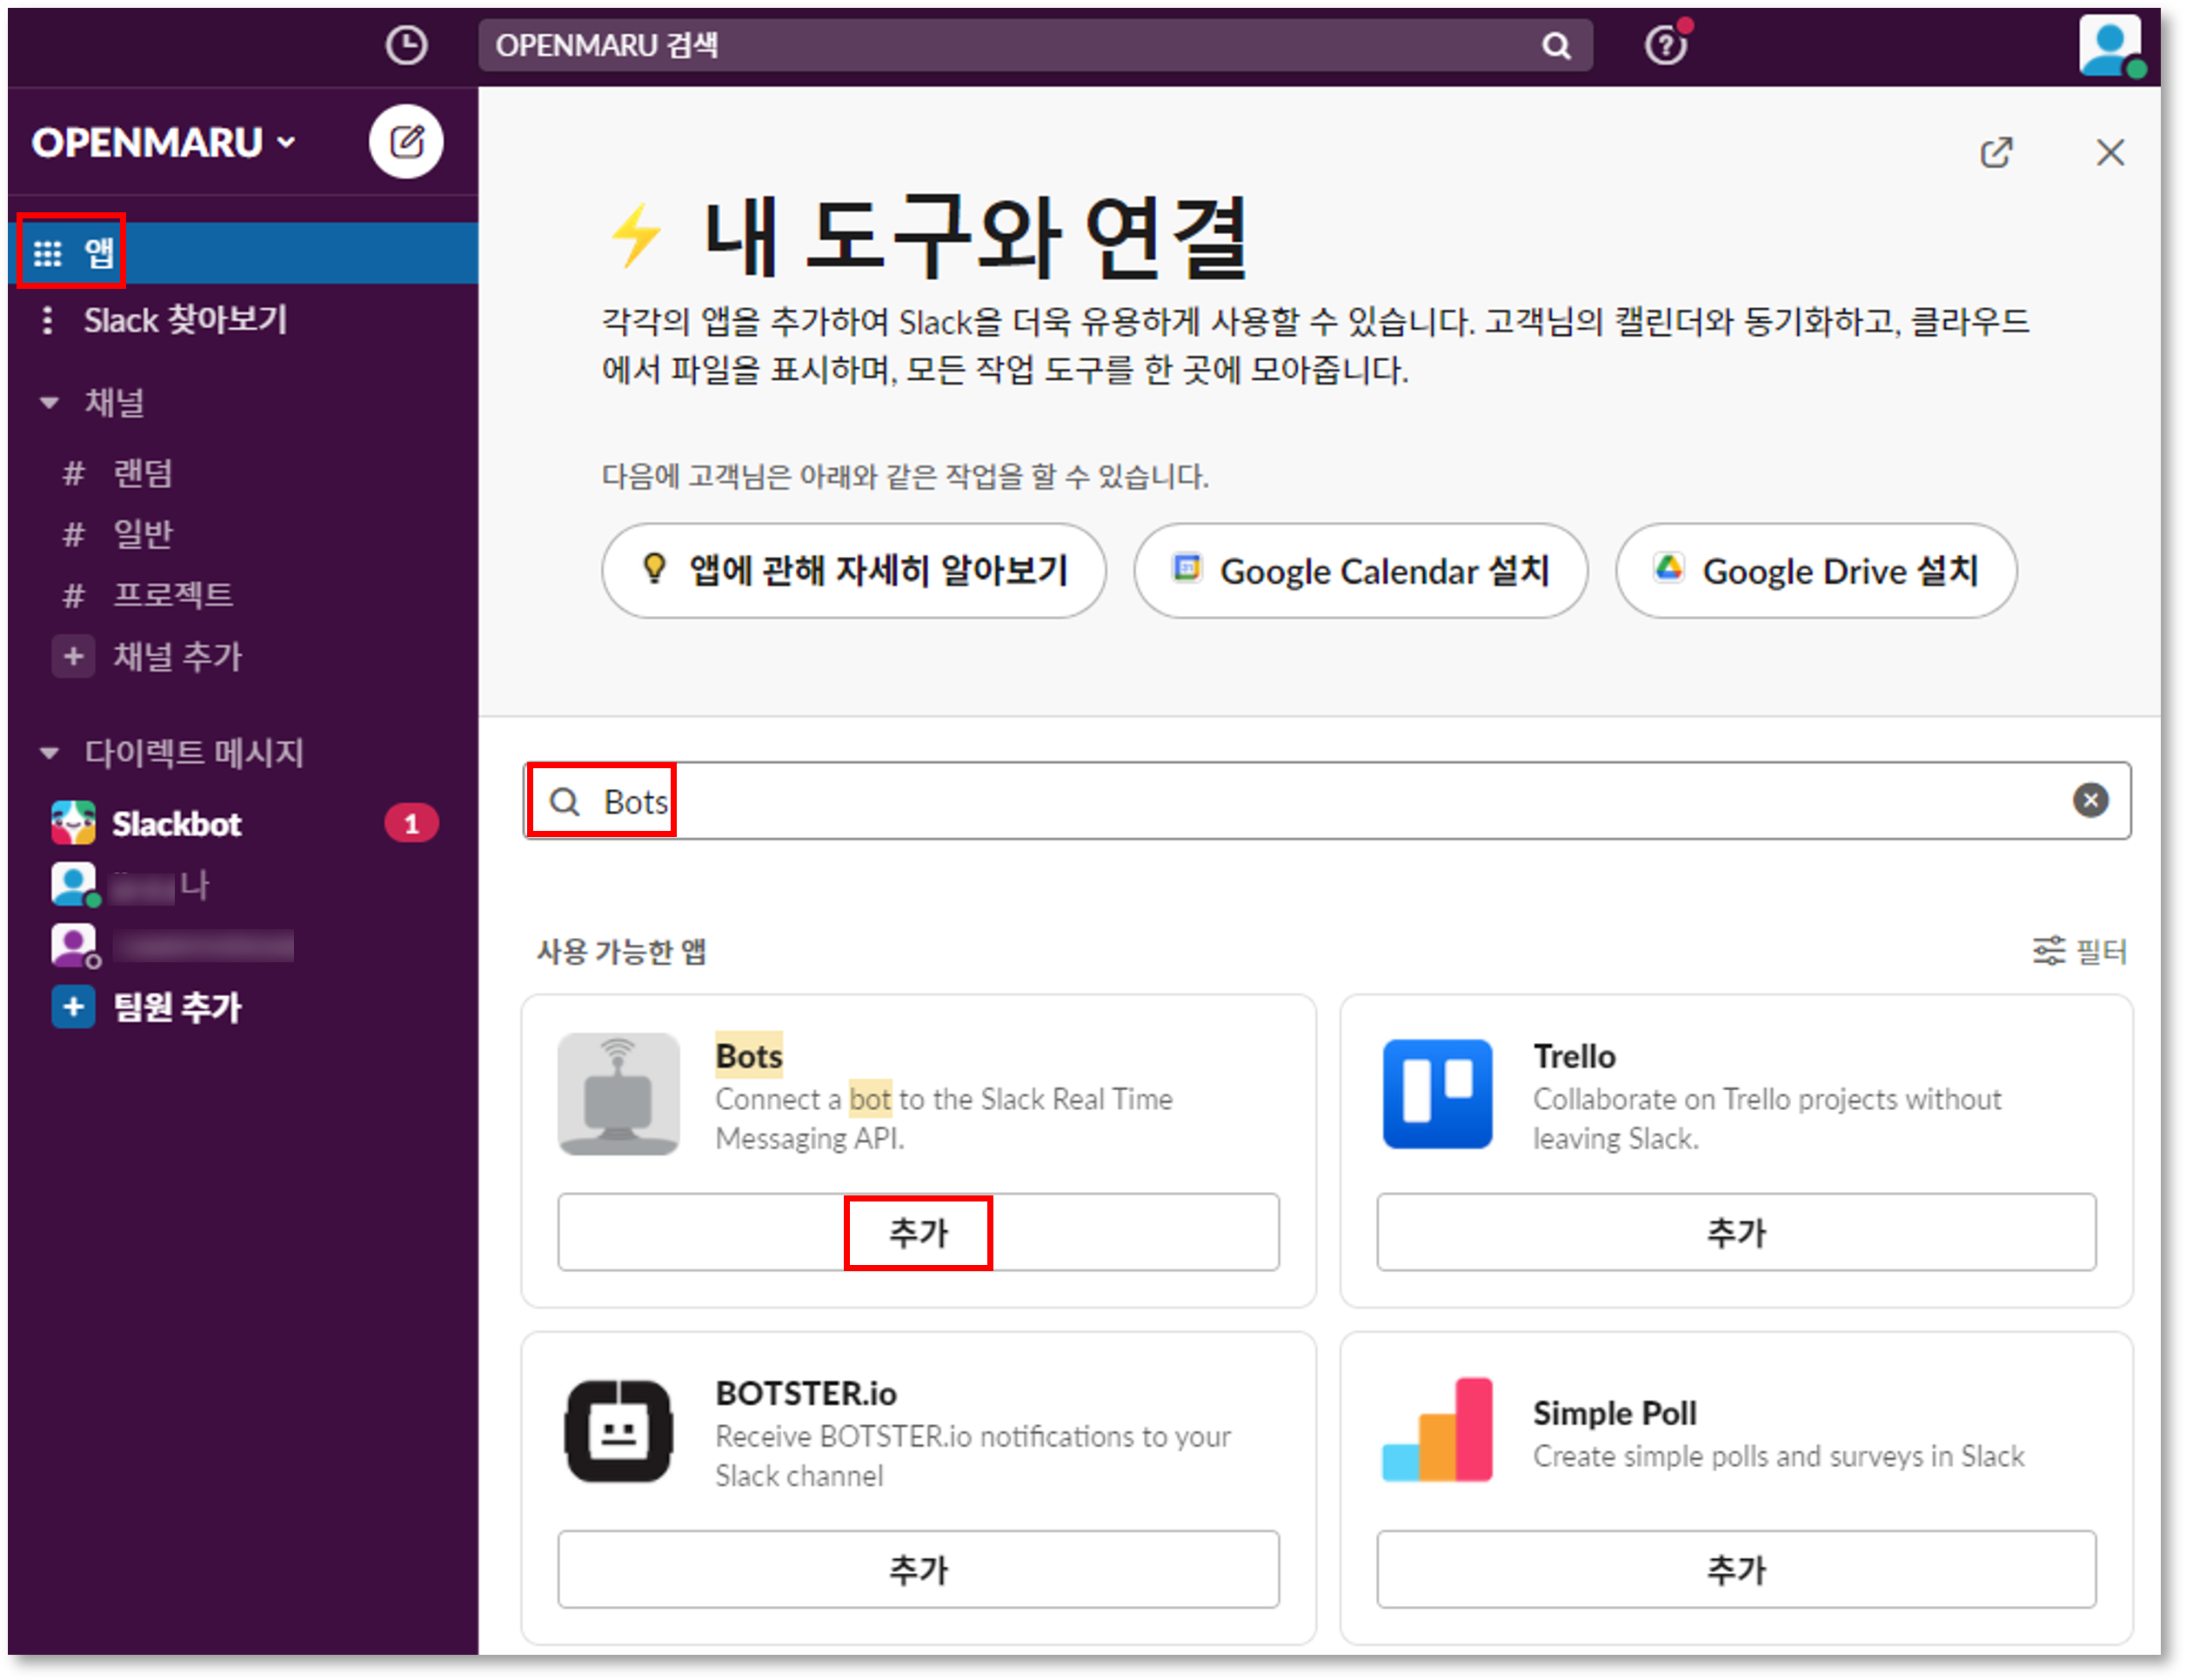
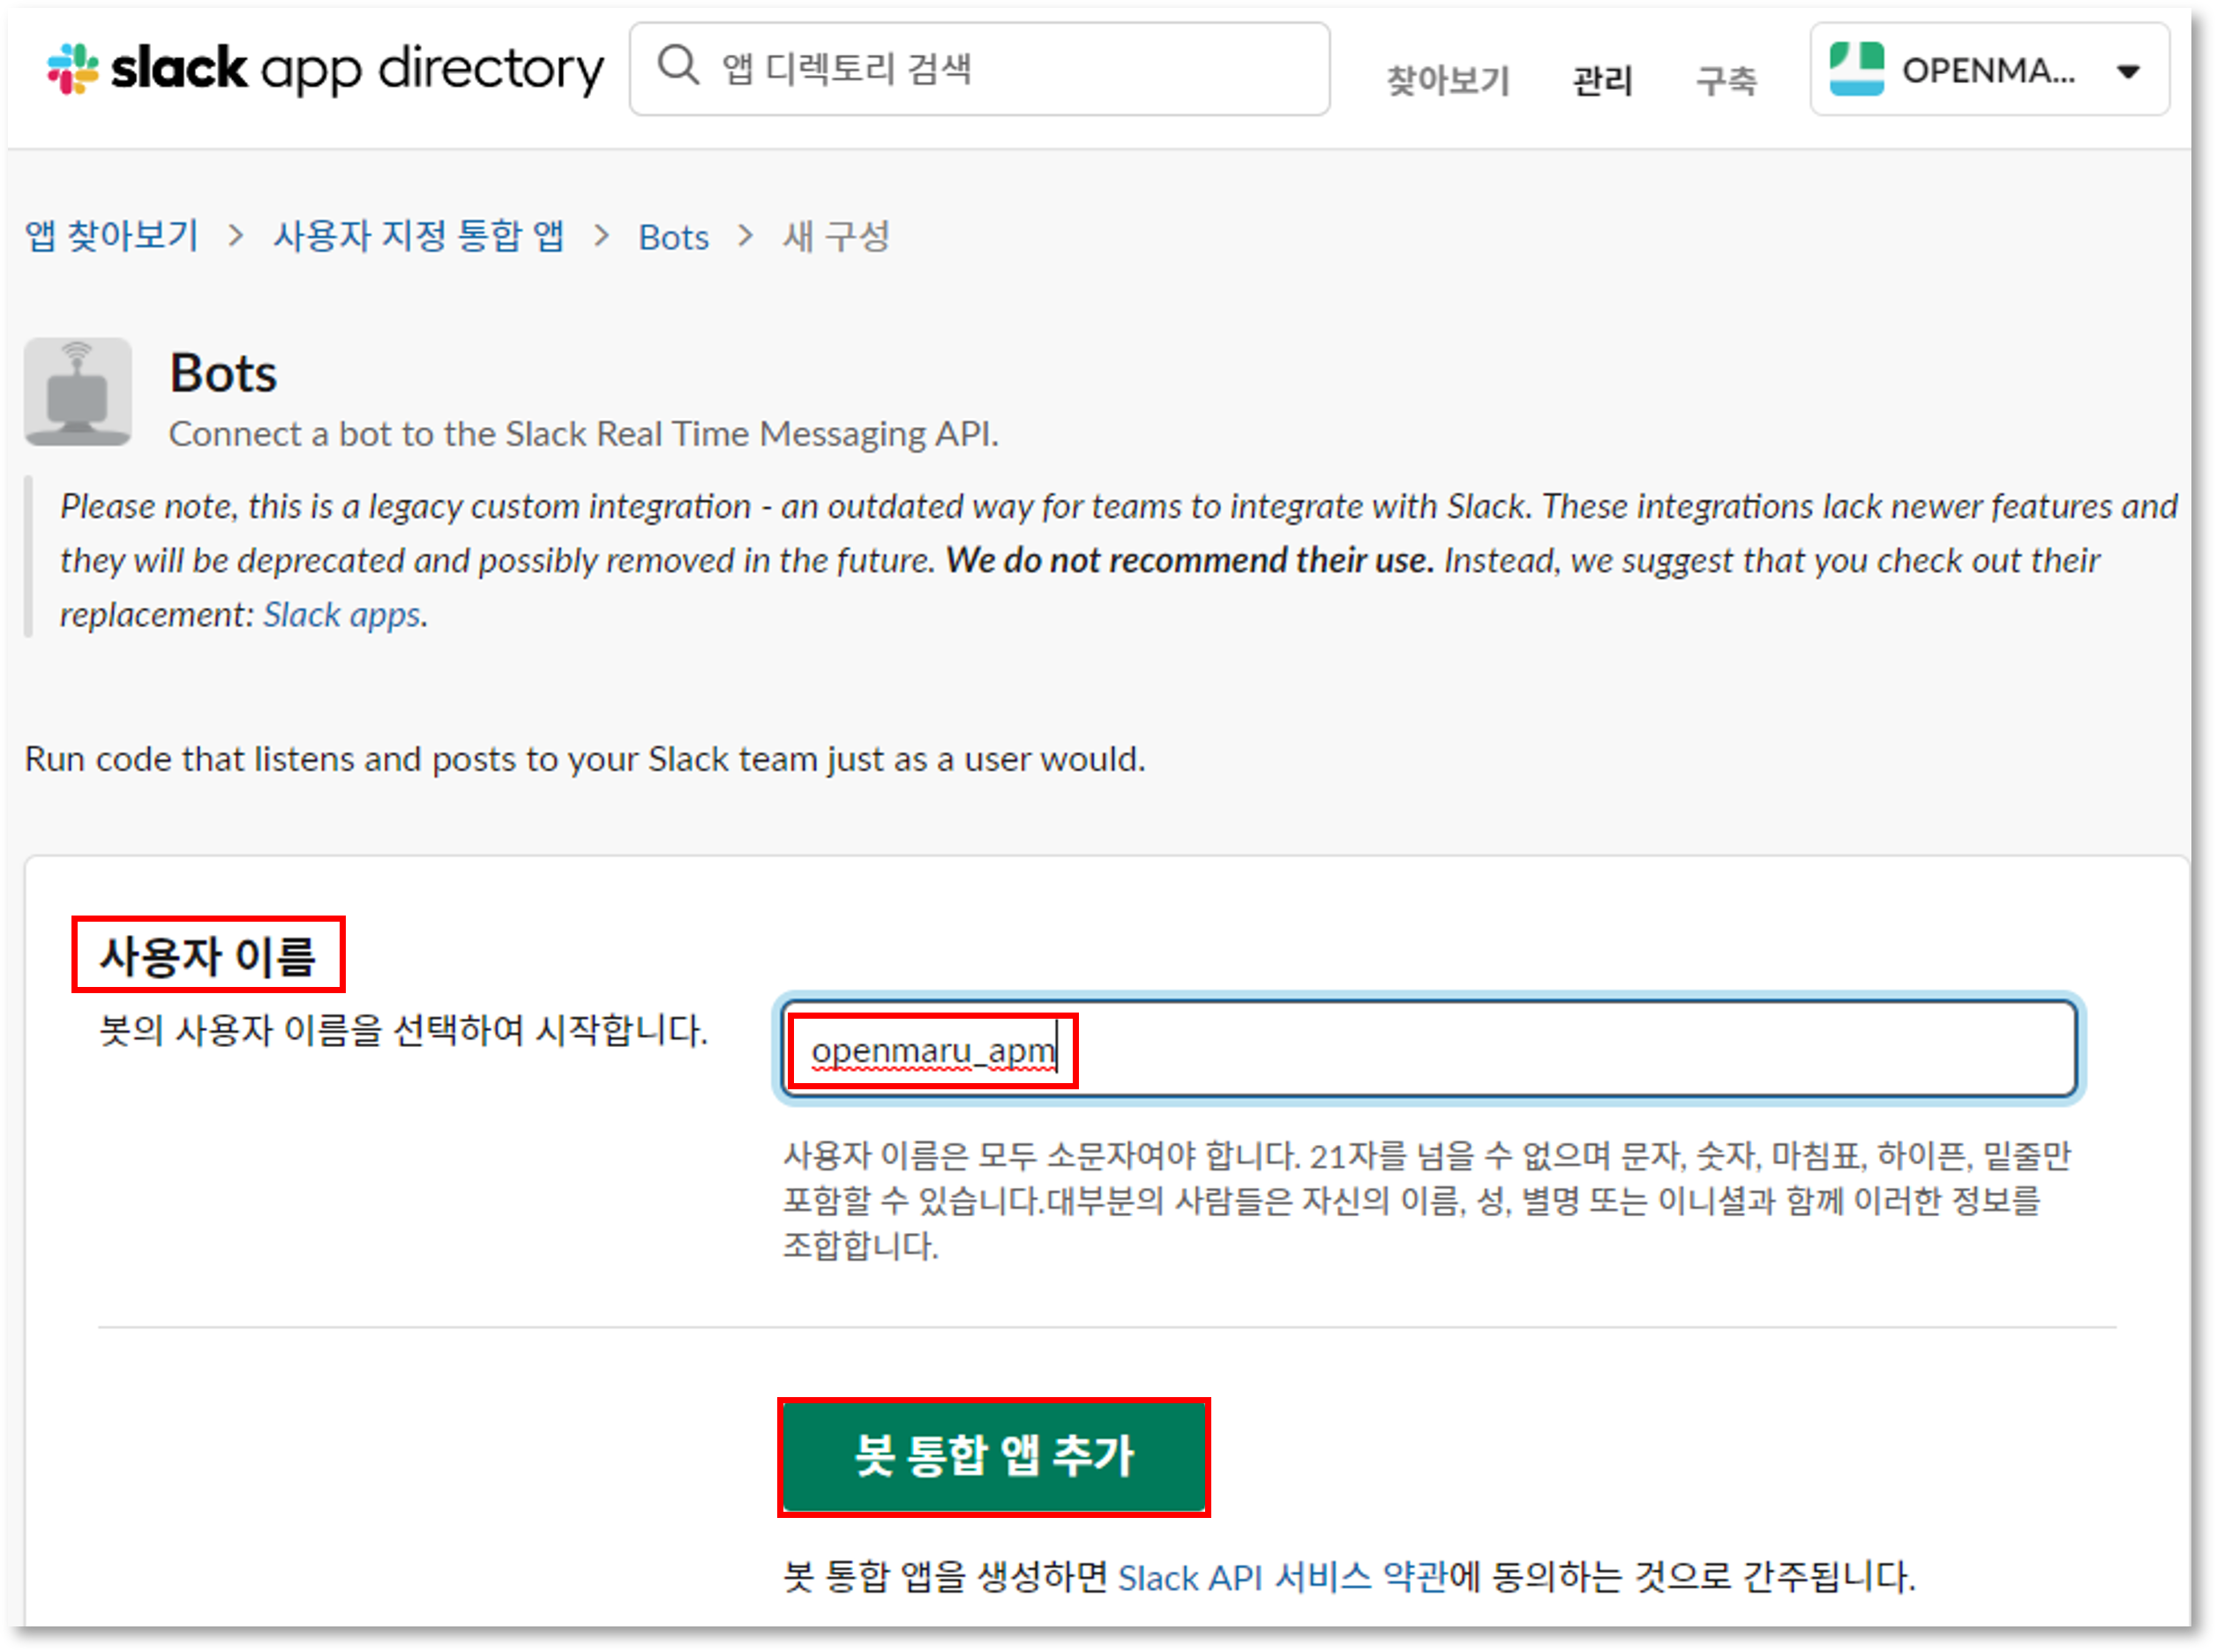
Setting the bot username
Enter a username for the bot and click the 'Add bot integration app' button.
Check Bot’s API Token
The bot’s APIToken is a key that is required to integrate with APM. Keep it in mind.
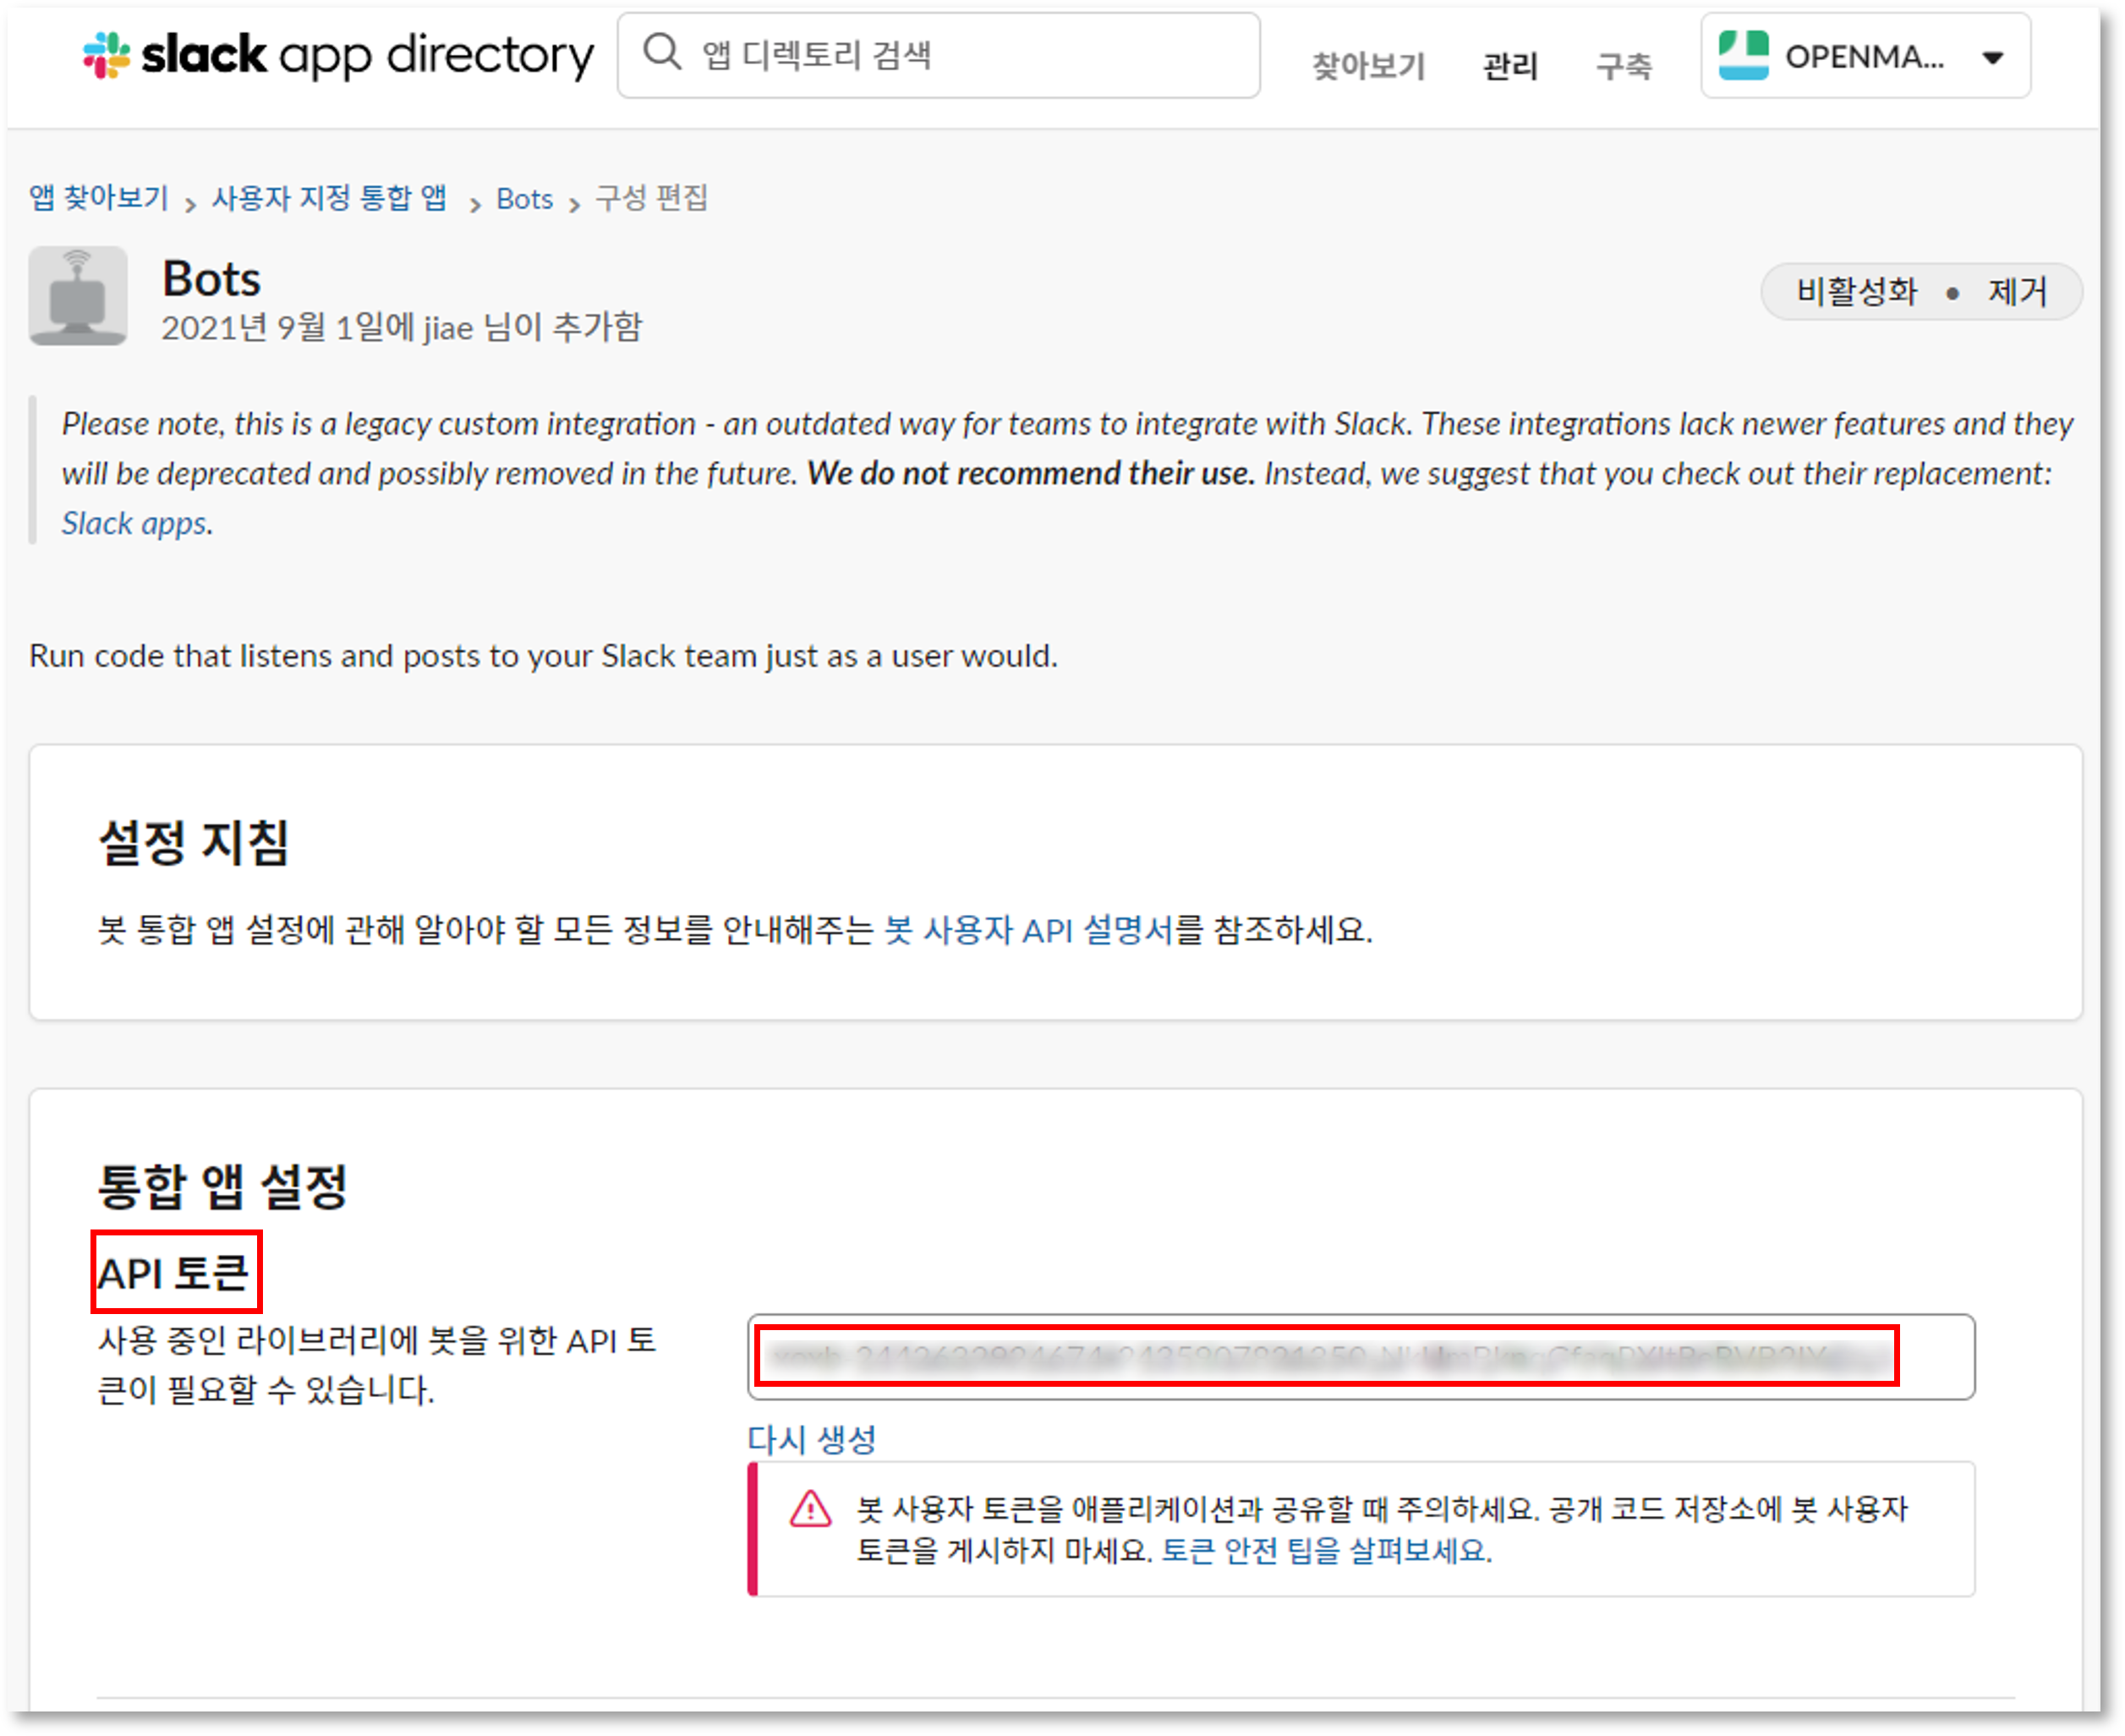
Save the Bot integration app
After confirming the API Token, click the Save Integration App button to save it.
Confirm Bot user
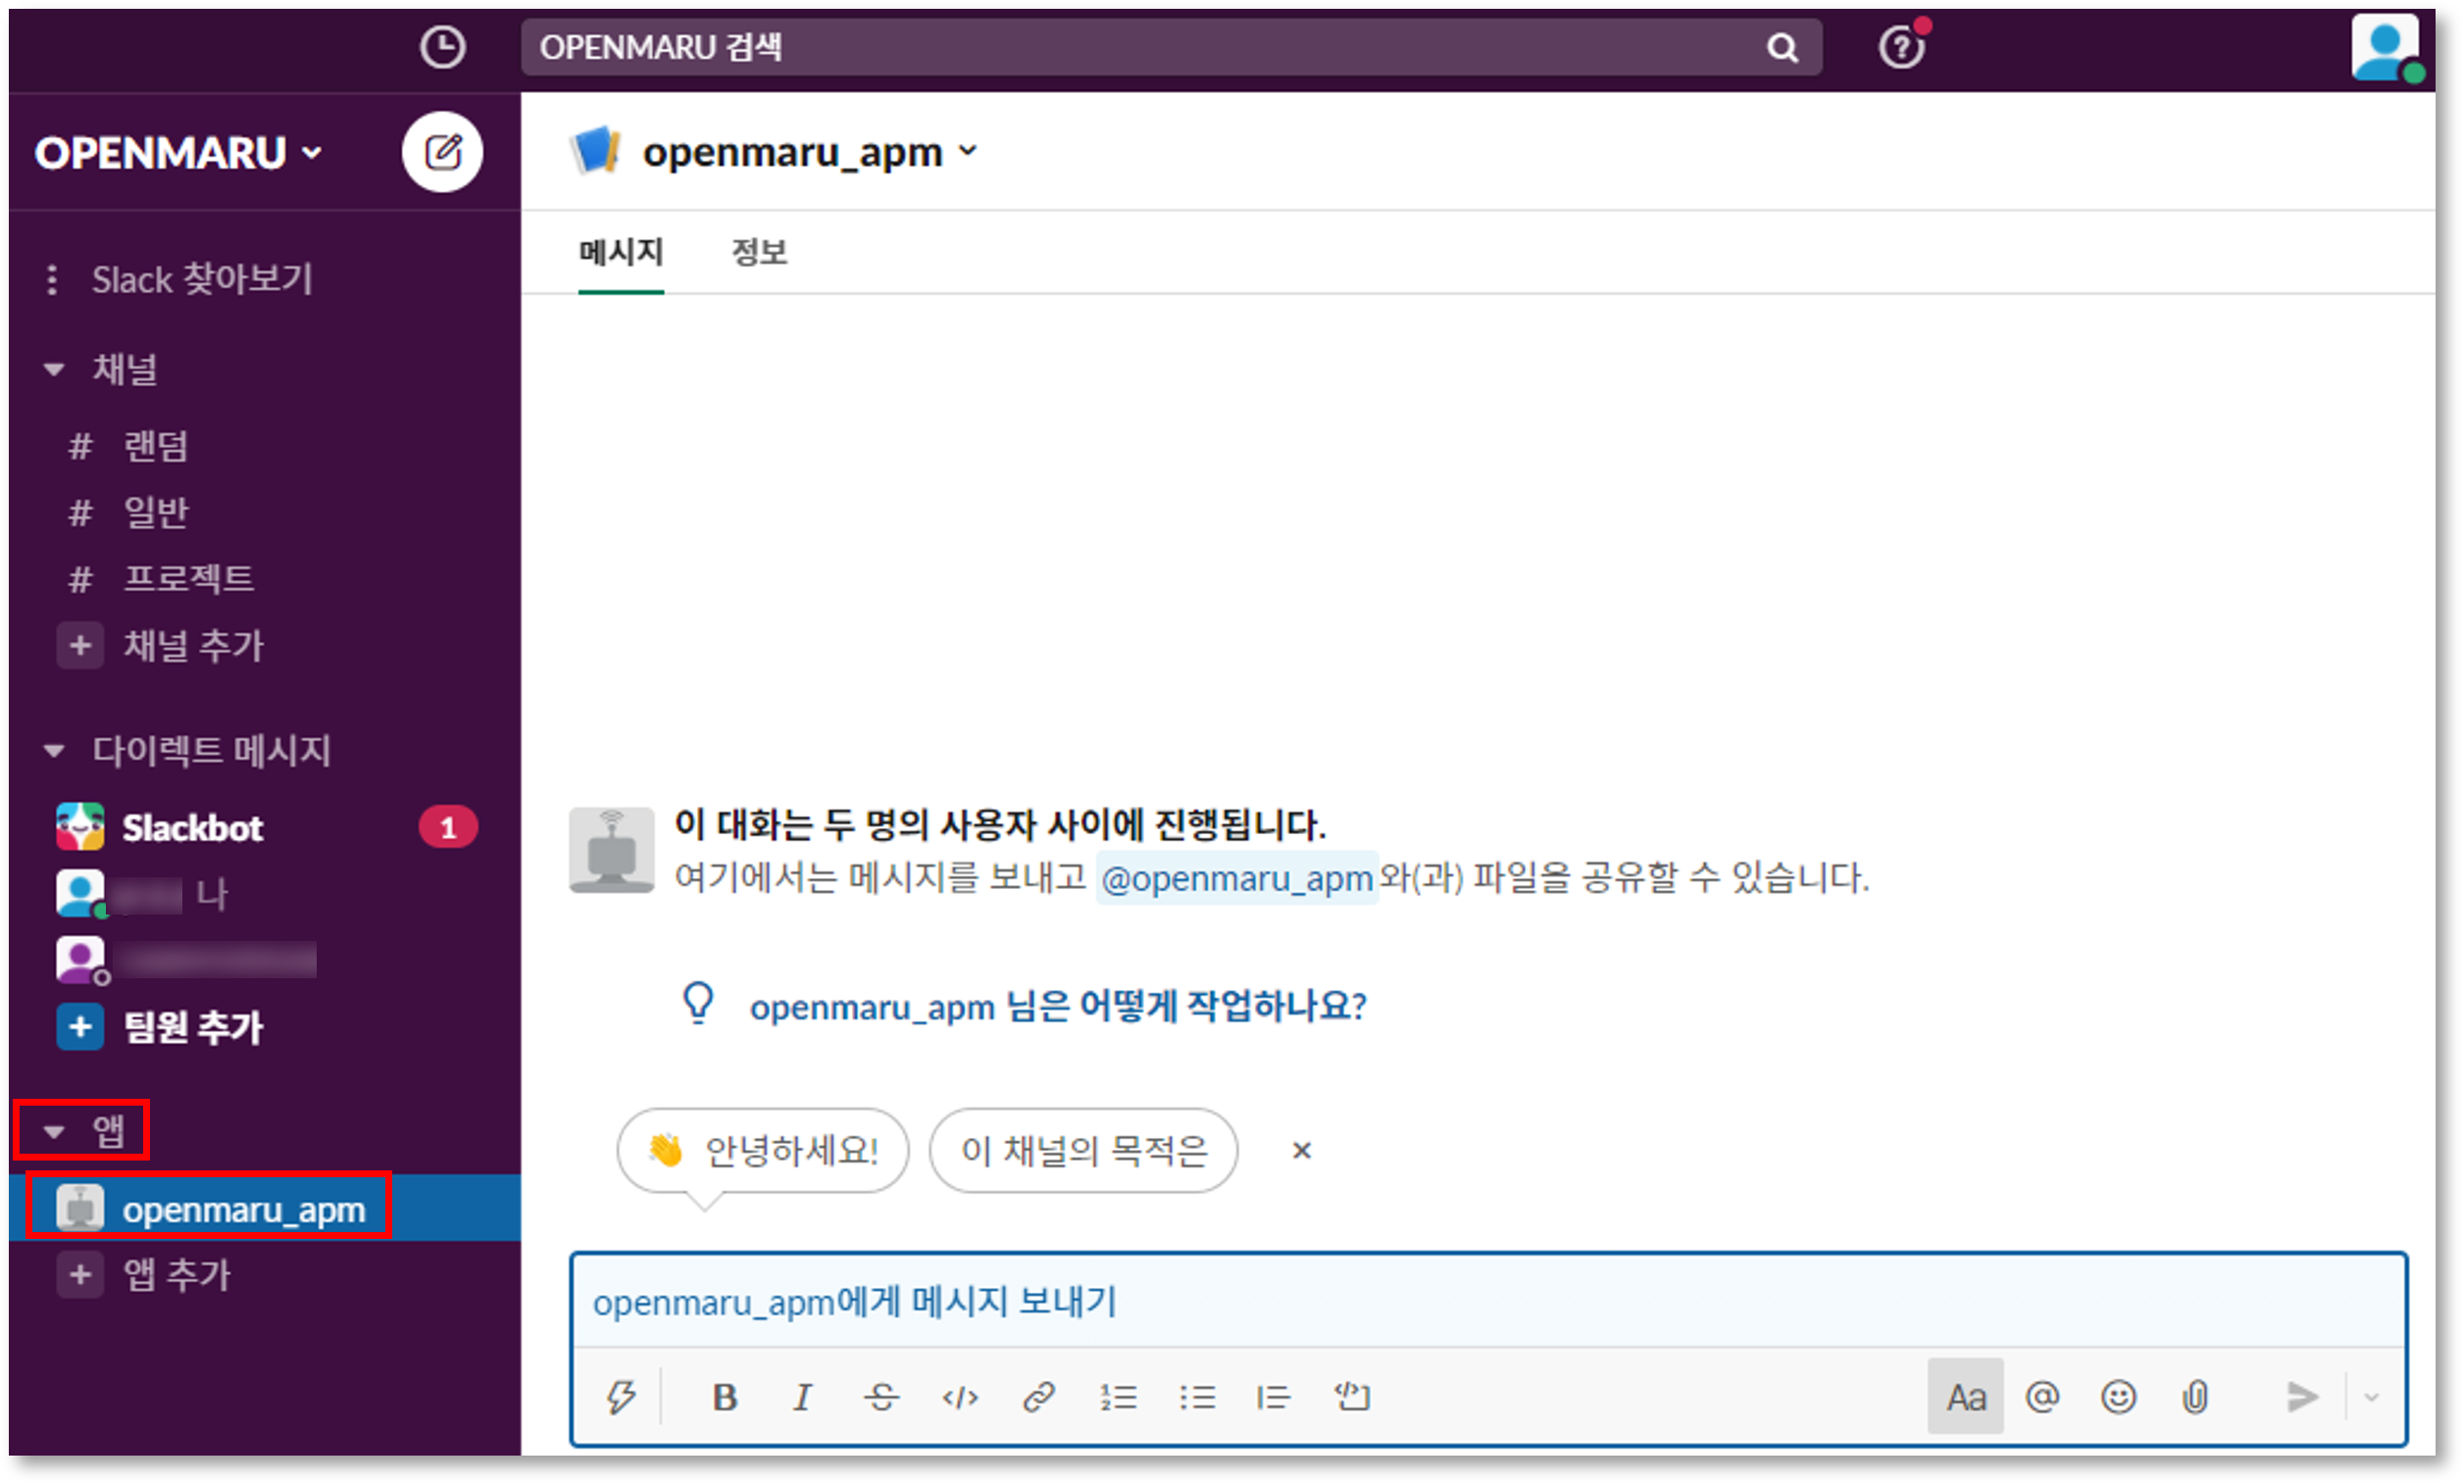
Go to Slack’s screen - Apps - Bot named 'openmaru_apm' and you can see that a bot has been created.
Create a channel to store APM events
Click the Add channel - Create new channel button.
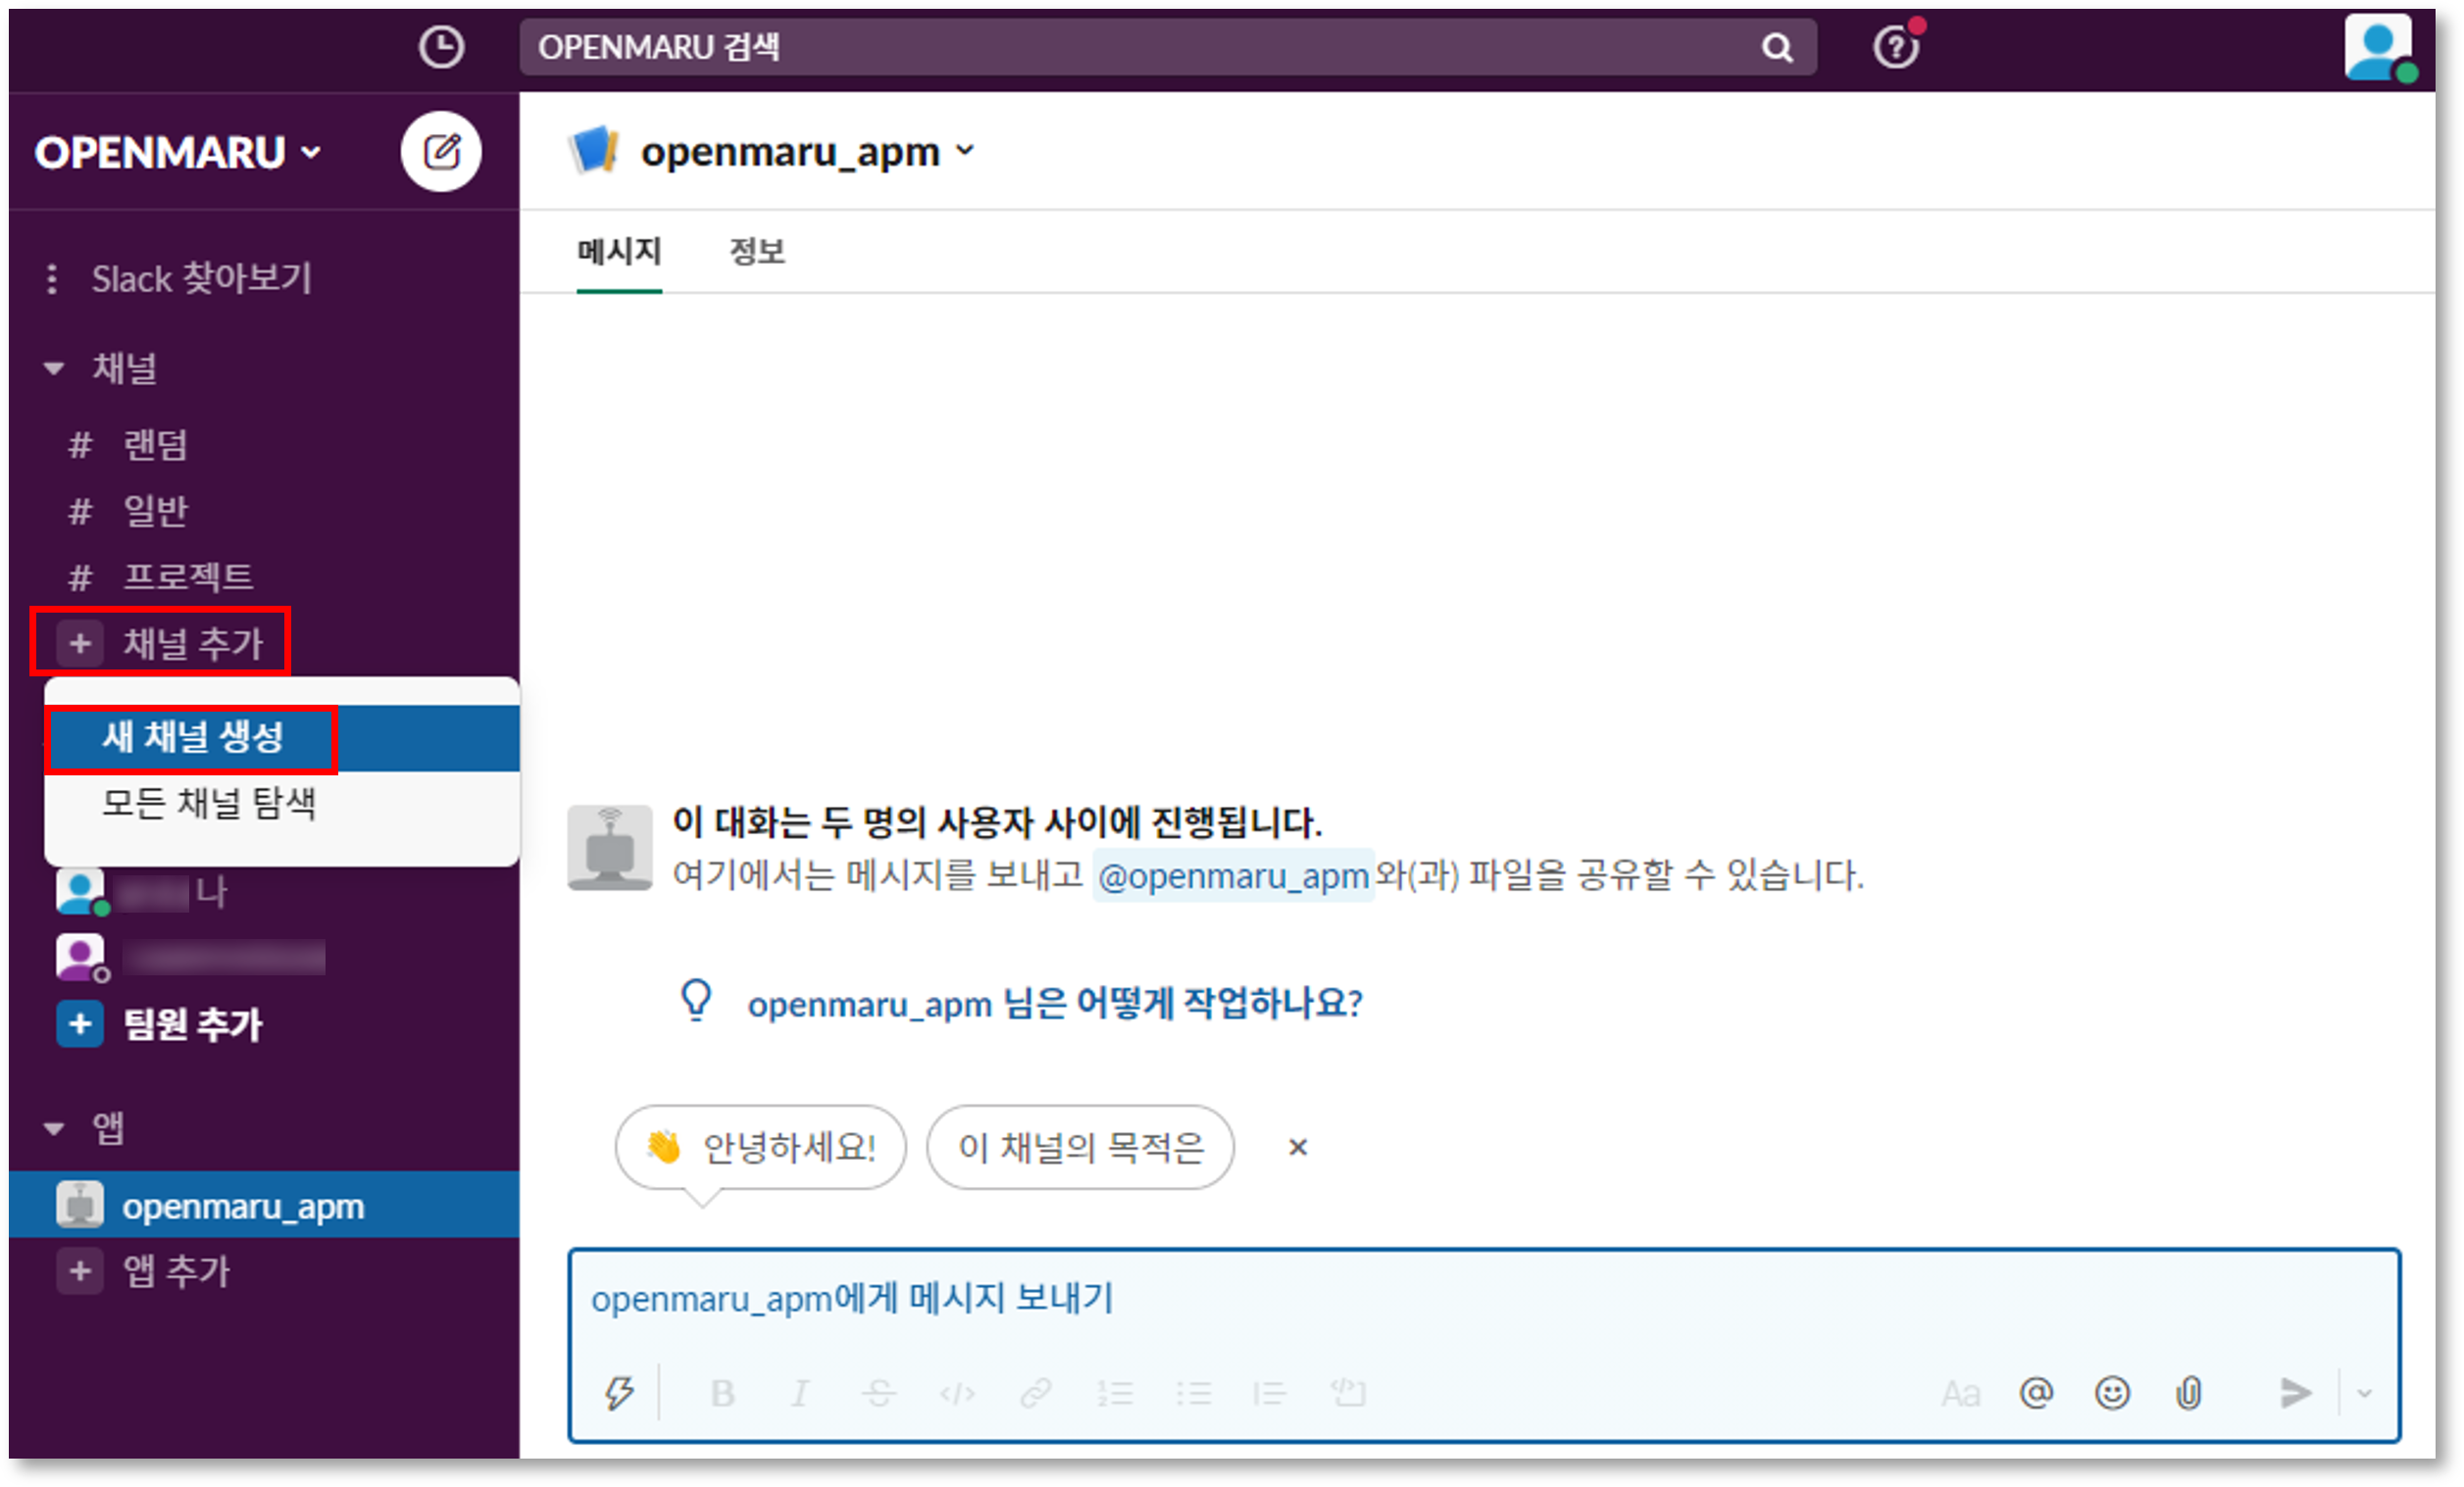
Name the channel to create it.

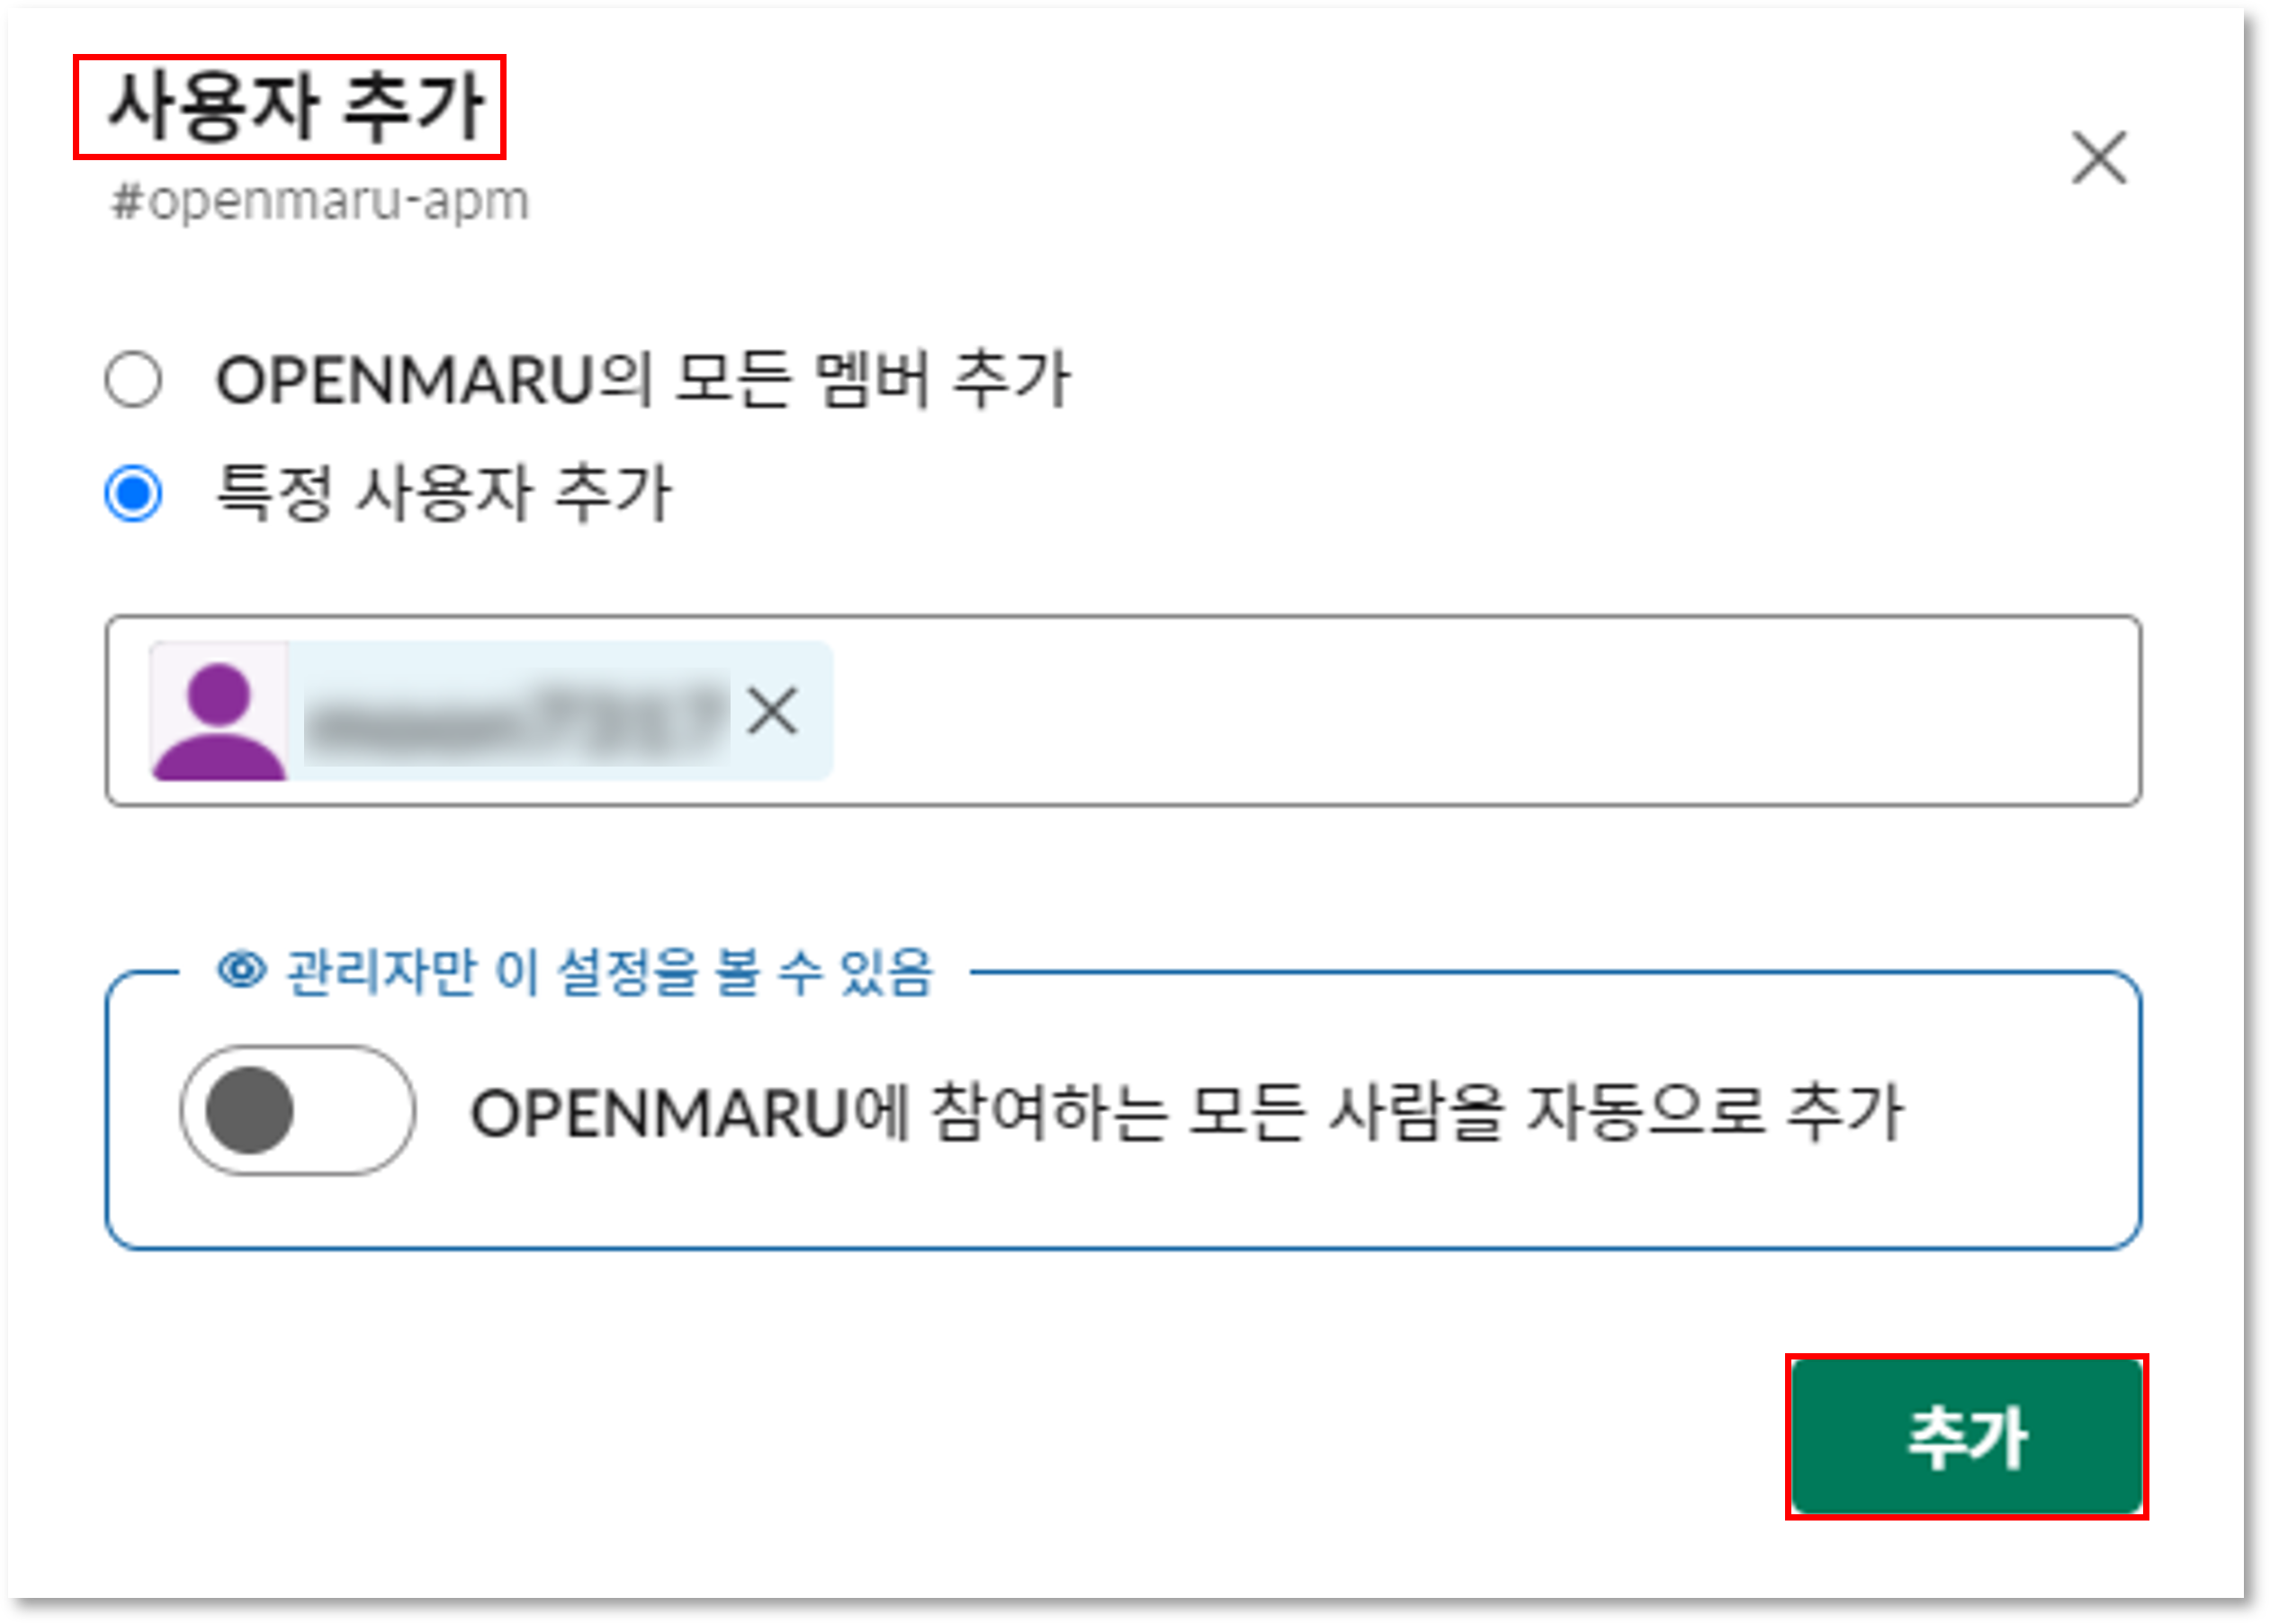
Click "Add User" to add all members of the channel or add a specific user.
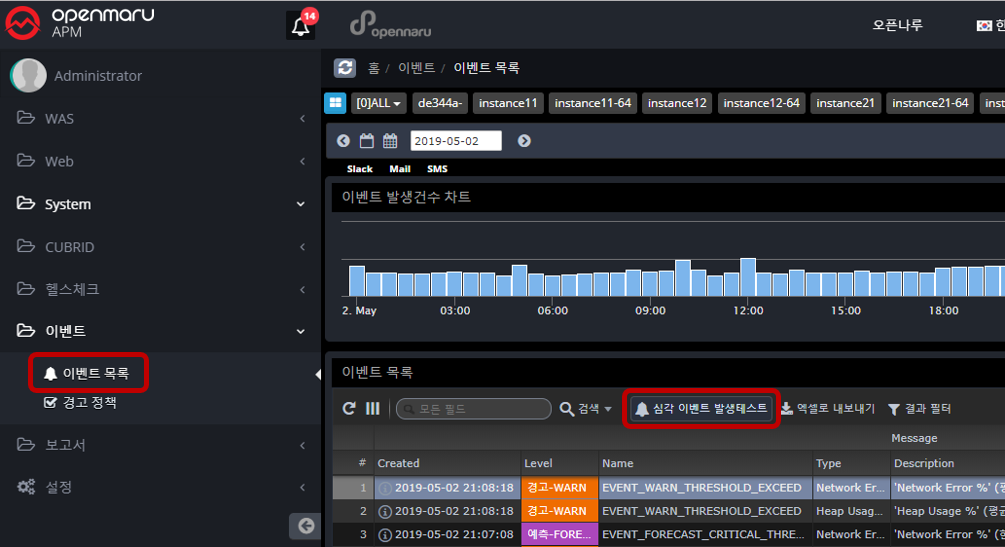
Set up APM events
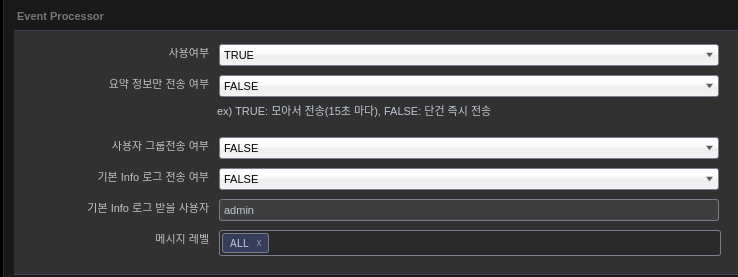
Connect to APM and click the Settings - System Settings - Events menu.
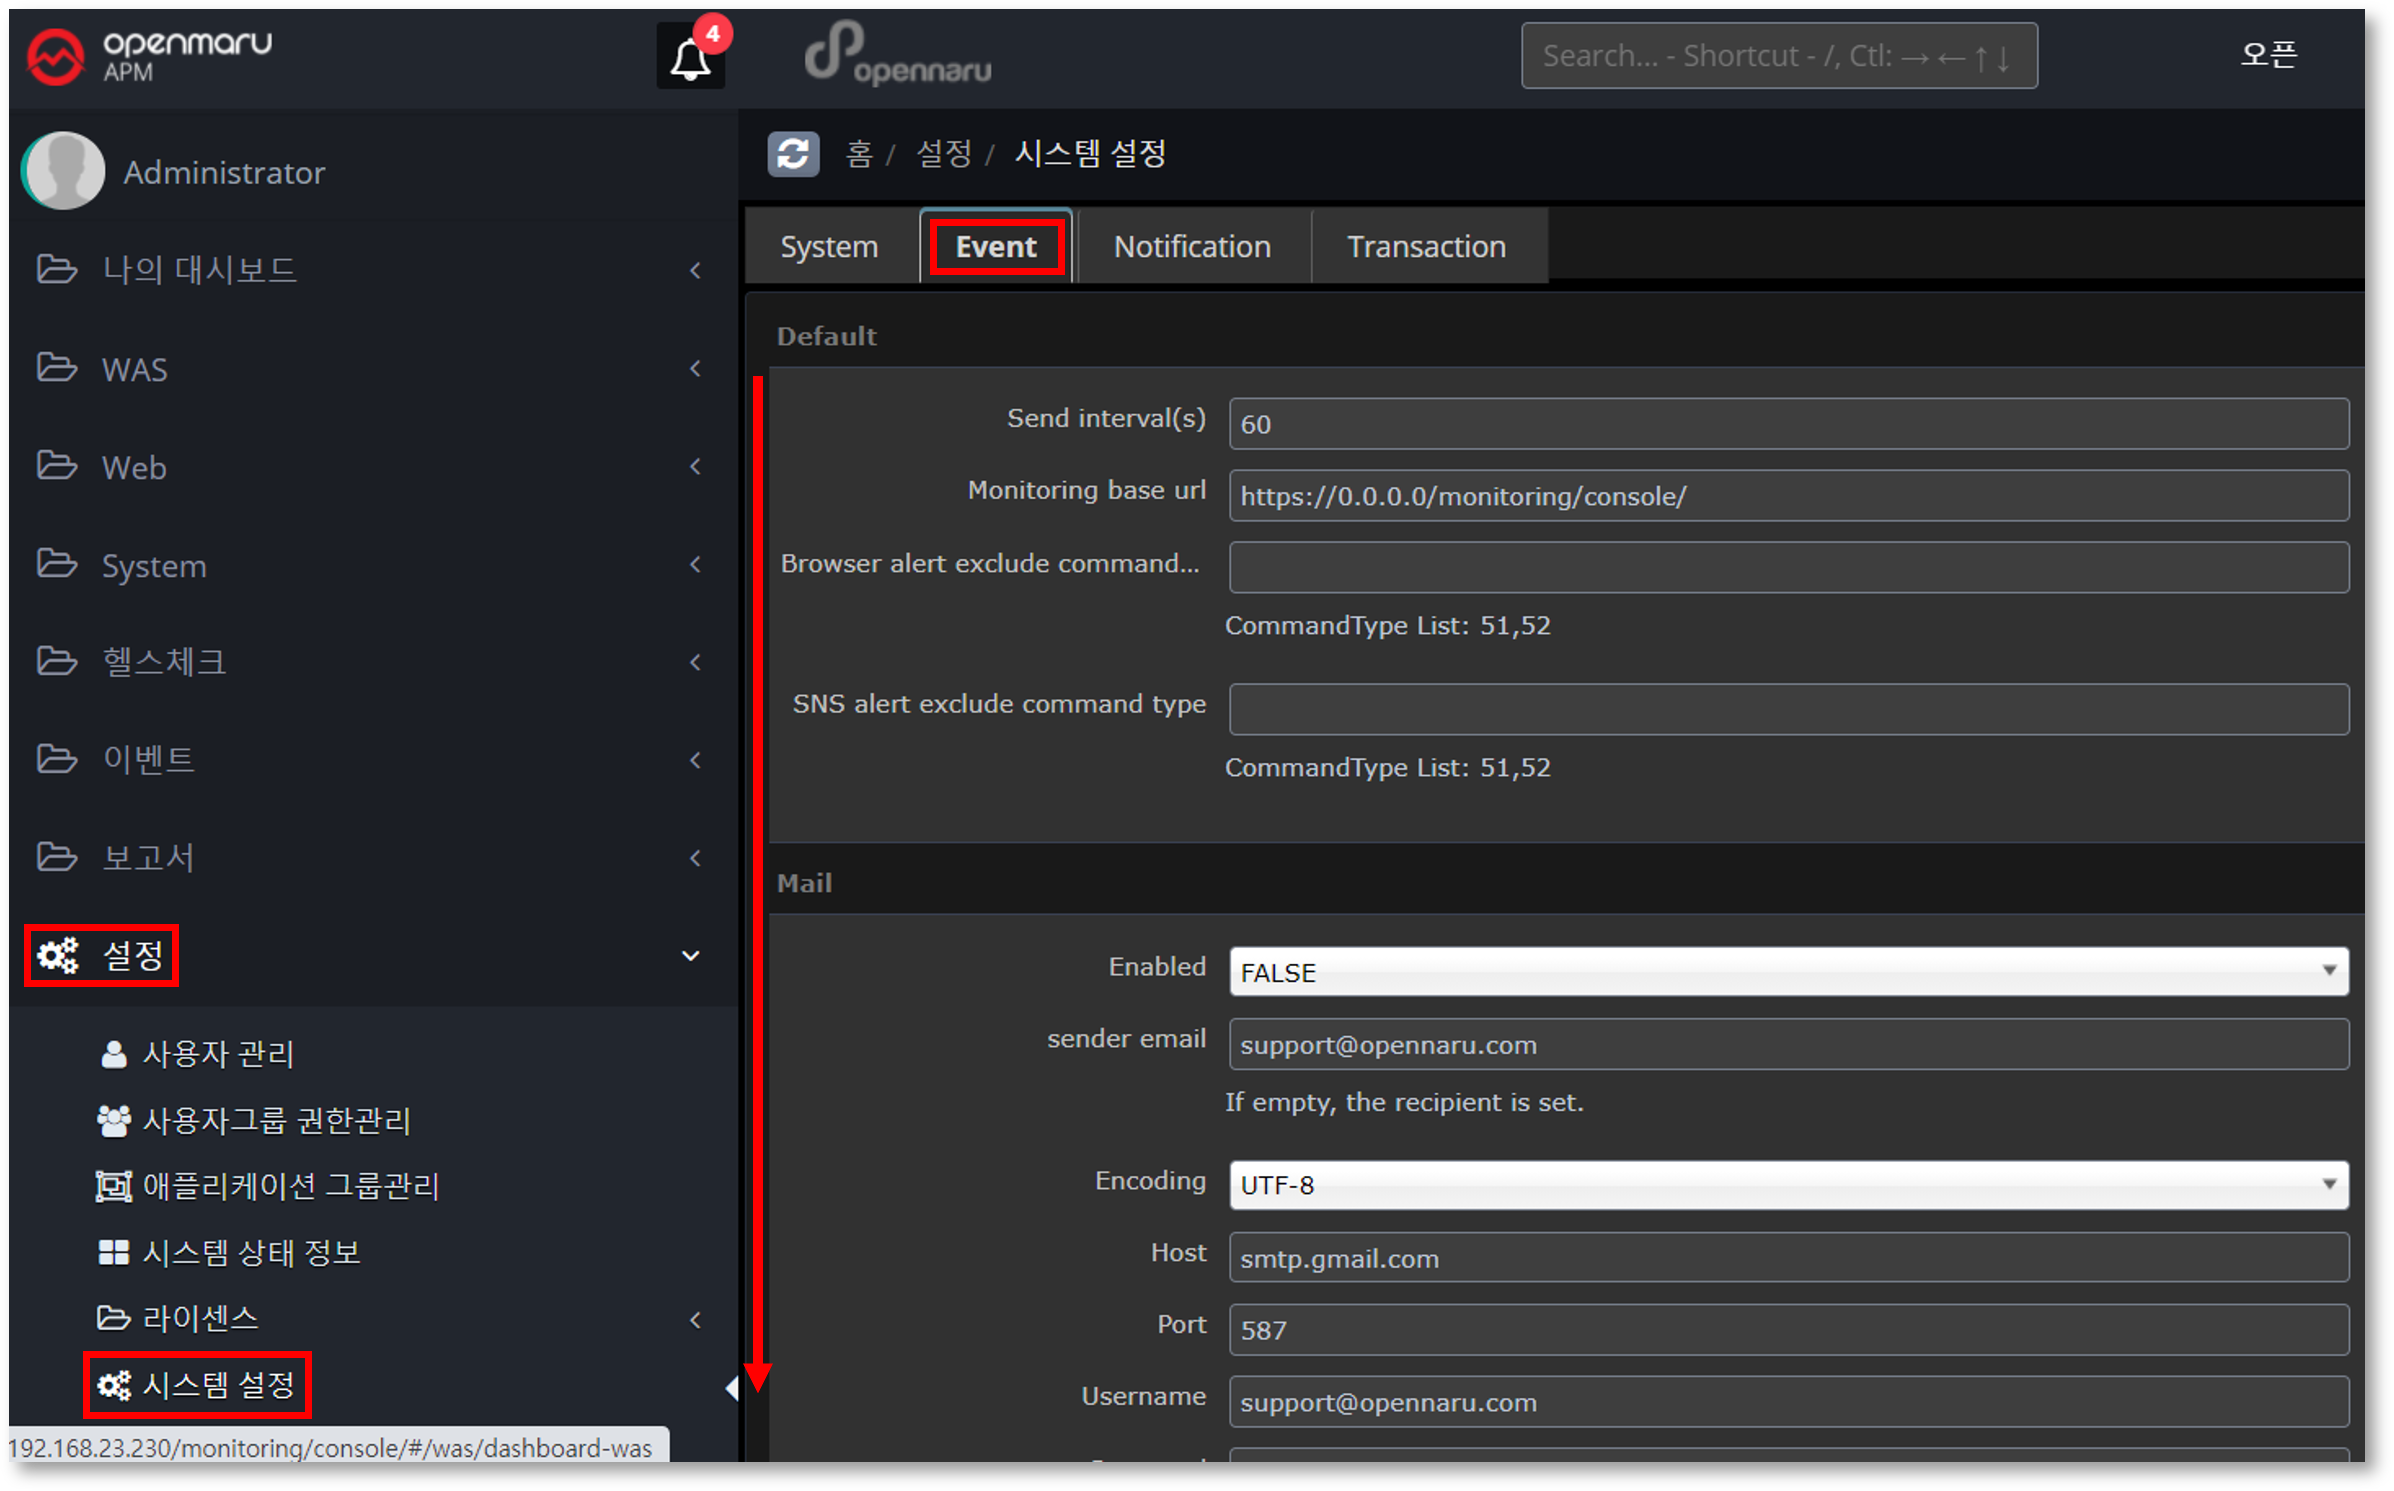
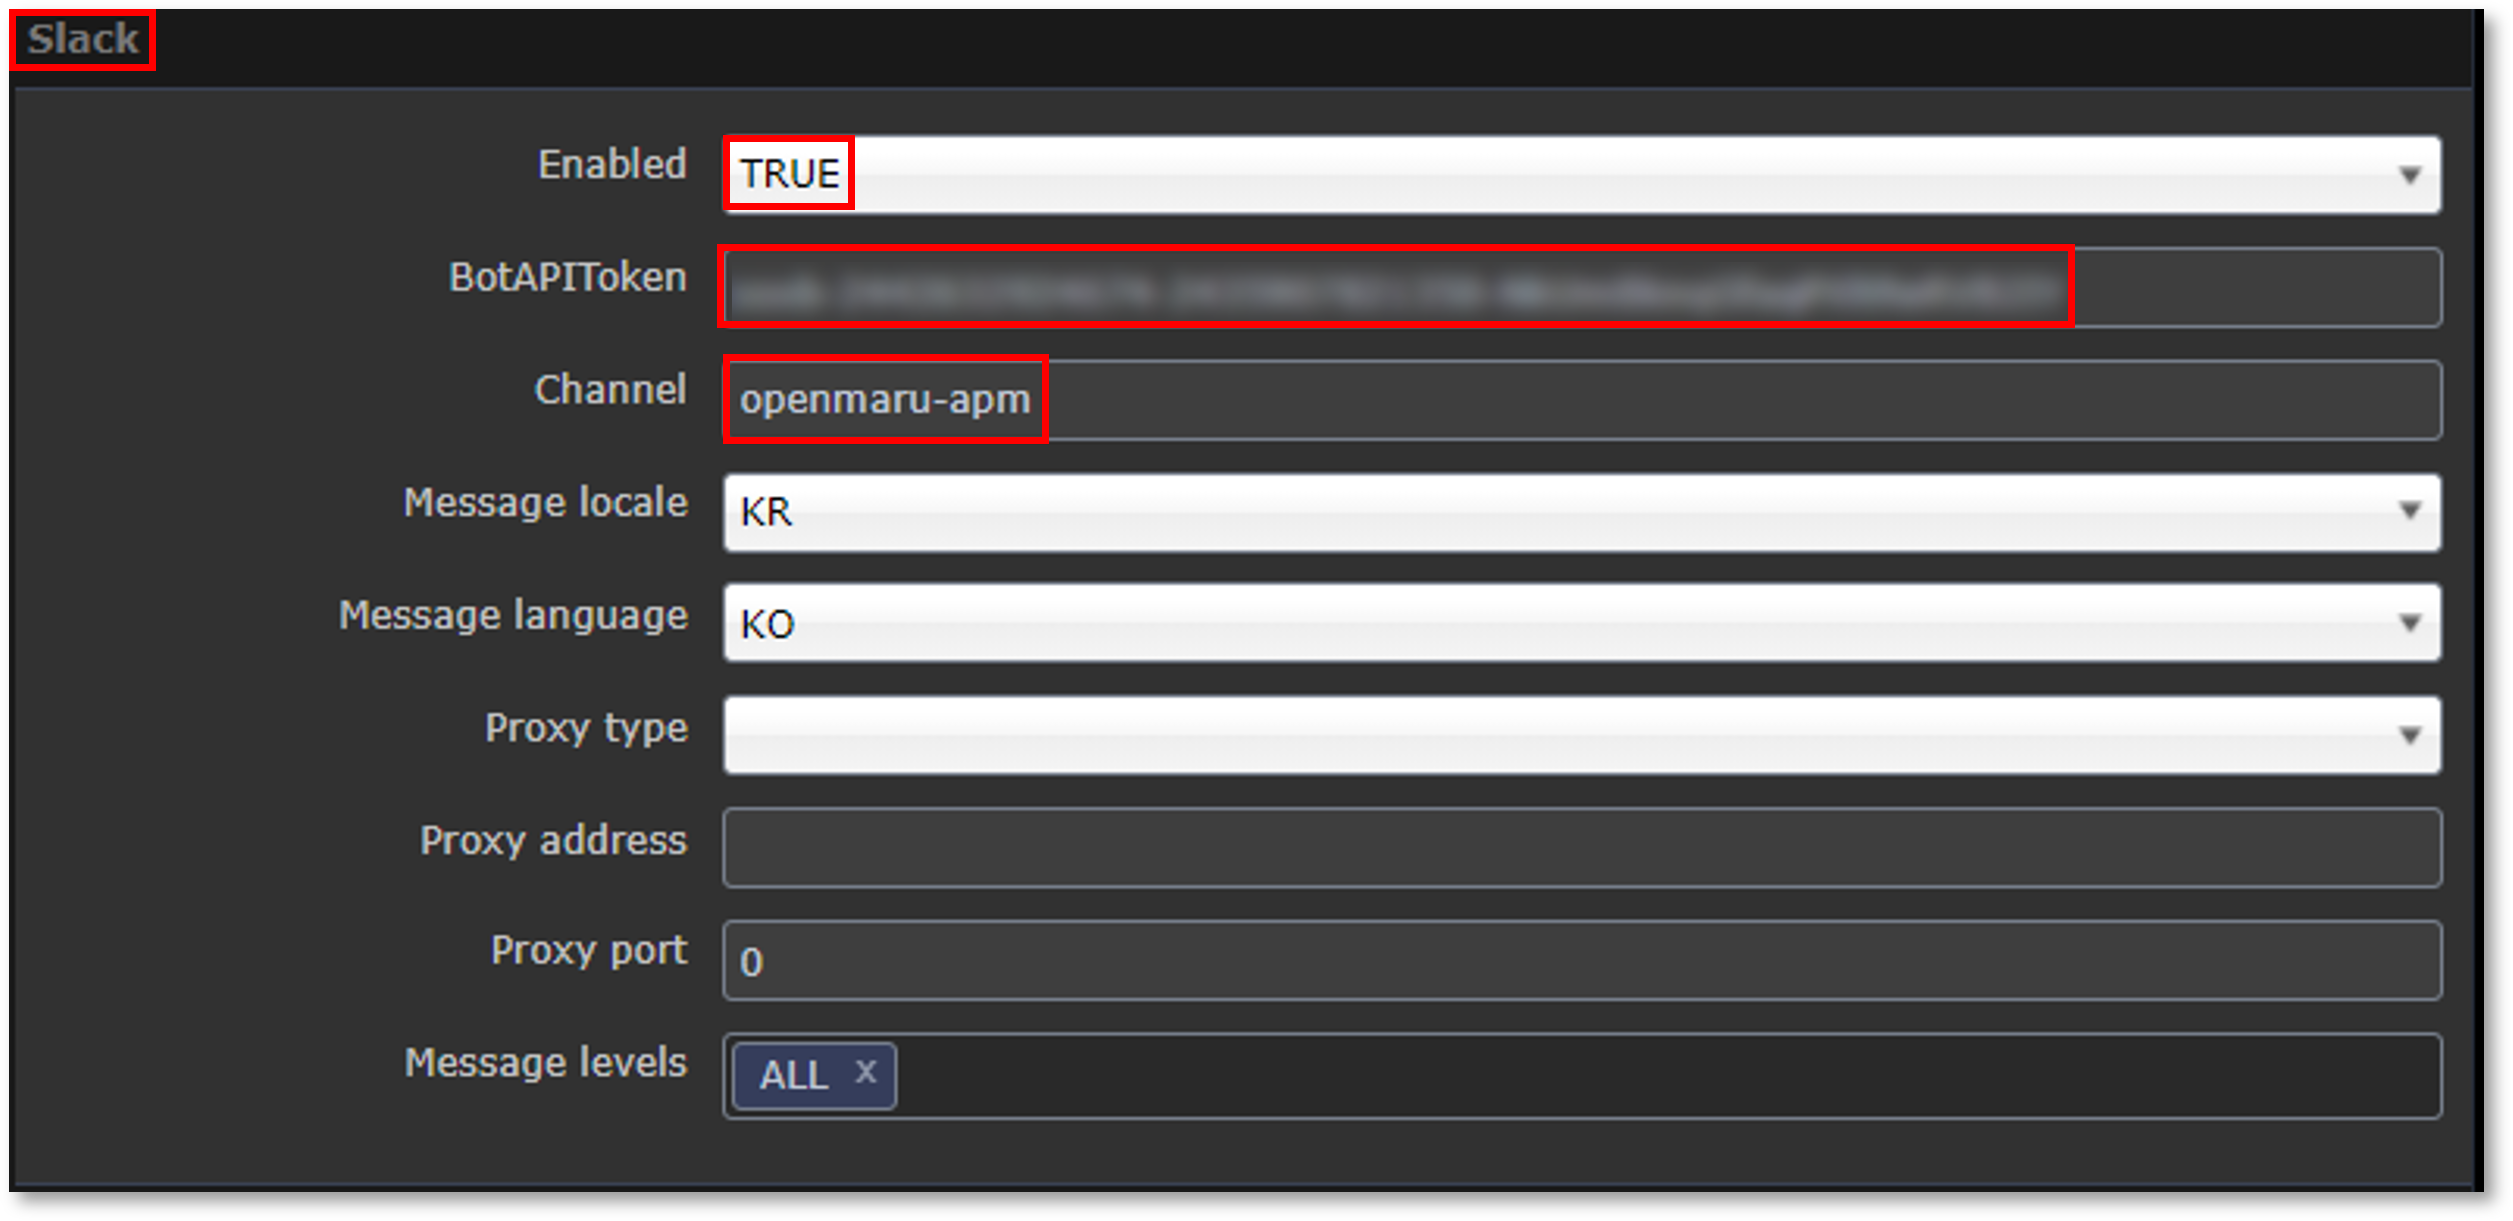
In the Slack section, change the value to the one shown.
| Item | Description |
|---|---|
Enabled |
Sets whether to use the slack integration. Set to "TRUE" if you want to receive event notifications. |
BotAPIToken |
Enter the Bot’s APIToken value. |
Channel |
Enter the channel name to receive events from the APM created earlier. |
Message locale / Message language |
If set to kr, ko, it sends Korean messages, and if set to us, en, it sends English messages. |
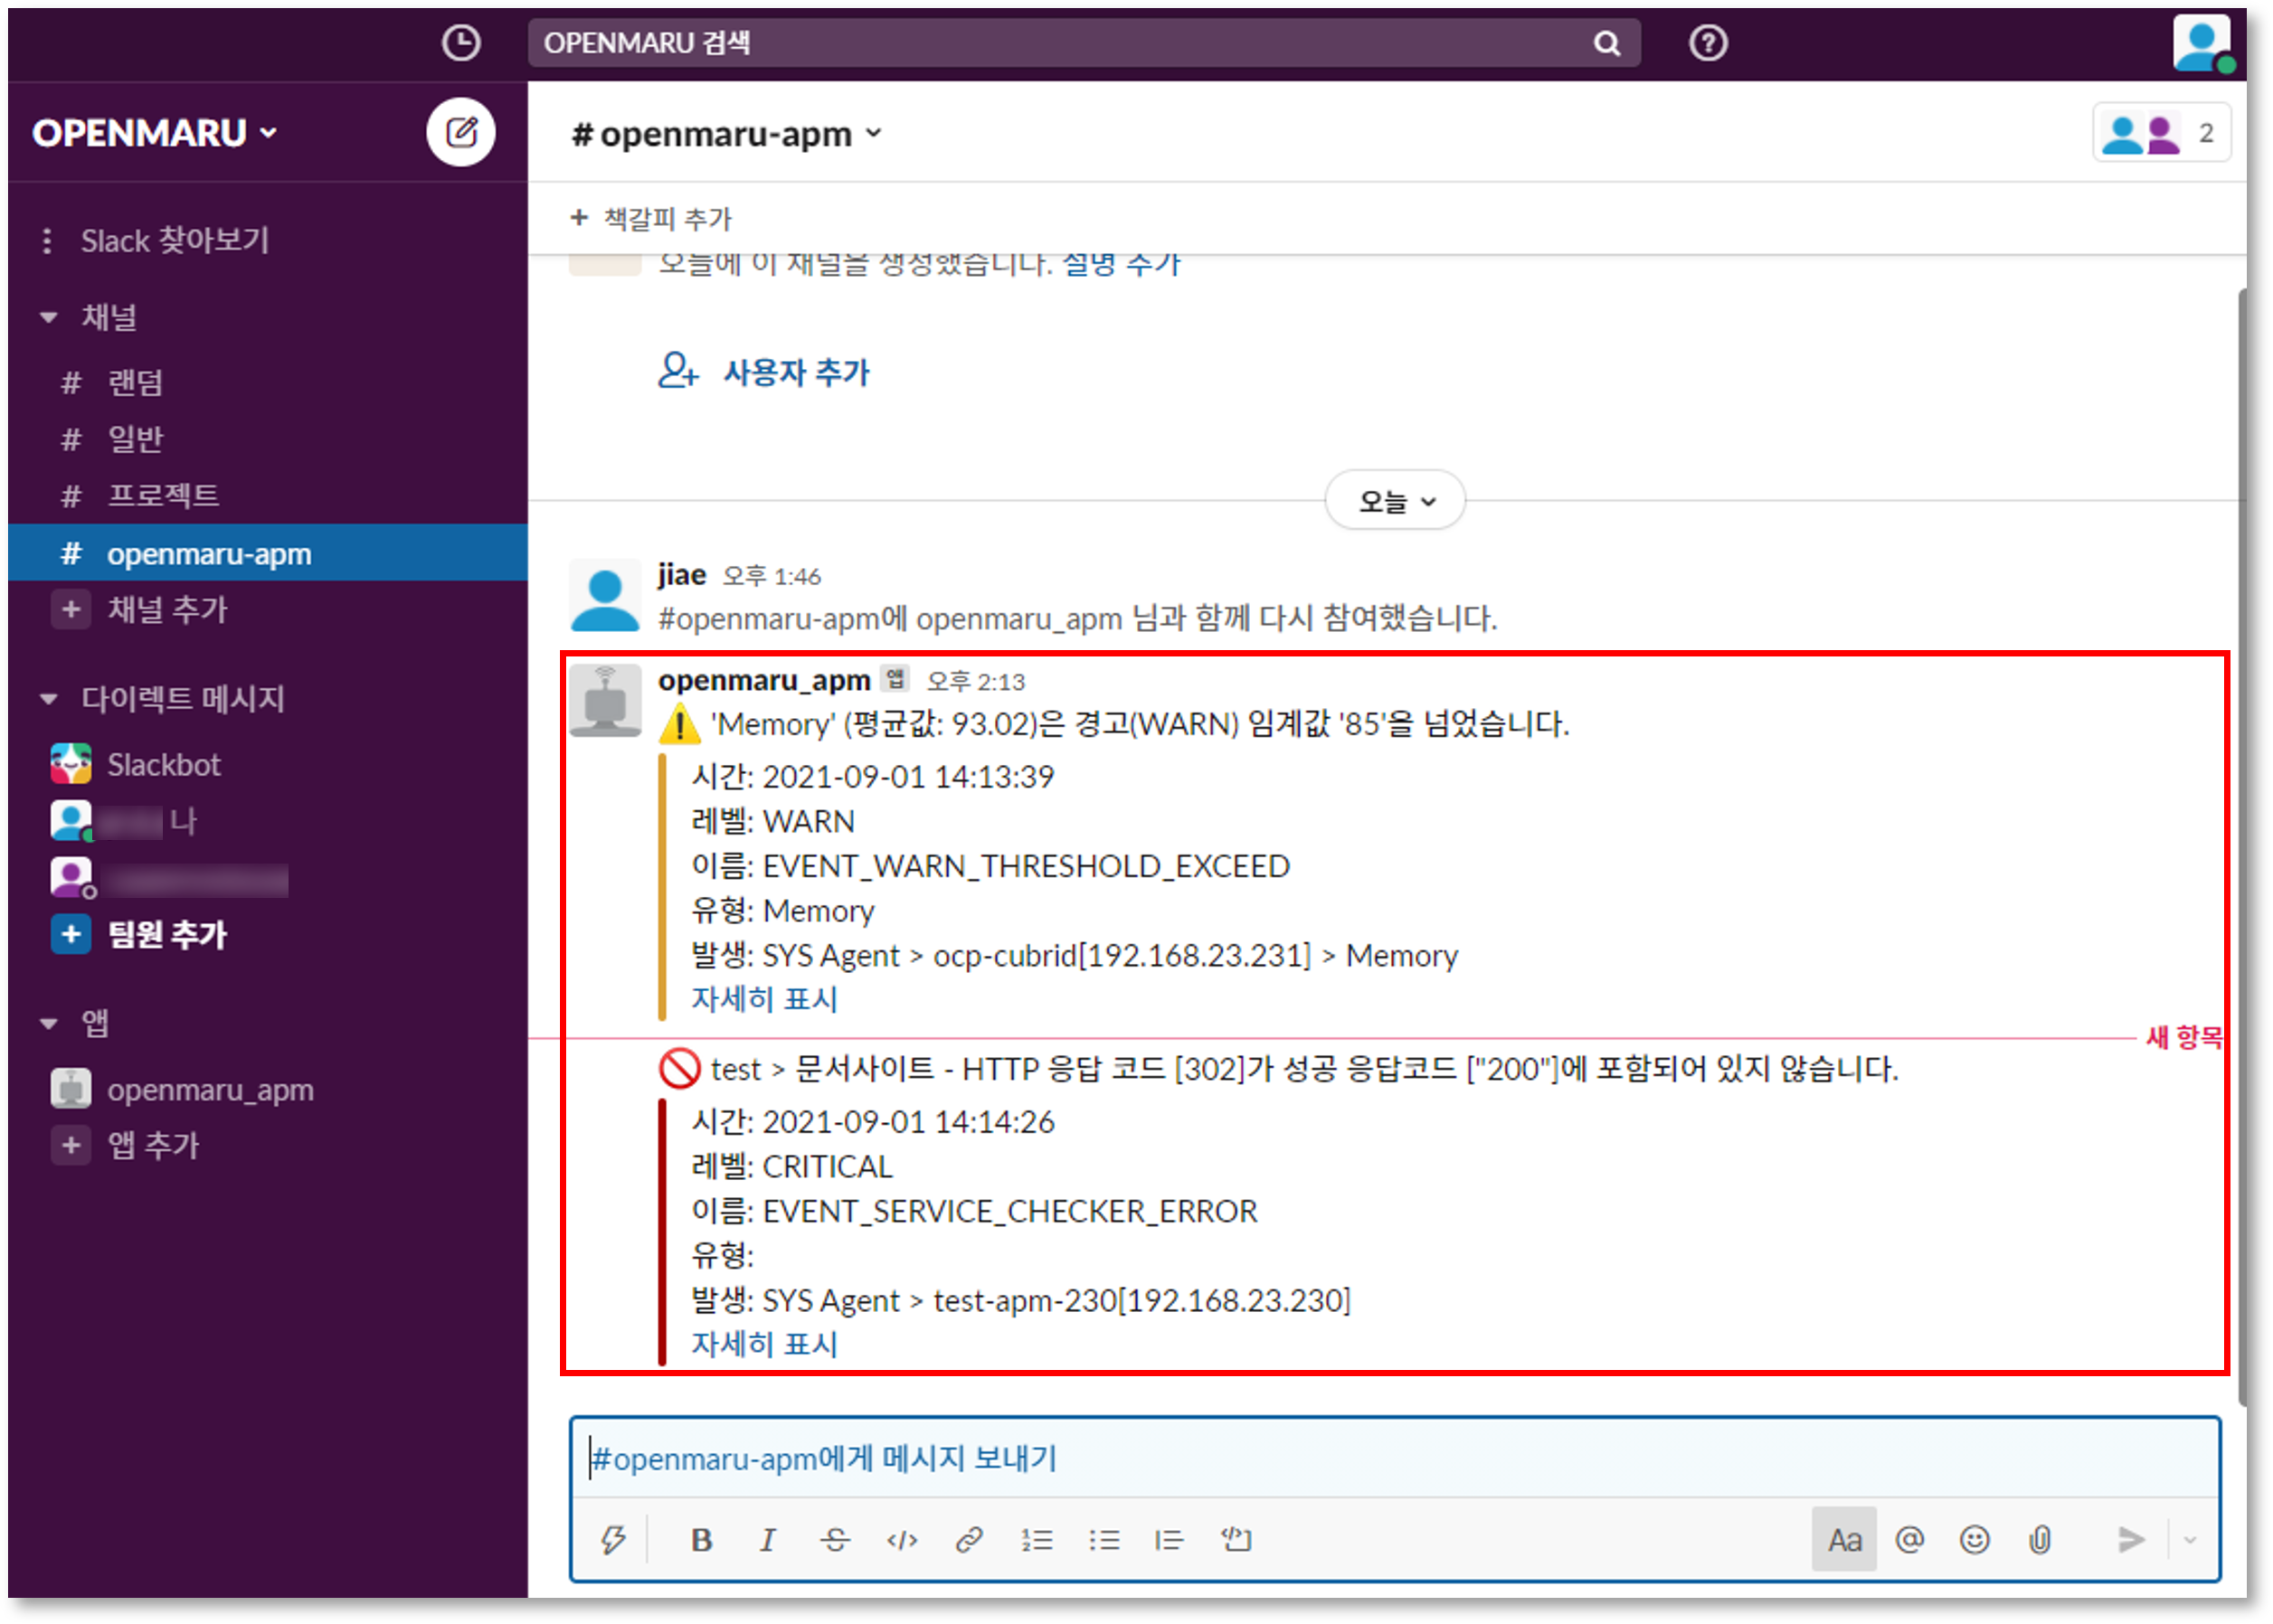
Confirm sending events to the channel in Slack
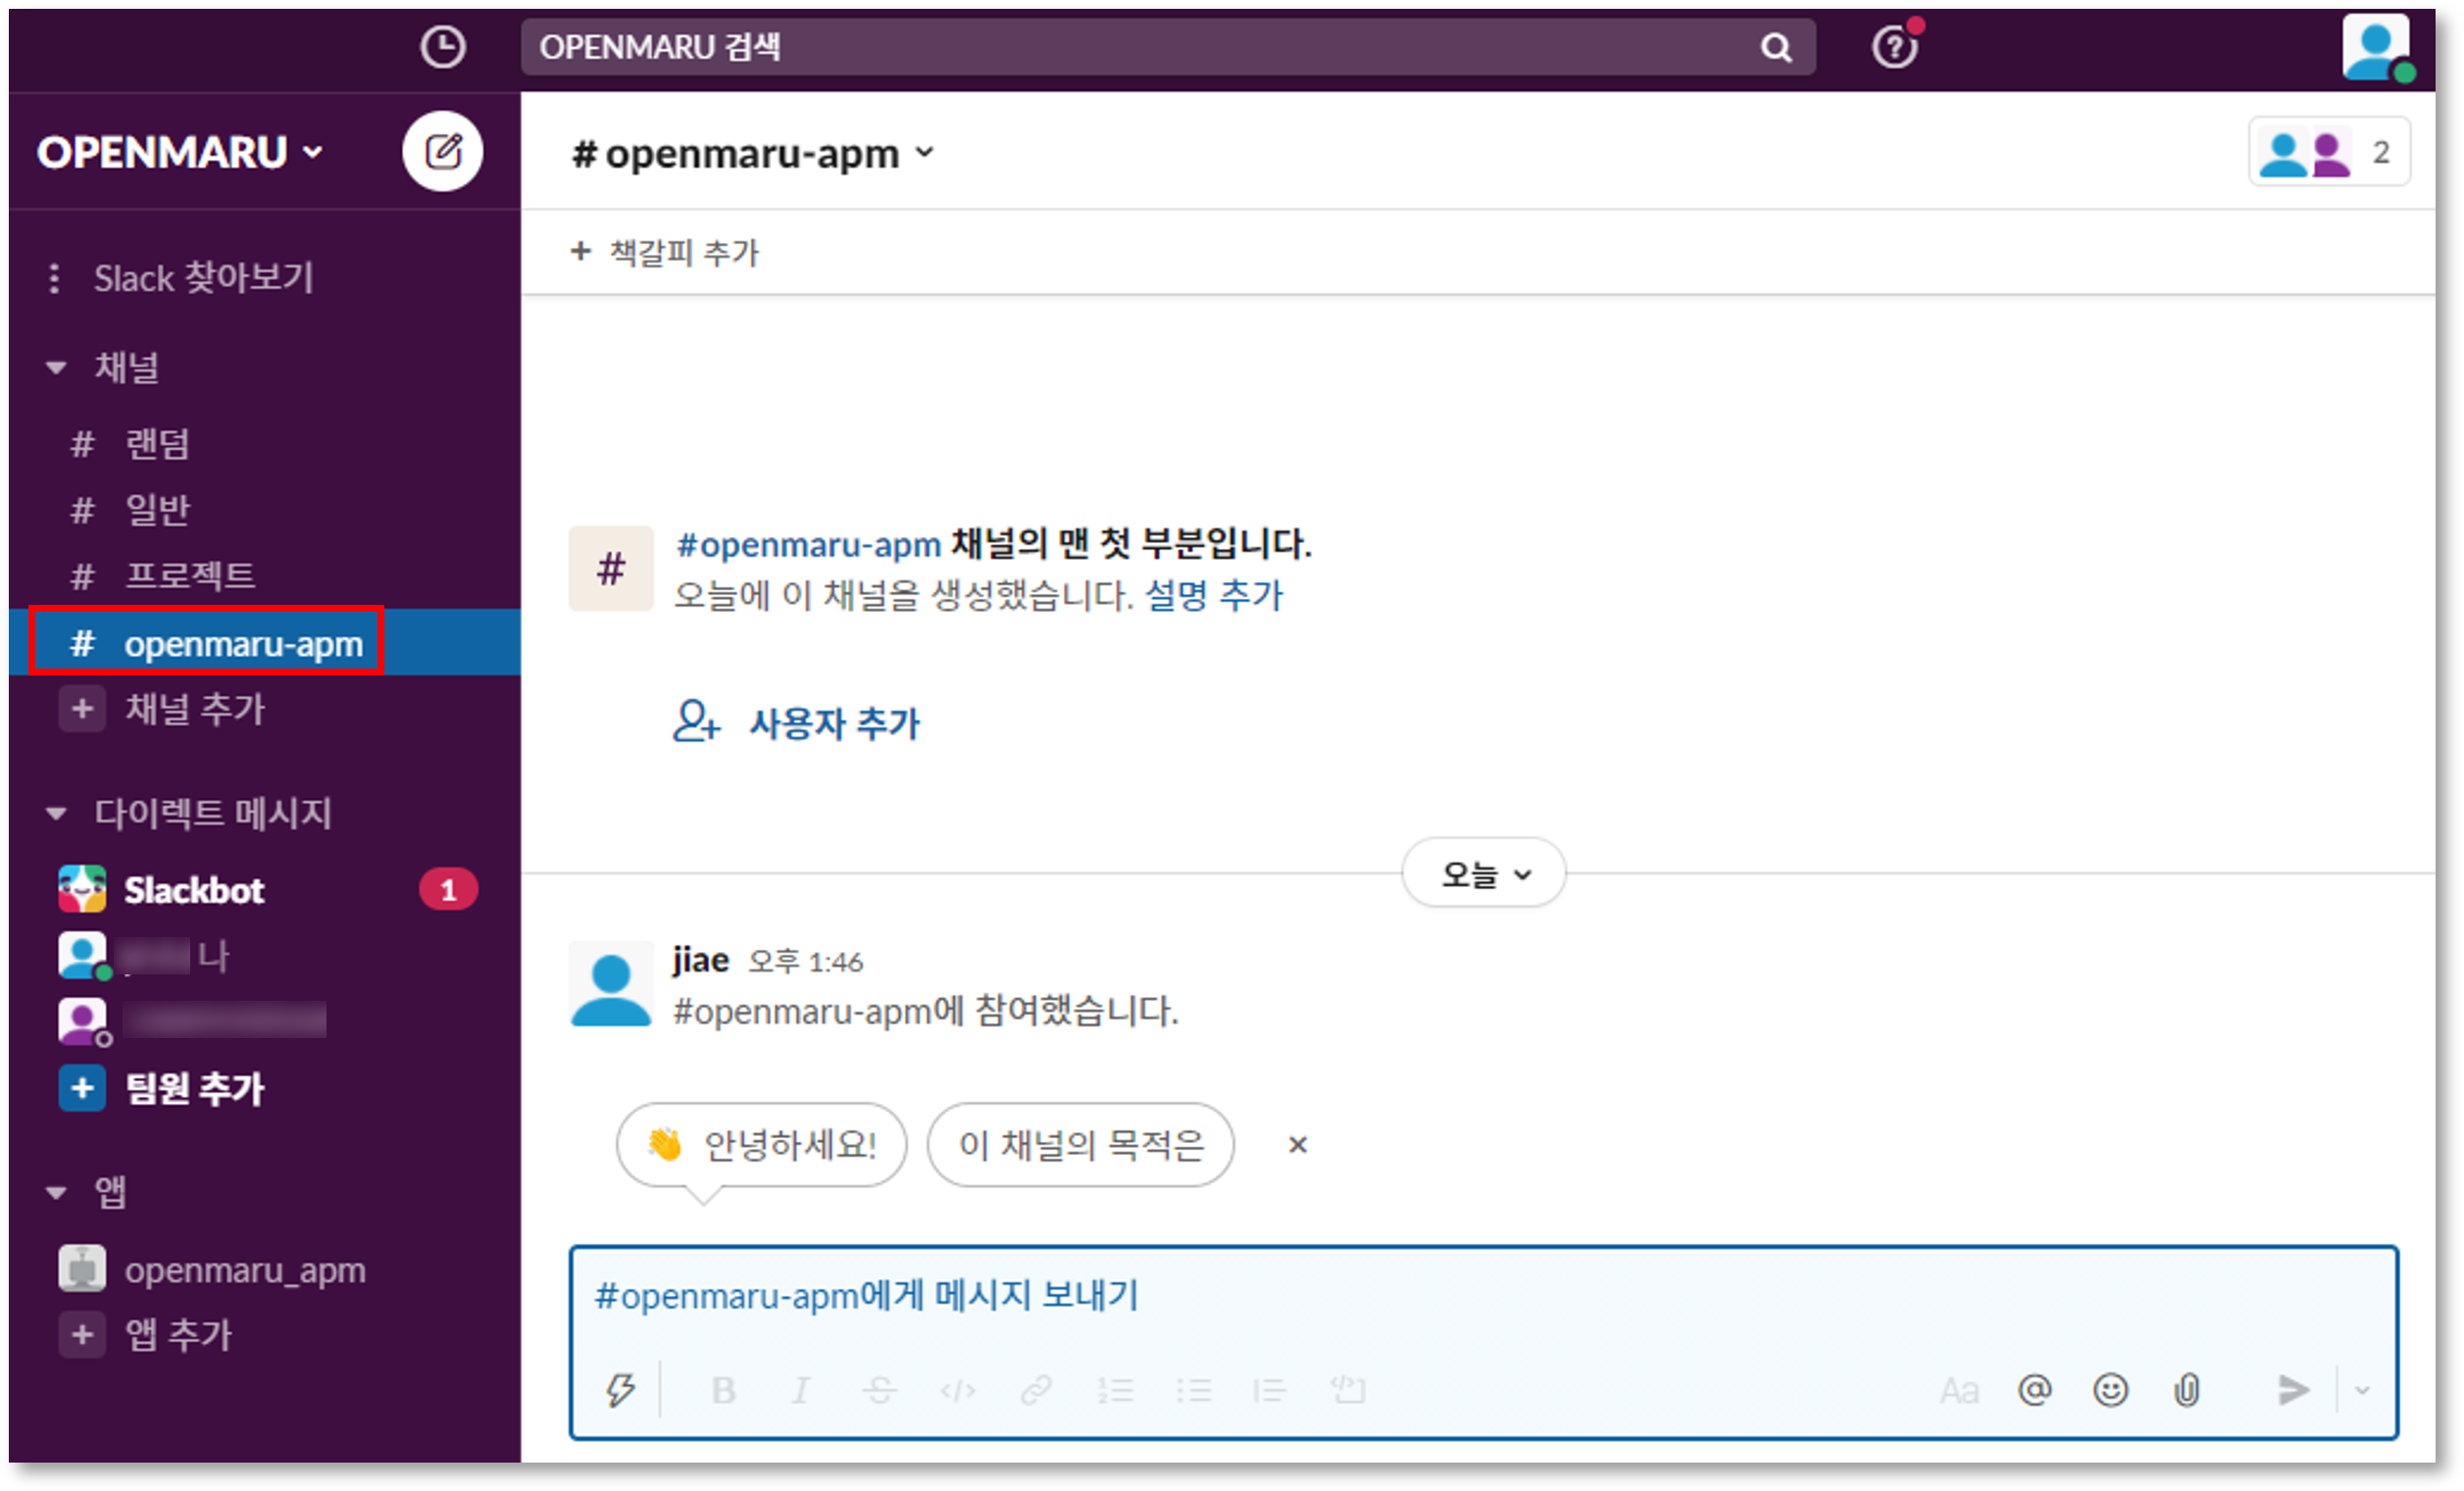
After restarting the APM server, you can now see APM events sent by the @openmaru_apm bot to the 'openmaru-apm' channel in Slack.
You can add users to the openmaru-apm channel that you want to receive events from.
You’ll be able to receive notifications of Slack events through a variety of clients, including iOS and Android apps, browsers, and Windows applications.
By default, you can access Slack through a browser, desktop applications on MacOS, Windows, and Linux, or mobile apps on iOS, Android, and Windows Phone. :imagesdir: images :keywords: APM, email, event, notification, notification settings, mail, integration :description: OPENMARU Cloud APM provides email notifications for all events that occur in APM. You can receive 'notifications' of server status in APM.
5.2 How to set up email sending
Setting up APM events
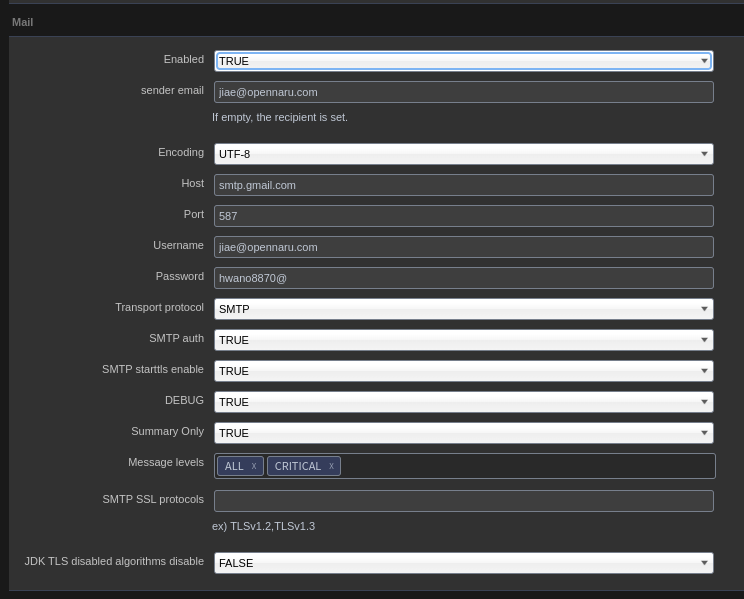
Go to Settings - System settings - Event In the Mail section, set the following settings.
| Item | Description |
|---|---|
Enabled |
Set to true or false whether to send the event to email. ex) true |
sender email |
ex) tester@gmail.com |
Encoding |
Sets the encoding of the email body. ex) UTF-8 |
Host |
Enter the hostname or IP address of the SMTP server. ex) smtp.gmail.com |
Port |
Enter the port of the SMTP server. ex) 587 |
Username |
Enter the user ID to log in to the SMTP server. ex) tester@gmail.com |
Password |
Enter the user password to log in to the SMTP server. ex) password |
Transport protocol |
Enter the SMTP protocol. ex) smtp |
SMTP auth |
Enter true or false whether the SMTP server requires user authentication. ex) true |
SMTP starttls enable |
Sets whether TLS encryption should be used for SMTP transmissions, true or false. ex) true |
DEBUG |
Set to true or false to enable debugging of SMTP mail transfers. ex) true |
Summary Only |
ex) true |
Message levels |
Error Level value ex) ALL |
SMTP SSL protocols |
ex) ex) TLSv1.2,TLSv1.3 Specifies the TLS connection version. For gmail, specify TLSv1.2 (as of 2022. 07) |
JDK TLS disabled algorithms disable |
ex) false true when the SMTP server is servicing with TLS 1.1 or lower version |
Configure the above settings and click the SAVE button to save them.
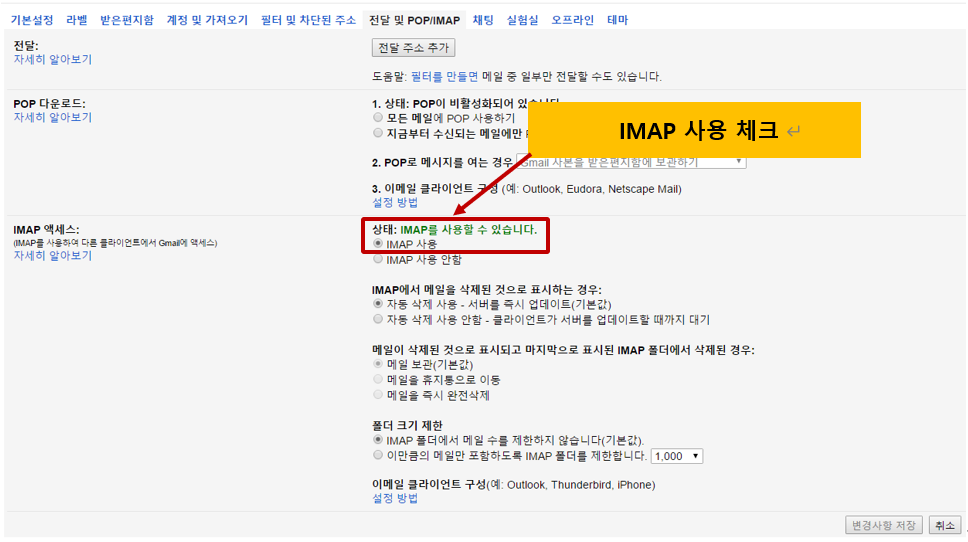
If you use GMail as an SMTP server, you need to check Use IMAP on the Forwarding configuration and POP/IMAP tabs as shown below.
You will also need to lower the security settings for your user account in GMail.
GMail "My Account" - Google Account Management - Security - Access for low-security apps
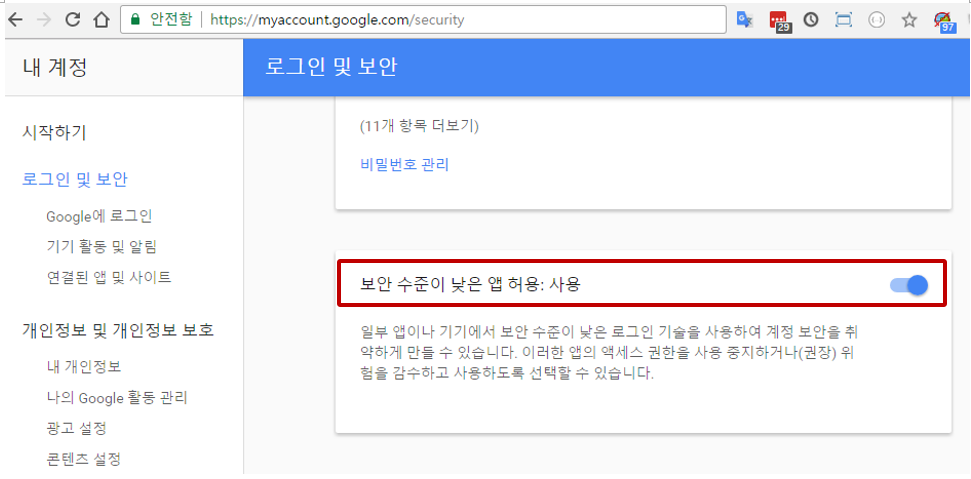
Set Allow low-security apps to 'Enabled'.
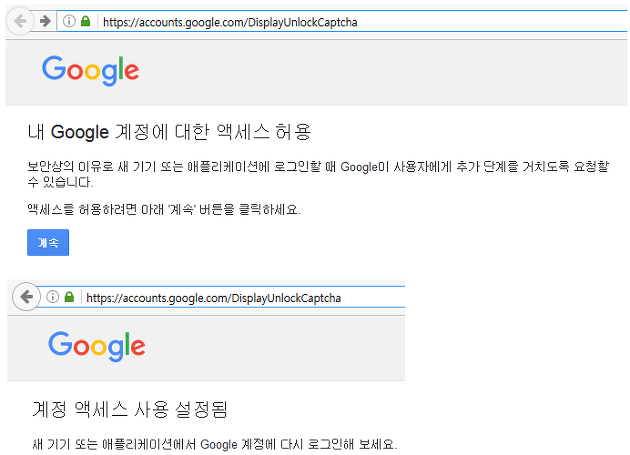
If the above settings do not work, follow the link below.
Under Allow access to my Google account, set the following settings.
 :imagesdir: images
:keywords: APM, SMS, text, event, notification, notification settings, integration
:description: OPENMARU Cloud APM provides SMS notifications for all events that occur in APM. You can receive 'notifications' of server statuses that occur in APM.
:imagesdir: images
:keywords: APM, SMS, text, event, notification, notification settings, integration
:description: OPENMARU Cloud APM provides SMS notifications for all events that occur in APM. You can receive 'notifications' of server statuses that occur in APM.
5.3 How to set up SMS sending
Setting up APM events
APM Settings → System Settings → Event tab - SMS + Select Enabled to True. Enabled to True
Install khan-event-processor
khan-event-processor-5.1.0-2.6-dist.zip
drwxr-x--- 4 khanapm khan 137 Mar 15 15:57 config
-rwxr-xr-x 1 khanapm khan 671 Jan 4 12:57 kill.sh
drwxr-x--- 2 khanapm khan 44 Mar 15 15:57 lib
drwxr-x--- 2 khanapm khan 21 Mar 15 15:57 logs
-rwxr-xr-x 1 khanapm khan 594 Jan 4 12:57 nohup.sh
-rwxr-xr-x 1 khanapm khan 1057 Jan 4 12:57 start.sh
-rwxr-xr-x 1 khanapm khan 633 Jan 4 12:57 status.sh
-rwxr-xr-x 1 khanapm khan 599 Jan 4 12:57 tail.sh
Configure khan-event-processor
config/application.properties
]
# Database Connection
#.
jdbc.driverClass=org.mariadb.jdbc.Driver
jdbc.url=jdbc:mariadb://localhost:3306/sms
jdbc.user.name=sms
jdbc.user.password=sms01

jdbc.driverClass=oracle.jdbc.driver.OracleDriver
#jdbc.url=jdbc:oracle:thin:@192.168.23.28:1521:XE
#jdbc.user.name=opennaru
#jdbc.user.password=opennaru

#.
# Rabbit MQ Connection
#.
rabbitmq.host=localhost
rabbitmq.port=5672
rabbitmq.username=khan
rabbitmq.password=opennaru12$

.
# Ignore SMS Event Message is older than minutes
#.
sms.ignoreMinutes=5

# # # Crop SMS Message
# Crop SMS Message
# # Crop SMS Message
sms.message.length=200


# all, info, warn, forecast, critical
# ALL : Send ALL Messages to SMS DB
# Comma-delimited send level definitions
# ex) WARN, CRITICAL - send WARN and CRITICAL only
sms.sendLevels=CRITICAL
The settings related to SMS in the application.properties file are as follows.
| Category | Setting value | Description |
|---|---|---|
sms.ignoreMinutes |
5 |
Ignore data before the specified time. |
sms.message.length |
200 |
Limit message length. |
sms.sendLevels |
CRITICAL |
Specify messages to send (specified via comma) |
"config/spring-context.xml"
        <!-- SMS Message to Database -->
        <route id="smsEventToDatabase" autoStartup="true">
            <from uri="direct:sendSMSDB"/>

            <transacted/>

            <!-- crop message -->
            <setHeader headerName="messageLimit">
                <simple resultType="java.lang.Integer">\{\{sms.message.length}}</simple>
            </setHeader>

            <!-- make message UID String 20 byte and crop sms message with sms.message.length in application.properties -->
            <bean ref="messageContentProcessor"/>
            <!--<bean ref="inspectProcessor"/>-->
            <bean ref="velocityProcessor"/>

            <doTry>
                <!-- For Oracle DB Insert -->
                <to uri="mybatis:SmsOracleDB.insert?statementType=Insert"/>
                <!-- For Maria DB Insert -->
                <!--<to uri="mybatis:SmsMariaDB.insert?statementType=Insert"/>-->
                <!-- For REST API CALL -->
                <!--<to uri="direct:sendSMSHttp"/>-->

                <doCatch>
                    <exception>java.sql.SQLException</exception>
                    <bean ref="counterProcessor" method="handleException"/>
                    <rollback/>
                </doCatch>
            </doTry>
            <onCompletion>
                <bean ref="counterProcessor" method="report"/>
                <bean ref="timeWatch" method="stop"/>
            </onCompletion>
        </route>

        <!-- SMS Message to HTTP -->
        <route id="smsEventToHttp" autoStartup="true">
            <from uri="direct:sendSMSHttp"/>
...
            <doTry>
                <to uri="velocity:template/HTTP-POST-BODY.vm?contentCache=true"/>
                <!-- Set REST API URL -->
                <to uri="http://localhost/send"/>
...
    </camelContext>

</beans>
Creating a DMBS Query
Select the file according to the DBMS type
config/mappers/SMS-MariaDB.xml
config/mappers/SMS-OracleDB.xml
The DBMS Table below is an example, and you can create it using the variables below according to your situation.
    <insert id="insert" parameterType="com.opennaru.khan.monitoring.app.event.SmsEvent">
        <![CDATA[
                INSERT INTO
                SMS_SKTELINK
                (
                        CMP_MSG_ID,
                        CMP_USR_ID,
                        ODR_FG,
                        SMS_GB,
                        USED_CD,
                        MSG_GB,
                        WRT_DTTM,
                        SND_DTTM,
                        SND_PHN_ID,
                        RCV_PHN_ID,
                        CALLBACK,
                        SND_MSG,
                        CMP_SND_DTTM,
                        CMP_RCV_DTTM,
                        REG_SND_DTTM,
                        REG_RCV_DTTM,
                        EXPIRE_VAL,
                        SMS_ST,
                        RSLT_VAL,
                        RSRVD_ID,
                        RSRVD_WD
                )
                VALUES(
                        #{msgId},
                        '00000',
                        '1',
                        '1',
                        '00',
                        'A',
                        TO_CHAR(SYSDATE, 'YYYYMMDDHH24MISS'),
                        TO_CHAR(SYSDATE, 'YYYYMMDDHH24MISS'),
                        '02-1234-1234',
                        #{phoneNumber},
                        '02-1234-1234',
                        #{message},
                        NULL,
                        NULL,
                        NULL,
                        NULL,
                        0,
                        '0',
                        '99',
                        NULL,
                        NULL
                )
        ]]>
    </insert>
REST API Data 설정(JSON)
{
   "subject" : "${sms.subject}",
   "contents" : "${sms.message}",
   "html" : "${sms.htmlMessage}",
   "phoneNumber" : "${sms.phoneNumber}",
   "email" : "${sms.email}",
   "sender" :
      {
         "emailAddress" : "knoxportal@samsung.com"
      },
   "smsRecipients" :
      [
#foreach( $phone in $sms.phoneNumbers )
         {
            "address" : "${phone}"
         }#if( $foreach.hasNext ), #end
#end
      ],
   "mailRecipients" :
      [
#foreach( $email in $sms.emails )
         {
            "address" : "${email}"
         }#if( $foreach.hasNext ), #end
#end
      ]
}
Available variables
| Category | Description |
|---|---|
msgId |
yyyyMMddHHmmss + "9" + 00001 (sequential) (20 digits) |
eventKey.year |
yyyy |
eventKey.month |
MM |
eventKey.date |
dd |
eventKey.hour |
HH |
eventKey.minute |
mm |
eventKey.second |
ss |
eventKey.count |
sequence number (5 digits) |
phoneNumber |
recipient number |
phoneNumbers |
a list of recipient numbers |
subject |
Message subject |
message |
Message content (TEXT) |
htmlMessage |
Message content (HTML) |
eventData.created |
Time of occurrence (TimeMillis) |
eventData.level |
Event level |
eventData.agentType |
Agent type |
eventData.hostname |
Host name |
eventData.ipAddress |
IP address |
eventData.instanceId |
Instance name |
eventData.readableMessage |
Message content (excluding time and agent information) |
eventData.readableWhere |
Agent information |
Start and stop
 ./start.sh
 ./tail.sh
:imagesdir: images
:keywords: APM, Synology Chat, events, notifications, notification, notification settings, integration
:description: OPENMARU Cloud APM provides Synology Chat notifications for all events that occur in APM. You can receive 'notifications' of server status in APM.
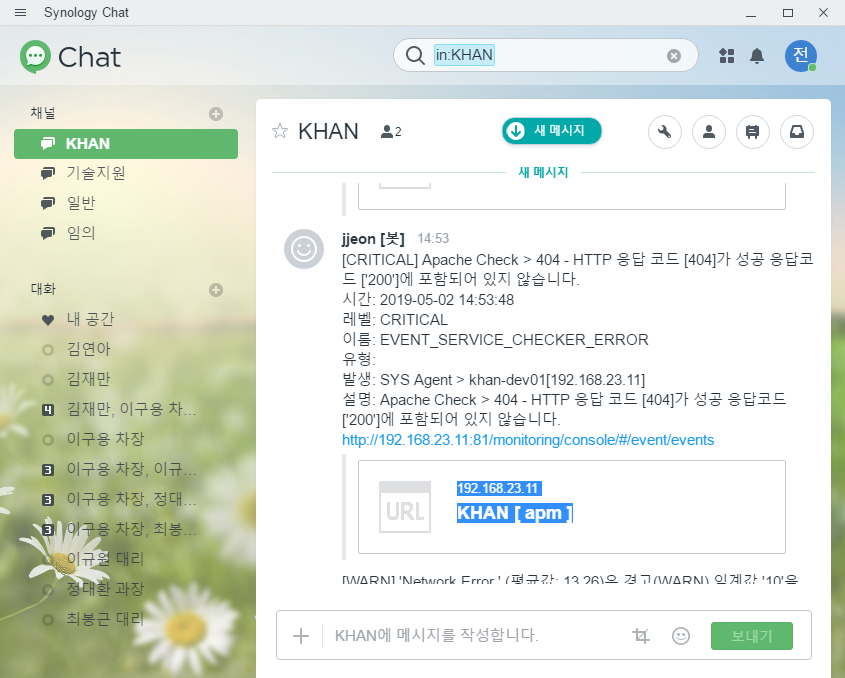
5.3 Synology Chat event integration
Synology Chat integration settings
Click on the top right icon of Synology Chat and select the Integrations menu.
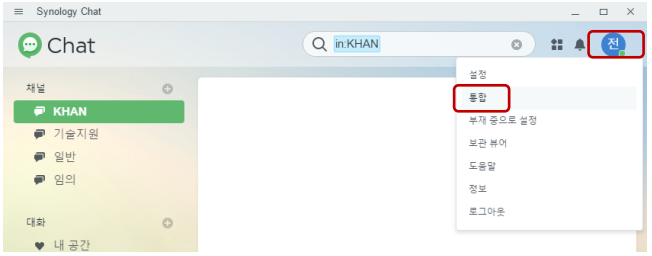
Select Incoming Webhooks.
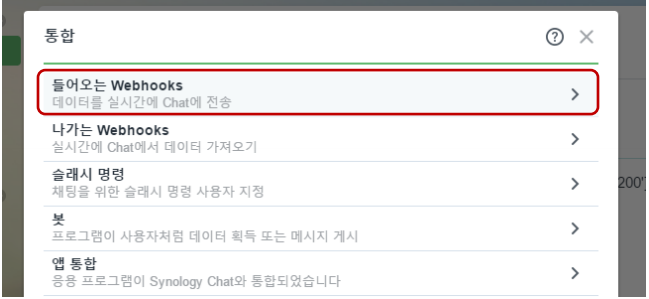
Click the '+ Create' button.

Specify the channel to which the event will be delivered and the username to which the event will be logged.
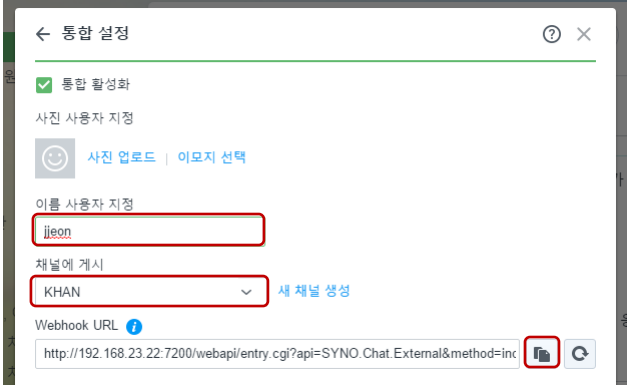
Copy the webhook URL and copy the token.
http://synology.myhome.com:5000/webapi/entry.cgi?api=SYNO.Chat.External&method=incoming&version=2&token=OWqRRyCVUaNazCRNsFgTJJUgQDxoRdxS3TIggwkWATguvY1pWrqXLdVD0qCSe
Set up the APM Synology Chat event
To set up APM events
APM Settings → System Settings → Events tab - Synology+. Enabled to True
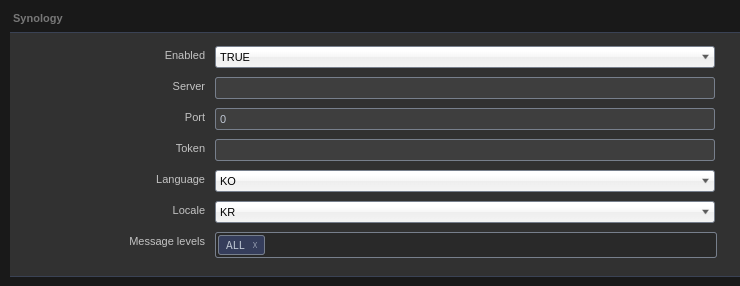
The settings and contents of the settings item are as follows.
| Category | Default | Description |
|---|---|---|
synology.chat.enabled |
false |
true, false Sets whether Synology Chat Event sending is enabled. |
synology.chat.token |
Sets the token set by incoming webhooks. |
|
synology.chat.message.language |
en |
Select the message language to send to Synology Chat. en, ko available |
synology.chat.message.locale |
en |
Select the message locale to send to Synology Chat. Available for us, kr |
synology.chat.server |
Specifies the IP of the Synology Chat server. Must be reachable from the KHAN apm server. |
|
synology.chat.port |
5000 |
Specifies the port number of the Synology Chat server. |
synology.chat.levels |
ALL |
Select the type of events to send to Synology Chat. ALL : All events Specify the events to send among INFO, WARN, FORECAST, and CRITICAL events, separated by commas. |
If you change the event.properties file, a restart of the KHAN apm server is required.
References
-
Red Hat Documentation
-
Red Hat Support Portal
-
*OpenNaru Support Portal
-
OpenNaru Facebook Page
t : +82-2-469-5426 f : +82-2-469-7247
e : support@opennaru.com, sales@opennaru.com
h : http://www.opennaru.com
This document was generated using openmaru Installer, an automatic installation product of opennaru.com. This document is copyrighted by opennaru.com.
#:sectnums!: