Getting started
What is OPENMARU APM?
OPENMARU APM is an Application Performance Monitoring (APM) tool that provides real-time monitoring of Java-based web applications, which can be used to proactively prevent failures and continuously improve performance.
OPENMARU APM provides not only real-time behavioral monitoring of Java-based web applications, but also features that allow you to apply real-time statistical analysis techniques to determine problems in advance.
About the installation guide
This user guide is for users who want to monitor their Web Application Server (WAS) using OPENMARU APM. It is also a guide for identifying and analyzing failure causes through monitoring of web applications.
Main features
OPENMARU APM is a product for monitoring web application servers and provides the following features.
-
*Provides service satisfaction index (APDEX) * *
It expresses the satisfaction of the service from the user’s point of view in a single number. You can understand the situation of the service at a glance through the index from 0 to 100.
-
'T-Map' Transaction Distribution Map + *T-Map Transactions are represented as a heat map for intuitive analysis of the overall response time of the service, and detailed profiling including SQL queries for selected cells is provided.
-
Real-time Forecast * + *Forecast Real-time statistical analysis alerts you to predictive events that will reach thresholds set by administrators in the next few minutes.
-
WAS Failure Analysis Tool
Provides the JVM Thread Dump analysis tool, which is most commonly used for WAS failure analysis. It provides various data required for WAS Trouble Shooting.
-
*Anomaly monitoring + *Anomaly Monitoring Notifies you through events when anomalies are detected that are out of the ordinary through statistical analysis.
-
OS resource and web server monitoring
Monitor various values such as OS CPU, Memory, Disk usage, Load Average, Network usage, Socket status, Web server traffic, RPS, etc.
-
Sophisticated event handling + *Sophisticated event handling Threshold values are calculated based on the statistical values of the collected values for the monitored indicators, so monitoring events are only triggered when absolutely necessary.
-
HTML 5-based User Interface
Provides an intuitive user interface based on HTML 5 for use on various devices, including mobile.
System Configuration
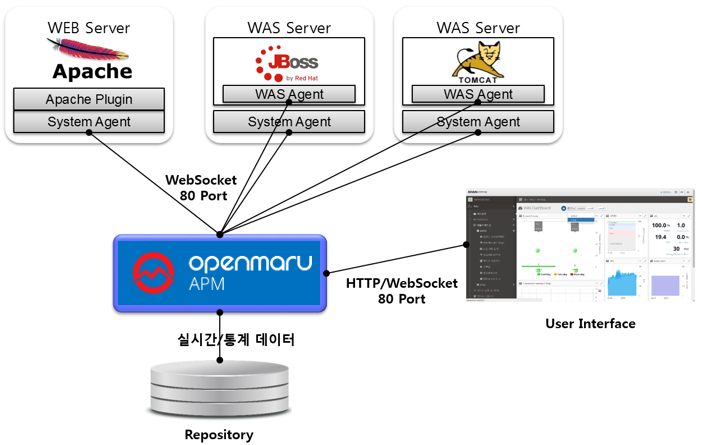
**OPENMARU APM consists of WAS Agent to monitor Web Application Server (WAS) server and SYS Agent to monitor system status and web server status, OPENMARU APM Server to collect and process/store data, and HTML 5-based User Interface (UI).
The web server has a system agent and an Apache web server plug-in of the system agent to monitor system information and web server status.
The WAS server installs the System agent for collecting system information and the WAS agent for monitoring WAS. Both the agent and the connection to the server use the WebSocket protocol.
Supported environments
Supported environments for installing OPENMARU APM Server
OPENMARU APM Server can be installed on the following operating system environments using the OPENMARU APM Provisioning feature.
| Operating System | |
|---|---|
RHEL (Red Hat Enterprise Linux) 6.x / 7.x |
x86_64 |
CentOS 6.x / 7.x |
x86_64 |
The minimum/recommended usage environment for OPENMARU APM Server is as follows.
| Category | Minimum Environment | Recommended Environment |
|---|---|---|
Number of Cores |
4 Cores |
8 Cores or more |
Memory |
8 GB |
16 GB or more |
Disk |
300 GB |
500 GB or more |
The specifications of the system are highly dependent on the number of servers and instances to be monitored.
If you utilize OPENMARU APM’s provisioning feature, OPENMARU APM’s agents are automatically installed/configured, but if this is not possible, you can install them manually as follows. :imagesdir: images :keywords: agent, system agent, system agent, monitoring, apache, nginx, cubrid, docker, cri-o :description: This is the OPENMARU Cloud APM system agent installation guide. You can check the specifications for installing the system agent. It guides you to set up web server monitoring such as Nginx and Apache.
3.1 Installing OPENMARU Cloud APM System Agent
Download System Agent
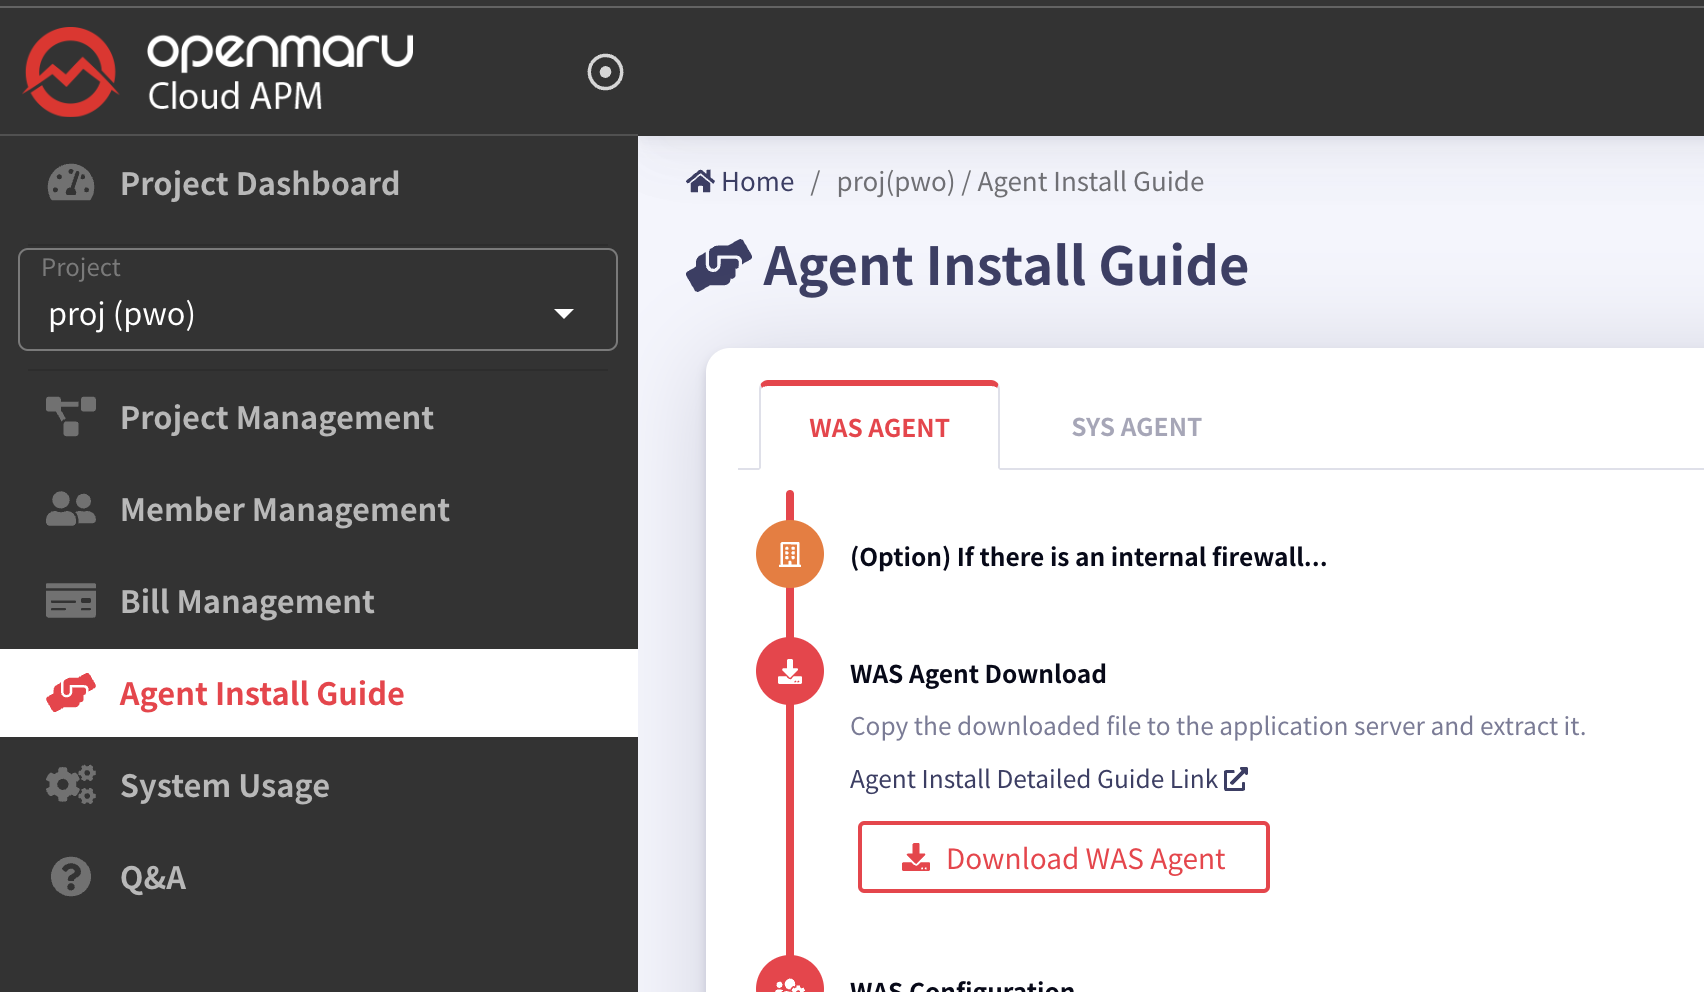
Log in to the console of the OPENMARU APM server and download the file for installation.
When you select Agent Installation Guide > SYS AGENT, the page where you can click Download SYS Agent is displayed as shown below.

Download the file to install the system agent.
If you are using a Linux operating system, you can download it directly using the wget command as shown below.
-
Download the system agent.
$ wget https://cloud.openmaru.io/api/v1/projects/[Project-ID]/download/sys-agent.zip
Install the system agent
-
extract the file.
$ unzip sys-agent.zip
-
change agent settings.
$ cd khan-sys-agent
$ vi conf/khan-sys-agent.conf
-
khan-sys-agent.conf
khan.host=cDIwMjEwODAwMDYuYXBtLmEtYXBuZTIub3Blbm1hcnUuaW8=

khan.port=443

# specify this machine's ip address, only valid ip address of this machine can be used.
#khan.agent.ip=192.168.10.11

# agent's compression algorithm : snappy(default), lzw
#agent.compress.type=lzw

# Gathering netstat info : true(default)
#khan.netstat=false

# include network interface
# configuration sample for openshift
#khan.network.interfaces=eth0,eth1,ens192,lo,tun0,vxlan_sys_4789
# configuration sample for kubernetes
#khan.network.interfaces=eth0,eth1,ens192,lo,tun0,kube-ipvs0,vxlan.calico,nodelocaldns

# include disk mount
# configuration sample for openshift
#khan.disk.mounts=/,/home,/data,/var/lib/docker/containers,C,D

# Allow command list
#khan.allow.commands=service,systemctl

# Memory sigar supported OS vendor version : Enterprise Linux 5,5,Enterprise Linux 6,6(default) startsWith
#khan.memory.sigar.supported.os.vendor.versions=Enterprise Linux 5,5,Enterprise Linux 6,6
Settings in the khan-sys-agent.conf file
The settings in the khan-sys-agent.conf file are as follows.
| Settings (environment variables) | Description | Default |
|---|---|---|
khan.host |
Enter the IP of the OPENMARU APM server. |
khan.port |
khan.port |
Enter the port number of the OPENMARU APM server. |
|
khan.tls |
TLS enabled or not |
false |
agent.compress.type |
Encryption algorithm |
snappy |
khan.netstat |
Whether to monitor network (netstat) |
true |
khan.network.interfaces |
Monitor only set network interfaces + (OMAPM_NETWORK_INTERFACES) ex) eth0,eth1,ens192,lo,tun0,vxlan_sys_4789 |
All interfaces |
khan.disk.mounts |
Monitor only set mount disks + (OMAPM_DISK_MOUNTS) ex) /,/home,/data,/var/lib/docker/containers,C,D |
|
khan.allow.commands |
Restrict execution nouns in the agent + (OMAPM_ALLOW_COMMANDS) ex) service,systemctl |
|
OMAPM_NAME |
SYS agent name Separation when installing more than one agent on one machine (Openmaru SYS Container images only) |
Setting up plugins for the system agent
The System Agent can use plugins to extend its functionality.
Currently, APM provides the following plugins: Apache monitoring plugin, nginx monitoring plugin, cubrid monitoring plugin, Docker container monitoring plugin, and CRI-O container monitoring plugin.
Set disabled.txt in the plugins directory and start the system agent to run the plugin module.
Enable a plugin
To enable a plugin, you can set which plugins to use by setting the following in the plugins/disabled.txt file.
-
plugins/disabled.txt file.
#.
# name to disable plugin
# # name to disable plugin

khan-plugin-apache
khan-plugin-nginx
khan-plugin-docker
khan-plugin-crio
khan-plugin-containerd
khan-plugin-cubrid
khan-plugin-mysql
-
Enable the khan-plugin-apache and khan-plugin-docker plugins.
#.
# name to disable plugin
# # name to disable plugin

#khan-plugin-apache
khan-plugin-nginx
#khan-plugin-docker
khan-plugin-crio
khan-plugin-containerd
khan-plugin-cubrid
khan-plugin-mysql
Copy the plugin zip file to the plugins directory, and start the system agent to run the plugin module. At this time, the directory is created by unzipping the zip file.
Apache plugin settings
The Apache plugin is configured using the config.properties file under plugins/khan-plugin-apache-5.1.0/conf.
Since the configuration file can be changed by upgrading the plugin, you can separate the plugin file from the configuration file by setting it in the config.properties file in the plugins/khan-plugin-apache.conf directory.
-
*config.properties configuration file contents
instance=apache
host=localhost
port=80
username=
password=
infoUrlPath=/server-info?server
statusUrlPath=/status?auto
jkStatusUrlPath=/jkstatus
modClusterManagerUrlPath=/mod_cluster_manager

maxConnections=1
maxConnectionsPerHost=1
maxConnectionsPerRoute=1
waitIdleCheck=60000
waitIdleClose=120
requestTimeout=1000
sessionTimeout=1000

## "key":"log directory path":"http status code index" - split with whitespaces, ex) homepage:/data/logs/homepage:8
#http.status.code.log.dir=homepage:/data/logs/homepage:8,admin:/data/logs/admin:8
#http.status.code.log.exclude.url.patterns=\\*/,/status,/server-info,/jkstatus,/mod_cluster_manager
#http.status.code.log.exclude.file.patterns=^httpd.log$,.*mod_jk.*,.*modjk.*,.*error_log.*,.*modcluster.*
| Settings | Description | Defaults |
|---|---|---|
instance |
Apache instance name to be displayed in OPENMARU APM |
apache |
host |
Hostname of the Apache server to collect information from, preferably localhost |
localhost |
port |
Port number of the Apache server to collect information from |
80 |
username |
Not currently used |
|
password |
currently deprecated |
|
infoUrlPath |
URL where Apache’s mod_info is set. Make it accessible from localhost. |
|
statusUrlPath |
URL where Apache’s mod_status is set. Make it accessible from localhost. |
|
jkStatusUrlPath |
Apache jkstatus page URL. |
/jkstatus |
modClusterManagerUrlPath |
Enter the URL of the Apache mod cluster manager access page. |
/mod_cluster_manager |
maxConnections |
Maximum number of connections to collect Apache information, 1 is sufficient |
|
maxConnectionsPerHost |
The number of connections to collect Apache information. |
|
maxConnectionsPerRoute |
Number of connections to collect Apache information |
|
waitIdleCheck |
Idle check wait time |
|
waitIdleClose |
Idle Close wait time |
|
requestTimeout |
Timeout if no response to request |
|
sessionTimeout |
Session Timeout |
|
http.status.code.log.dir |
HTTP response code monitoring settings |
homepage:/data/logs/homepage:8 Service name to be displayed in the console: Web server log directory path: Response code location (space-based) |
http.status.code.log.exclude.url.patterns |
Specify URL patterns to exclude from response code monitoring |
|
http.status.code.log.exclude.file.patterns |
Specify log file patterns to exclude from response code monitoring |
How to set up Apache for APM monitoring
In the httpd.conf file, set the permissions to read /status, /server-info URLs from localhost as shown below. At this time, set ExtendedStatus to On to get more information from server-status.
#
# ExtendedStatus controls whether Apache will generate "full" status
# information (ExtendedStatus On) or just basic information (ExtendedStatus
# Off) when the "server-status" handler is called. The default is Off.
#
ExtendedStatus On

#
# Allow server status reports generated by mod_status,
# with the URL of http://servername/server-status
# Change the ".example.com" to match your domain to enable.
#
<Location /status>
  SetHandler server-status
  Order deny,allow
  Deny from all
  Allow from localhost
</Location>

#
# Allow remote server configuration reports, with the URL of
# http://servername/server-info (requires that mod_info.c be loaded).
# Change the ".example.com" to match your domain to enable.
#
<Location /server-info>
  SetHandler server-info
  Order deny,allow
  Deny from all
  Allow from localhost
</Location>
NGINX plugin settings
The nginx plugin configuration uses the config.properties file located under plugins/khan-plugin-nginx-5.1.0/conf. Since the configuration file can be changed by upgrading the plugin, you can separate the plugin file from the configuration file by setting it in the config.properties file in the plugins/khan-plugin-nginx.conf directory.
-
config.properties configuration file contents.
#.
# Nginx status monitoring
# # Nginx status monitoring

instance=nginx
host=localhost
port=80
username=
password=
statusUrlPath=/nginx_status

maxConnections=1
maxConnectionsPerHost=1
maxConnectionsPerRoute=1
waitIdleCheck=60000
waitIdleClose=120
requestTimeout=1000
sessionTimeout=1000
| Settings | Description | Default |
|---|---|---|
instance |
Nginx instance name to be displayed in OPENMARU APM |
nginx |
host |
Hostname of the nginx server to collect information from, preferably localhost |
localhost |
port |
Port number of the nginx server to collect information from |
80 |
username |
Not currently used |
|
password |
Deprecated |
|
statusUrlPath |
URL where nginx’s http_stub_status_module is set to Make it accessible from localhost. |
|
maxConnections |
Maximum number of connections to collect nginx information, 1 is sufficient |
1 |
maxConnectionsPerHost |
Number of connections to collect nginx information |
|
maxConnectionsPerRoute |
Number of connections to collect nginx information |
|
waitIdleCheck |
Idle check wait time |
|
waitIdleClose |
Idle Close wait time |
|
requestTimeout |
Timeout if there is no response to a request |
|
sessionTimeout |
Session Timeout |
How to set up nginx for APM monitoring
Since ngx_http_stub_status_module is not built by default, add the following to the nginx/conf.d/default.conf file.
    location /nginx_status {
    stub_status;
    allow 127.0.0.1;
    deny all;
}
Cubrid Plugin Settings
The configuration of the cubrid plugin uses the config.properties file under plugins/khan-plugin-cubrid-5.1.0/conf. Since the configuration file can be changed by upgrading the plugin, you can separate the plugin file from the configuration file by setting it in the config.properties file in the plugins/khan-plugin-cubrid.conf directory.
-
config.properties configuration file contents.
#.
# Cubrid status monitoring
# # Cubrid status monitoring

# cubrid server home directory
# if cubridHome is empty then check environment variable 'CUBRID'
cubridHome=

# comma separated broker names to exclude gather stats
excludedBrokers=query_editor
| Settings | Description | Default |
|---|---|---|
cubridHome |
Enter the path to the home directory of cubrid. |
|
excludeBrokers |
Enter the name of the broker to exclude from status collection. |
How to set up Cubrid for APM monitoring
In the cubrid home directory, modify conf/cm.conf support_mon_statistic to YES to enable resource monitoring of the database.
~
# support monitoring statistic (YES/NO), default NO
# If you want to use the advanced monitoring feature on CUBRID Manager,
# you should set this value to YES.

support_mon_statistic=YES
~
APM DASHBOARD settings
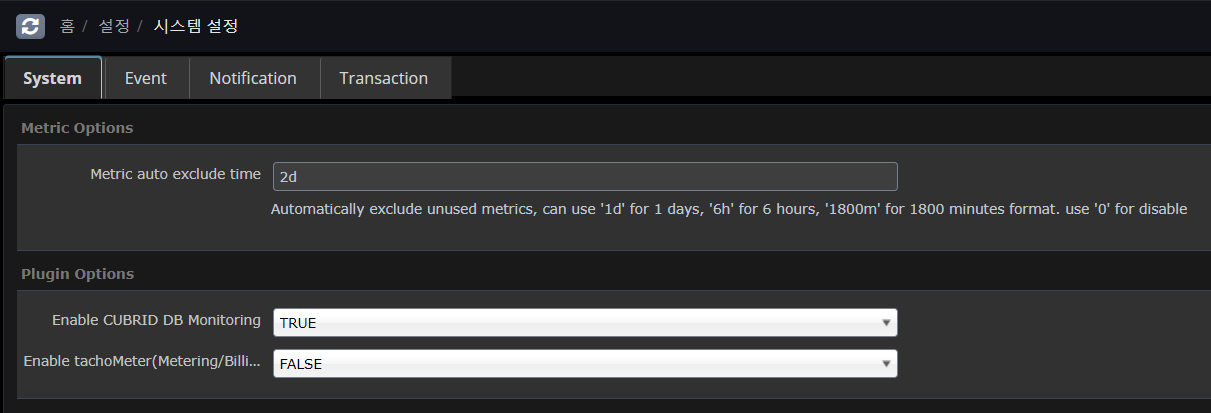
In APM dashborad Home Settings > System Settings > System In Plugin Options, set Enable CUBRID DB Monitoring to TRUE and save it.
Docker plugin settings
To configure the Docker plugin, use the config.properties file under plugins/khan-plugin-docker-5.1.0/conf.
Since the configuration file can be changed by upgrading the plugin, you can separate the plugin file from the configuration file by setting it in the config.properties file in the plugins/khan-plugin-docker.conf directory.
-
config.properties configuration file contents.
#
# Docker status monitoring
#

# Add docker remote api options in /etc/sysconfig/docker file.
# OPTIONS='...', -H tcp://0.0.0.0:4243 or -H tcp://127.0.0.1:4243
#docker.host=localhost
#docker.port=4243

# docker daemon connect type : sock or net
# Must use sock in Openshift
docker.connect.type=sock

docker.sock=/var/run/docker.sock

# docker's cgroup driver type : cgroup or systemd
# Openshift 3.6 use systemd type, below Openshift 3.5 use cgroup type
docker.cgroup.driver.type=systemd
#docker.cgroup.driver.type=cgroup


# connect timeout in millisecond
docker.connectTimeout=5000

# read timeout in millisecond
docker.readTimeout=2000
| Settings | Description | Default |
|---|---|---|
docker.host |
Enter the hostname or IP of the docker daemon. |
localhost |
docker.port |
Enter the port number of the docker daemon. |
4342 |
docker.connect.type |
Specify whether you want to use a socket file generated by Docker Engine or access Docker Engine using HTTP. You can use sock or net. On Openshift, you must use sock. |
sock |
docker.sock |
Specifies the socket file that Docker Engine creates. On Red Hat flavors of Linux, use the /var/run/docker.sock file. |
/var/run/docker.sock |
docker.cgroup.driver.type |
Specifies the cgroup driver type. Openshift 3.6 uses systemd and Openshift 3.5 uses cgroup. |
CRI-O plugin settings
The CRI-O plugin is configured using the config.properties file under plugins/khan-plugin-crio-5.1.0/conf.
Since the configuration file can be changed by upgrading the plugin, you can separate the plugin file from the configuration file by setting it in the config.properties file in the plugins/khan-plugin-crio.conf directory.
-
+] config.properties configuration file contents.
#
# CRI-O Container status monitoring
#

# crio sock file location
crio.sock=/var/run/crio/crio.sock

# connect timeout in millisecond
crio.connectTimeout=5000

# read timeout in millisecond
crio.readTimeout=2000
| Settings | Description | Defaults |
|---|---|---|
crio.sock |
Specifies the socket file that CRI-O creates. On Red Hat-like Linux, the file /var/run/crio.sock is used. |
/var/run/crio/crio.sock |
CONTAINERD plugin settings
The Containerd plugin is configured using the config.properties file under plugins/khan-plugin-containerd-5.1.0/conf.
Since the configuration file can be changed by upgrading the plugin, you can separate the plugin file from the configuration file by setting it in the config.properties file in the plugins/khan-plugin-crio.conf directory.
-
config.properties configuration file contents
#
# khan-plugin-containerd
#

# containerd sock file location
containerd.sock=/var/run/containerd/containerd.sock
# connect timeout in millisecond
containerd.connectTimeout=5000
# read timeout in millisecond
containerd.readTimeout=2000
| Settings | Description | Default |
|---|---|---|
containerd.sock |
Specifies the socket file that CONTAINERD creates. On Red Hat-like Linux, use the /var/run/containerd/containerd.sock file. |
/var/run/containerd/containerd.sock |
MySQL plugin settings
The configuration of the Containerd plugin uses the config.properties file under plugins/khan-plugin-mysql.conf.
Since the configuration file can be changed by upgrading the plugin, you can separate the plugin file from the configuration file by setting it in the config.properties file in the plugins/khan-plugin-mysql.conf directory.
The MySQL plugin supports Mysql, Mariadb, and Percona.
Before setting up, you need to create a MySQL account and assign permissions.
For MySQL 5.6 or MySQL 5.7, use the following command to create a user.
## Create an account
mysql> CREATE USER 'openmaru'@'localhost' IDENTIFIED BY '[PASSWORD]';
For MySQL 8.0 and later, create a user using the password encryption method.
mysql> CREATE USER 'openmaru'@'localhost' IDENTIFIED WITH mysql_native_password by '[PASSWORD]';Register the privileges.
## Get a list of running sessions
mysql> GRANT PROCESS,SELECT ON *.* TO 'openmaru'@'localhost';

## Force query termination on a running session
mysql> grant super on *.* to 'openmaru'@'localhost';
If performance_schema is not enabled
mysql> SHOW VARIABLES LIKE 'performance_schema';
+--------------------+-------+
| Variable_name | Value |
+--------------------+-------+
| performance_schema | ON |
+--------------------+-------+

mysql> GRANT SELECT ON performance_schema.* TO 'openmaru'@'localhost';-
Enable Slow Log monitoring
| Only available when log_output is TABLE |
mysql> show global variables where VARIABLE_NAME in ('slow_query_log', 'log_output');
+--------------------+-------+
| Variable_name | Value |
+--------------------+-------+
| slow_query_log | ON |
| log_output | TABLE |
+--------------------+-------+

my.conf
[mysqld]
general_log=on
log_output='TABLE'
-
*config.properties configuration file contents
#
# khan-plugin-mysql
#

# Enable remote monitoring (default: false)
#0.remote.enabled=false
0.cluster.name=
0.instance.id=om-mariadb
#  - ex) jdbc:mariadb://localhost:3306/mysql, jdbc:mysql://localhost:3306/mysql
0.jdbc.jdbcUrl=jdbc:mariadb://192.168.23.23:3306/mysql
#  - ex) org.mariadb.jdbc.Driver, com.mysql.jdbc.Driver, com.mysql.cj.jdbc.Driver
0.jdbc.driverClassName=org.mariadb.jdbc.Driver
0.jdbc.username=root
0.jdbc.password=opennaru
0.jdbc.maximumPoolSize=10
0.jdbc.minimumIdle=0
0.jdbc.validationTimeout=5000
0.jdbc.connectionTimeout=5000
0.path.my.cnf=/etc/my.cnf
-
The jdbc settings follow the HikariCP options.
-
For numeric prefixes, such as 0., utilize it when monitoring N MYSQLs (not only local but also remote MYSQLs can be monitored).
-
0.instance.id=db1
-
0….
-
1.instance.id=db2
-
1….
-
| Setting | Description | Default |
|---|---|---|
0.cluster.name |
If HA is configured, recognize as a group if the name is the same |
|
0.instance.id |
A distinguishable name for the collection server |
Required |
0.jdbc.jdbcUrl |
Connection JDBC URL |
Required |
0.jdbc.driverClassName |
Driver Class |
Required, org.mariadb.jdbc.Driver, com.mysql.cj.jdbc.Driver |
0.jdbc.username |
User Name |
Required |
0.jdbc.password |
Password |
Required |
0.jdbc.maximumPoolSize |
Pool maximum size |
10 |
0.jdbc.minimumIdle |
Pool minimum size |
0 |
0.jdbc.validationTimeout |
Validation check timeout |
5000 |
0.jdbc.connectionTimeout |
Time to wait before fetching the pool |
0.5 seconds |
0.path.my.cnf |
my.conf configuration file location + (if monitoring locally) (for local monitoring) |
/etc/my.cnf |
-
+] JDBC driver
Replace the driver files in the following directory if they are not compatible.
-
plugins/khan-plugin-mysql-5.1.0/lib/
-
mysql-connector-java-8.0.30.jar
-
mariadb-java-client-1.8.0.jar
-
Starting and ending the system agent
-
start the system agent.
$ cd khan-sys-agent/bin
$ ./start.sh
-
*shut down system agent
$ ./kill.sh
-
*Check system agent logs
$ ./tail.sh
2021-08-18 13:43:03 [INFO ] KhanAgentConfig.java::setPluginsStatus:371 - plugin khan-plugin-apache = status: enable
2021-08-18 13:43:03 [INFO ] KhanAgentConfig.java::setPluginsStatus:371 - plugin khan-plugin-docker = status: disable
2021-08-18 13:43:03 [INFO ] KhanAgentConfig.java::setPluginsStatus:371 - plugin khan-plugin-cubrid = status: enable
2021-08-18 13:43:03 [INFO ] KhanAgentConfig.java::setPluginsStatus:371 - plugin khan-plugin-service-checker = status: enable
2021-08-18 13:43:03 [INFO ] KhanAgentConfig.java::setPluginsStatus:371 - plugin khan-plugin-nginx = status: disable
2021-08-18 13:43:03 [INFO ] KhanAgentConfig.java::setPluginsStatus:371 - plugin khan-plugin-crio = status: disable
2021-08-18 13:43:03 [INFO ] ApacheStatusPlugin.java::start:64 - Starting Apache Plugin
2021-08-18 13:43:03 [INFO ] CubridStatusPlugin.java::start:37 - Starting Cubrid Plugin
2021-08-18 13:43:03 [INFO ] ServiceCheckerPlugin.java::start:44 - Starting Service Checker Plugin
2021-08-18 13:43:03 [INFO ] WebSocketService.java::startService:70 - Server URL : wss://p2021080005.apm.a-apne2.openmaru.io:443/monitoring/websocket
2021-08-18 13:43:03 [INFO ] WebSocketClient.java::createBootstrap:129 - Trying to connect : wss://p2021080005.apm.a-apne2.openmaru.io:443/monitoring/websocket
2021-08-18 13:43:04 [INFO ] WebSocketClient.java::operationComplete:140 - Connected.
2021-08-18 13:43:08 [INFO ] WebSocketClientHandler.java::channelRead0:115 - Successfully Connected.
3.2 Installing the OPENMARU Cloud APM WAS agent
Author |
Version |
Date |
Usage |
v1.0 |
2021-09-03 |
Download the WAS agent
Log in to the console of the OPENMARU APM server and download the files for installation.
Select the Settings > Resources menu and you will see a page where you can download the user manual WAS Agent and System Agent as shown below.
Download the file to install the system agent.
If you are using a Linux operating system, you can download it directly using the wget command as shown below.
Java 1.8 or later is recommended.
-
Download the WAS agent.
$ wget https://cloud.openmaru.io/api/v1/projects/[projectID]/download/was-agent.zip
Install the WAS agent
-
unzip agent installation file.
$ unzip khan-agent-5.1.0.zip
-
Create a khan-agent.jar symbolic link file.
Create a symbolic link file as shown below to facilitate khan-agent version upgrade.
Enable the khan-agent.jar file in the agent settings of WAS, and when you upgrade the khan-agent version, you can remove the symbolic link and create a new one with the new version of the file.
$ ln -s khan-agent-5.1.0.jar khan-agent.jar
Set up the WAS agent
To set the WAS server instance name
Setting in the khan-agent.conf file.
# WAS Instance's ID
# Can use RANDOM string or IP ADDRESS
# ex: instanceid-${RANDOM:4} ==> instanceid-qfPb
# ex: instanceid-${RANDOM:4}-s ==> instanceid-qfPb-s
# ex: instanceid-${IPADDR:3} ==> instanceid-23-10 (ip=192.168.23.10)
# ex: instanceid-${HOSTNAME:-:2} ==> instanceid-apm (hostname=test-apm)
# ex: instanceid-${HOSTNAME:-:2}-${IPADDR:3}-${RANDOM:4}-s ==> instanceid-apm-23.10-afcg-s (hostname=test-apm, ip=192.168.23.10)-
${RANDOM:4} : Generate 4 random uppercase/lowercase letters of the alphabet
-
${IPADDR:3} : Add the 3rd digit of the IP address
-
${IPADDR:-1}: Adds the first digit of the IP address from the back.
-
${hostname:-:2} Add the second digit of the HOSTNAME, separated by -.
khan-agent.conf configuration file
The parts of the configuration file below that need to be changed are marked with a fluorescent color.
###################  OPENMARU APM Agent Configuration File  ###################

# Group name
# ex: grp-${HOSTNAME:-:1}-${HOSTNAME:-:2}  ==> grp-jbossweb53-20  (hostname=jbossweb53-20-8tp2j)

application.name=openmaru

# KHAN [monitoring] Server's IP Address and Port
khan.host=Cloud APM default
khan.port=443
khan.tls=true
#khan.tls=false

# specify this machine's ip address, only valid ip address of this machine can be used.
#khan.agent.ip=

user.key=NIL

# WAS Instance's ID
# Can use RANDOM string or IP ADDRESS
# ex: instanceid-${RANDOM:4}  ==> instanceid-qfPb
# ex: instanceid-${RANDOM:4}-s  ==> instanceid-qfPb-s
# ex: instanceid-${IPADDR:3}  ==> instanceid-23-10   (ip=192.168.23.10)
# ex: instanceid-${HOSTNAME:-:2}  ==> instanceid-apm  (hostname=test-apm)
# ex: instanceid-${HOSTNAME:-:2}-${IPADDR:3}-${RANDOM:4}-s  ==> instanceid-apm-23.10-afcg-s  (hostname=test-apm, ip=192.168.23.10)

instance.id=khan11
agent.type=WAS

# agent's compression algorithm : snappy(default), lzw
#agent.compress.type=lzw

# APDEX satisfied response time in seconds(duration <= apdex = SATISFIED, duration > apdex*4 = APDEXTHRESHOLD, else = TOLERATING)
apdex.threshold=3.0

# enable transaction trace
transaction.trace.enabled=true
# transaction trace threshold in ms
transaction.trace.threshold=500
transaction.trace.threshold.under.detail.enabled=false

# Maximum number of lines to save trace
transaction.trace.max.line=2000

# enable sql capture
sql.capture.enabled=true

transaction.trace.sql.parameterize=false
# sampling intervals
transaction.trace.sampling.interval=1

# SQL query's stacktrace threshold in ms
transaction.trace.sql.stacktrace.threshold=30000

# SQL query max size (default unlimit)
#transaction.trace.sql.max.size=-1

# SQL query parameter max size (default 40)
transaction.trace.sql.parameter.max.size=40

# enable request header trace : default = false
#transaction.trace.header.enabled=true
# request header trace keys
transaction.trace.header.keys=

# enable request cookie trace : default = true
#transaction.trace.cookie.enabled=false
# request cookie trace keys : default JSESSIONID
transaction.trace.cookie.keys=JSESSIONID

# enable session trace : default = false
#transaction.trace.session.enabled=false
# session trace keys(class maximum depth : 2)
# ex: loginId, user:userId
transaction.trace.session.keys=

# add parameter to url (key1:maxLen,key2,maxLen)
# ex) p1:10,p2:10
#transaction.trace.parameter.keys=


# database fetch count warning
#database.fetch.warnings=10000,20000,30000

# database connection leak warning
database.conn_leak.warning=false

# enable or disable whole database pool statistics monitoring
# default : true
# can override with environment : KHAN_DB_POOL_STAT_ENABLED
#database.pool.stat.enabled=false

# include patterns : comma separated datasource name patterns list to include
# can override with environment : KHAN_DB_POOL_INCLUDE_PATTERNS
#database.pool.stat.include.patterns=

# exclude patterns : comma separated datasource name patterns list to exclude
# can override with environment : KHAN_DB_POOL_EXCLUDE_PATTERNS
#database.pool.stat.exclude.patterns=

include.packages=

# exclude url patterns(Regular Expression), can use multiple regexp with comma(,)
# ex) transaction.exclude.url.patterns=/test/test.*,/abc/test.*
#transaction.exclude.url.patterns=
transaction.exclude.url.patterns=\\*

# exclude url suffix
transaction.exclude.url.suffix=.gif,.swf,.css,.hwp,.xls,.xlsx,.eot,.pptx,.ppt,.asf,.pdf,.txt,.flv,.mp3,.mp4,.doc,.html,.wmv,.jpg,.zip,.wav,.png,.ttf,.mov,.ico,.js,.woff,.xml,.htc,.NewProxyConnection,.DelegatingConnection,.SqlSessionTemplate,.CUBRIDConnection,.PoolableConnection,.WrappedConnection,/bea_wls_deployment_internal/DeploymentService,.GIF,.SWF,.CSS,.HWP,.XLS,.XLSX,.EOT,.PPTX,.PPT,.ASF,.PDF,.TXT,.FLV,.MP3,.MP4,.DOC,.HTML,.WMV,.JPG,.ZIP,.WAV,.PNG,.TTF,.MOV,.ICO,.JS,.WOFF,.XML,.HTC
transaction.exclude.url.suffix.exclude=true

# exclude browser user-agent : ^openmaru-health-check$(default)
transaction.exclude.user.agent.patterns=^openmaru-health-check$

# comma seperated url patterns that consider the status code to be 500
# transaction.errorpage.url.patterns=/session/force500.*,/test/test500.*

# Display when an exception is included
transaction.with.exception.view.enabled=true

# Display when an HTTP API Error is included : default error status codes - 400 more than
transaction.with.external.http.error.view.enabled=true
transaction.with.external.http.error.codes=

# Request Traffic Controller(RTC) WALL
# enabled = false (default)
#traffic.control.enabled=true

# pattern.1=/url_startswith.*, maximum allowed concurrent requests
#traffic.control.pattern.1=/test/slow.*, 100
#traffic.control.pattern.2=/test/test.*, 100
#traffic.control.pattern.3=/test/TestServlet.*, 100

# -----------------------------
# User Behavior Tracker Options
# -----------------------------
ubt.check.enabled=false
# User Behavior check type : ip, cookie
ubt.check.type=ip
# UBT check alert count
ubt.check.user.count=100
# UBT check interval(Seconds)
ubt.check.time.interval=1
# UBT check alert prevent duplication(Seconds)
ubt.check.alert.dup.prevent=30

# 2 : use KHANUSER Cookie - Default
# 1 : use JSESSION_ID Cookie
# 0 : not use cookie - use client ip
user.tracking.mode=2

# 99 : last in the array
# N : index number in array (Last value without N)
# 0 : first in array
# -1 : original - Default
#user.tracking.client.ip.selection=-1

# user think time : default 5 minutes, max 15 minutes
# Can override with KHAN_USER_THINK_TIME environment
#user.thinktime.minutes=5

# Merge by removing duplicates
user.tracking.v2.enabled=false

# Tracking by login ID, default false
user.tracking.v2.login.enabled=false
# ex) session|loginId
# ex) session|user:loginId - desction : user(session key, LoginUser class), loginId(POJO, Member variable), class maximum depth : 2
# ex)  header|loginId
# ex)  cookie|loginId
user.tracking.v2.login.key=session.loginId

# To Disable Servlet Filter interceptor set false, default true
#enable.filter.interceptor=false

# To Disable ibatis interceptor set false, default true
#enable.ibatis.interceptor=false

# To Disable mybatis interceptor set false, default true
#enable.mybatis.interceptor=false

# To Disable HTTP interceptor set false, default true
#enable.http.interceptor=false

# To Disable SpringBatch interceptor set false, default true
#enable.springbatch.interceptor=false

# To enable logging interceptor set true, default false
enable.logging.interceptor=false

# comma separated logging levels to capture logging levels
# logging levels : TRACE,DEBUG,INFO,WARN,ERROR,FATAL
trace.logging.levels=WARN,ERROR,FATAL

# Push transaction details immediately(KAPM-1801), default : false
#push.transaction.no.delay=true

# Stop services after execute standlone application
# Only for standalone java application. default : false
#stop.services.after.execute=true

# count first request as active user
activeUser.countFirstRequest=false

user.charset.encoding=UTF-8
user.interceptor.file=user-interceptor.conf

# log directory
#log.dir=/svc/test/khan-agent/log

# log file name
log.file=khan-agent-${INSTANCEID}.log

# log level
log.level=INFO

# log files backup index( default : maintain 3 files)
log.backup.index=3

# log rotation file size : default 10M
log.rotate.size=10240000

# khanSessionManager
khan.session.manager.enabled=false

# enable session count( default: true)
active.session.count.enabled=true

# enable audit log file(default: false)
#audit.log.enabled=true
# User interceptor's user id key name(default: USER_ID)
#audit.log.userIdKey=USER_ID
# audit log directory(default: agent log directory)
#audit.log.dir=
# audit log file name(default: audit-{date: yyyy-MM-dd}.log )
#audit.log.filename=audit-{date: yyyy-MM-dd}.log
# audit log file rotating policy
#audit.log.policies=daily: 00:00
# audit log backup file counts
#audit.log.backups=3
Refer to the following table for a description of each item in the khan-agent.conf configuration file.
khan-agent.conf Configuration Details
(Use parentheses when using JVM environment variables (-D) and system environment variables (export or set))
Configuration priority : JVM OPTS > OS ENV > khan-agent.conf
All options in the configuration file can be used as environment variables by capitalizing them starting with the "OMAPM_" prefix and changing the . (dot) to _ (underscore).
| Setting item (environment variable) | Description | Default value |
|---|---|---|
omapm_sys_agent_enable |
Whether the agent is enabled or not (Available when using OPENMARU BASE WAS Container image) |
|
application.name |
Sets the name of the application group displayed in the OPENMARU APM console. Instances set to the same name are grouped and displayed. |
N/A |
khan.host |
Enter the IP of the OpenMARU APM server. +} or http:// or ws:// if entering a domain (https:// or wss:// for TLS) |
khan.port |
khan.port |
OPENMARU APM server. |
|
khan.tls |
TLS enabled or not |
false |
khan.agent.ip |
If not set, uses the machine’s default IP address as the default. Sometimes 127.0.0.1 is selected if no IP address is registered in the /etc/hosts file. In this case, set it by entering the machine IP address in khan.agent.ip. |
user.key |
user.key |
Not currently used |
|
instance.id (OMAPM_INSTANCE_ID) |
Name of the instance to be displayed in OPENMARU APM, with each instance using a unique name. |
agent.type |
agent.type |
Agent type, WAS |
WAS |
apdex.threshold |
User-satisfied response time used when calculating the user satisfaction index (default: 3.0, unit: seconds) |
3.0 |
transaction.trace.enabled |
Enable transaction trace. |
true |
transaction.trace.threshold |
Sends transactions older than the specified time to the server (unit: ms) |
500 |
sql.capture.enabled |
Set whether to collect SQL information |
true |
transaction.trace.sql.parameterize |
Option to strip all ' ''s in SQL statements |
false |
transaction.trace.sampling.interval |
Settings for sampling and sending transaction information. If set to 10, only 1 out of 10 times the same URL is sent. |
1 |
transaction.trace.sql.stacktrace.threshold |
Generates a stack trace when a SQL query is running for more than the specified time (ms). |
30000 |
transaction.trace.sql.max.size |
Limit the length of the SQL query to collect. + (OMAPM_TRANSACTION_TRACE_SQL_MAX_SIZE) Since 5.1.0-8.3 |
-1: No limit |
transaction.trace.sql.parameter.max.size |
Limit the length of SQL query parameters to be collected. |
40 |
transaction.trace.async.thread.enabled |
Whether to monitor asynchronous threads.
Runnable, ForkJoinTask, CompletableFuture |
false |
database.pool.stat.enable |
Collect connection pool information |
true |
database.fetch.warnings |
Displays warnings when fetching a specified number of comma-separated SQL ResultSets. If set to 10000,20000,30000,40000, a warning message is displayed when the number of ResultSet Fetches is 10,000,20,30,40,000. |
10000,20000,30000 |
database.conn_leak.warning |
Set whether to display a warning message when a database connection pool leak occurs. |
true |
transaction.exclude.url.patterns |
Specifies URL patterns to exclude from collecting transaction information. You can specify multiple patterns separated by commas. Example) /test/test.,/abc/test. |
|
transaction.exclude.url.suffix |
Specifies URL extensions to exclude from transaction information collection. URLs for static content such as JPGs and GIFs are set to be excluded. |
|
transaction.exclude.url.suffix.exclude |
Specifies whether to use the above setting (transaction.exclude.url.suffix). |
true |
transaction.exclude.user.agent.patterns |
Browsers to exclude from collection |
^openmaru-health-check$ |
traffic.control.enabled |
Raises an exception if the number of concurrent processing exceeds for the set Request URL pattern. |
false |
traffic.control.pattern.INDEX |
traffic.control.pattern.1=/test/slow., 100 traffic.control.pattern.2=/test/test., 100 |
true |
ubt.check.enabled |
Raise an alert notification if a request from a client (IP, COOKIE) occurs a certain number of times at a certain time. |
false |
ubt.check.type |
Same client judgment distinction (IP, COOKIE) |
ip |
ubt.check.user.count |
Count of checks |
100 |
ubt.check.time.interval |
Check time interval (seconds) |
1 |
ubt.check.alert.dup.prevent |
Time to prevent duplicate alert notifications (seconds) |
30 |
user.charset.encoding |
Set the user character set encoding. |
UTF-8 |
user.interceptor.file |
Specifies the user-interceptor configuration file so that you can measure the execution time of the desired method. |
user-interceptor.conf |
log.dir |
Specifies the directory where agent log files will be created. |
The |
log.file |
Specifies the name of the agent log file. |
log.level |
log.level |
Sets the agent log level. |
INFO |
log.backup.index |
Specifies the number of agent log files to keep. |
10 |
log.rotate.size |
Specifies the size of the log file to be rotated. (Default: 100MB) |
102400000 |
khan.session.manager.enabled |
Enable if using OPENMARU Cluster. |
false |
active.session.count.enabled |
Whether to collect WAS session counts |
true |
enable.logging.interceptor |
Determine whether to collect application logs Collect errors from SLF4J, Log4j, Log4j 2, and Logback set by the application |
false |
trace.logging.levels |
Specify the error levels to collect application logs for Specify TRACE, DEBUG, INFO, WARN, ERROR, and FATAL, separated by commas. |
warn,error,fatal |
transaction.trace.max.line |
Maximum number of lines to collect transaction trace details. |
2000 |
transaction.trace.header.enabled |
Whether to collect Request Header |
false |
transaction.trace.header.keys |
Request Header List of keys to be collected |
JSESSIONID |
transaction.trace.session.enabled |
Whether to collect session |
false |
transaction.trace.session.keys |
List of keys to collect for SESSION + (OMAPM_TRANSACTION_TRACE_SESSION_KEYS) Separated by ,(comma) (POJO objects are separated by the ":" symbol) symbol to separate POJO objects) ex) loginId, user:userId |
|
push.transaction.no.delay |
Send transaction message directly |
Pure Java Shutdown after running cron schedule Java |
stop.services.after.execute |
Use if not terminated after Pure Java execution + (OMAPM_STOP_SERVICES_AFTER_EXECUTE) ex) If the process is not terminated after applying push.transaction.no.delay=true |
Pure Java Exit after Cron Schedule Java execution |
user-interceptor.conf configuration file
OPENMARU APM’s agent internally measures the execution time of the main methods of Java EE and other popular frameworks and displays them in the transaction details.
If you want to measure the execution time of a user-created application, you can do so through the settings in the user-interceptor.conf file.
If you set too many methods in the user-interceptor.conf file, the transaction details data may be very large and cause problems. You should set only the methods you want to measure execution time.
If you want to measure the execution time, you can use the @TraceMethod annotation at the top of the method to measure and display the execution time. The @TraceMethod is only used when using the OPENMARU APM agent, otherwise it is ignored.
user-interceptor configuration file part of the khan-agent.conf file
user.interceptor.file=user-interceptor.conf
The default value for user.interceptor.file is user-interceptor.conf.
The file can be located in the same directory as the khan-agent.jar file.
It’s convenient to keep only the pattern definition files you want to hook into separate.
Define the Rule in the file below. It follows the conventions of the Java properties file.
The # is a comment, which you specify in the form of package/class=method_pattern.
How to set up the user-interceptor.conf file
-
When you want to hook a specific method by specifying a package, class name, etc. You can specify the method names separated by commas (,).
com/opennaru/package/ABCDEFMethodOnly=abc, def
-
Hooking all methods within a specific package/class
com/opennaru/package/AllMethodsInThisClass=
-
Hooking methods that start with a specific name within a specific package/class. You can use a regular expression
com/opennaru/package/regexpMethodsInThisClass=/set.*/, /get.*/
-
To hook all packages/classes/methods under a specific package
com/opennaru/package/allsubclasses/.*=
-
Hooking only method names with a specific (regular expression) name in all packages/classes under a specific package
com/opennaru/allsubpackagesandclasses/.*=/set.*/, /get.*/
-
Subpackage names are separated by '/' or '.' to separate subpackage names. For example:
com.opennaru.allsubpackagesandclasses/.*=/set.*/, /get.*/
-
Regular expressions can also be used in class names
com/opennaru/anyclassesstartwith.*=/set.*/, /get.*/
Example of user-interceptor.conf settings
Below is an example file to measure the execution time by hooking specific methods and classes of the e-government framework.
# All packages/classes/methods under egovframework.let
egovframework.let/.*=

# Methods that start with get, except for methods that start with set and methods that start with getBbs in classes that start with Board under the egovframework/let/cop/bbs/service package
egovframework/let/cop/bbs/service/Board.*=/set.*/, /get(?!Bbs.*).*/

# All methods starting with get/set in all packages/classes under egovframework
egovframework/.*=/set.*/, /get.*/

# package names can be found with '/'
egovframework/let/cop/bbs/service/BoardMaster=/setBb.*/,/setRe.*/

# Package names can be found as '.'
egovframework.let.cop.bbs.service.BoardMaster=/setBb.*/,/setRe.*/
How to set User Interceptor using environment variable
In addition to the interceptor settings in the user-interceptors.conf file, you can set additional user interceptors using the OMAPM_INTERCEPTORS environment variable.
Setting priority: JVM OPTS > OS ENV > user-interceptors.conf
Enter a string separated by semicolons ( ; ).
| Settings (environment variables) | Description | Default |
|---|---|---|
omapm_interceptors |
OMAPM_INTERCEPTORS Measures the execution time of a user-created application’s Class.Method. |
} |
*Real-world application
Example) com/opennaru/test.=set.;com/test.=get.
## Enclose "(double quotes) on both sides of the value
## Otherwise ;(semicolon) has no effect
## Use \(backslash) without "(double quotes)

export OMAPM_INTERCEPTORS="egovframework/let/cop/bbs/service/Board.*=/set.*/, /get(?!Bbs.*).*/;egovframework/.*="
Agent Options in the Startup Script
If you specify the following options when WAS or Java is started, the WAS agent will be started.
export JAVA_OPTS=" $JAVA_OPTS -javaagent:/svc/test/khan-agent/khan-agent.jar "
export JAVA_OPTS=" $JAVA_OPTS -Dkhan.config.file=khan-agent-test11.conf"
export JAVA_OPTS=" $JAVA_OPTS -noverify"
In khan.config.file, specify the name of the file. The file can be located in the same directory as the khan-agent.jar file.
Some WAS types require different locations for agent settings or special options, which are described in detail in the next chapter.
include::04.chap/04.adoc[How to set up the WAS agent by type]. :imagesdir: images :keywords: apm, openmaru, transaction, was, webserver, apache, unix, jvm :description: This document describes the situations you may encounter while installing OPENMARU Cloud APM. The main issues are described in detail, and you can contact us via Contact Us in the bottom right corner for further inquiries.
3.4 Trouble Shooting
Transaction Trace information is displayed with broken Korean characters.
OPENMARU APM is using UTF-8 Charset by default. If you are using EUC-KR as the default charset in WAS, you can change the agent settings like below to convert EUC-KR to UTF-8 to display Hangul.
vi khan-agent-test.conf
----------
user.charset.encoding=EUC-KR
The server time difference between APM server and WAS machine is large.
If you set the following option in the OPENMARU APM instance startup script, the server time of the WAS/System machine will be ignored and all times will be used as the time of the OPENMARU APM server.
-Duse.monitoring.server.time=true
If you use the Provisioning feature of OPENMARU APM and select the 'Use monitoring server time (ignore agent time)' option below when installing, -Duse.monitoring.server.time=true will be set.

Check the transaction CPU time display
OPENMARU APM measures and displays the CPU usage time for each detailed method of a transaction. This feature has been supported since Java 1.6, so if you are using the OPENMARU APM agent for Java 1.5, the value is displayed as 0.
An error occurs while running WAS.
Error message
26-Feb-2016 16:57:58.334 SEVERE [main] org.apache.catalina.core.StandardService.initInternal Failed to initialize connector [Connector[HTTP/1.1-8090]]
  org.apache.catalina.LifecycleException: Failed to initialize component [Connector[HTTP/1.1-8090]]
    at org.apache.catalina.util.LifecycleBase.init(LifecycleBase.java:106)
    at org.apache.catalina.core.StandardService.initInternal(StandardService.java:567)
    at org.apache.catalina.util.LifecycleBase.init(LifecycleBase.java:102)
    at org.apache.catalina.core.StandardServer.initInternal(StandardServer.java:851)
      ... ...
      at org.apache.catalina.startup.Bootstrap.main(Bootstrap.java:484)
Caused by: java.lang.VerifyError: Expecting a stackmap frame at branch target 37
Exception Details:
  Location:

/org/apache/catalina/connector/CoyoteAdapter.service(Lorg/apache/coyote/Request;Lorg/apache/coyote/Response;)V @2: invokestatic
  Reason:
    Expected stackmap frame at this location.
  Bytecode:
    0x0000000: 014e b805 0713 0509 1305 0a13 0522 1305
    0x0000010: 232a 05bd 00f4 5903 2b53 5904 2c53 b605
    0x0000020: 124e a700 06b6 0515 2b04 b600 03c0 0004
    0x0000030: 3a04 2c04 b600 05c0 0006 3a05 1904 c700
Cause and workaround
Java 1.7 and later versions require the -noverify option.
Please make sure that the -noverify option is set in the server startup script.
-
See also -Xverify:none for Windows service registration issues.
Server information of Apache web server is not displayed.
Cause and Solution
Apache server information is obtained when the System Agent is started. If Apache is not running at that time, the information will not be collected.
If you restart only the System Agent while Apache is running, the server information is collected.
JVM Core dump occurs when running on a UNIX server.
On UNIX systems, an error occurs when OPENMARU APM uses the Snappy method, a speed-efficient compression algorithm, for data transmission.
Change the compression algorithm to lzw in the options of WAS Agent and SYS Agent as follows.
# agent's compression algorithm : snappy(default), lzw
agent.compress.type=lzw